Writing a no-build plugin
This guide covers creating a no-build plugin for JBrowse 2.
Pre-requisites
- you can run an instance of JBrowse 2 on the web, see any of our quickstart guides for details
- a stable and recent version of node
- basic familiarity with the command line and navigating the file system
What is the difference between a no-build plugin and a "regular" plugin?
A "regular" JBrowse plugin uses the
plugin template, which uses
rollup to bundle extra dependencies.
In contrast, "no-build" plugins have no build step and can be hand edited. This can be useful for adding extra jexl config callbacks for making extra config callbacks or similar modifications.
Writing a "no-build" plugin
Example use case: Adding a jexl callback function which you can use in your config
A common pattern is registering a custom jexl function to simplify config
callbacks. Create myplugin.js:
myplugin.js
export default class MyPlugin {
  name = 'MyPlugin'
  version = '1.0'

  install(pluginManager) {
    pluginManager.jexl.addFunction('customColor', feature => {
      if (feature.get('type') === 'exon') {
        return 'red'
      } else if (feature.get('type') === 'CDS') {
        return 'green'
      }
    })
  }

  configure(pluginManager) {}
}
Put myplugin.js alongside your config file and reference it in config.json:
{
  "plugins": [
    {
      "name": "MyPlugin",
      "esmLoc": {
        "uri": "myplugin.js"
      }
    }
  ],
  "tracks": []
}
Example use case: Adding a global menu item
Another example of a no-build plugin is to add menu items or minor extension
points. Here, we're going to add a menu item using the configure method in the
plugin class.
myplugin.js
export default class MyPlugin {
  name = 'MyPlugin'
  version = '1.0'
  install() {}
  configure(pluginManager) {
    // this is called in the web worker as well, which does not have a
    // rootModel, so check for existence of pluginManager.rootModel before
    // continuing
    if (pluginManager.rootModel) {
      // adding a new menu to the top toolbar
      pluginManager.rootModel.insertMenu('Citations', 4)

      // appending a menu item to the new menu
      pluginManager.rootModel.appendToMenu('Citations', {
        label: 'Cite this JBrowse session',
        onClick: session => {
          /* do nothing for now, see below for example */
        },
      })
    }
  }
}
Importing with jbrequire
Since no-build plugins have no build step, use jbrequire to access packages
exported by JBrowse core. See the
full list.
const { types } = pluginManager.jbrequire('@jbrowse/mobx-state-tree')
Complete example
esmplugin.js
export default class MyPlugin {
  name = 'MyPlugin'
  version = '1.0'

  install(pluginManager) {
    const { ConfigurationSchema } = pluginManager.jbrequire(
      '@jbrowse/core/configuration',
    )
    const WidgetType = pluginManager.jbrequire(
      '@jbrowse/core/pluggableElementTypes/WidgetType',
    )
    const { ElementId } = pluginManager.jbrequire(
      '@jbrowse/core/util/types/mst',
    )
    const { types } = pluginManager.jbrequire('@jbrowse/mobx-state-tree')

    const React = pluginManager.jbrequire('react')

    const CiteWidget = props => {
      // React.createElement can be used to add html to our widget component.
      // We write out raw React.createElement code because JSX requires a build
      // step and can't be used very easily in the no build plugin context
      const header = React.createElement(
        'h1',
        null,
        'Cite this JBrowse session',
      )
      const content = React.createElement(
        'p',
        null,
        'Diesh, Colin, et al. "JBrowse 2: A modular genome browser with views of synteny and structural variation." bioRxiv. 2022.',
      )

      return React.createElement('div', null, [header, content])
    }

    pluginManager.addWidgetType(() => {
      return new WidgetType({
        name: 'CiteWidget',
        heading: 'Cite this JBrowse session',
        configSchema: ConfigurationSchema('CiteWidget', {}),
        stateModel: types.model('CiteWidget', {
          id: ElementId,
          type: types.literal('CiteWidget'),
        }),
        ReactComponent: CiteWidget,
      })
    })
  }

  configure(pluginManager) {
    if (pluginManager.rootModel) {
      pluginManager.rootModel.insertMenu('Citations', 4)

      pluginManager.rootModel.appendToMenu('Citations', {
        label: 'Cite this JBrowse session',
        onClick: session => {
          // upon clicking on this menu item, we need to add and show our new widget
          const widget = session.addWidget('CiteWidget', 'citeWidget', {})
          session.showWidget(widget)
        },
      })
    }
  }
}
Then in your config you can reference it using the "esmLoc" function
{
  "plugins": [
    {
      "name": "MyPlugin",
      "esmLoc": {
        "uri": "esmplugin.js"
      }
    }
  ],
  "tracks": []
}
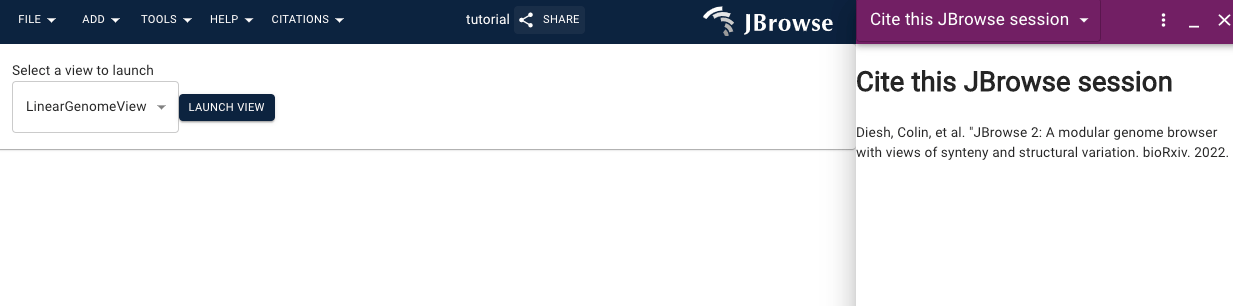
Result
With JBrowse running and the "Citation" plugin from above added to your config, your JBrowse session should look like the following:
Next steps
Have questions? Contact us.
Note: JSX syntax
Writing React code without JSX is more verbose since JSX requires a build step. If your plugin has dependencies or you prefer TypeScript, use the plugin template which includes a build step, bundler, and type checking.
Note: UMD vs ESM module syntax
This guide uses ESM modules (exporting a plain class), which all modern browsers support. For legacy browser compatibility you can also use UMD modules — see this example, which defines a specific global variable rather than exporting a class.
Note: Plugins in embedded React components
This no-build guide targets jbrowse-web, which loads plugins via plugins.json.
If you are using an embedded component (@jbrowse/react-app2 or
@jbrowse/react-linear-genome-view2) the approach is different: define your
plugin as a class and pass it in the plugins array to createViewState:
import { createViewState, JBrowseApp } from '@jbrowse/react-app2'

class MyPlugin {
  name = 'MyPlugin'
  install(pluginManager) {
    /* ... */
  }
  configure() {}
}

const state = createViewState({ config, plugins: [MyPlugin] })
See the
Using Plugins
story in the @jbrowse/react-app2 storybook for a live example.