Developer guide
In this guide, will introduce the JBrowse 2 ecosystem from the developer's point of view. We'll examine the core concepts of how code is packaged and structured, and then go over how to create new plugins and pluggable elements.
Introduction and overview
Let's get a high-level view of the JBrowse 2 ecosystem.
Products and plugins
The JBrowse 2 ecosystem has two main type of top-level artifacts that are published on their own: products and plugins.

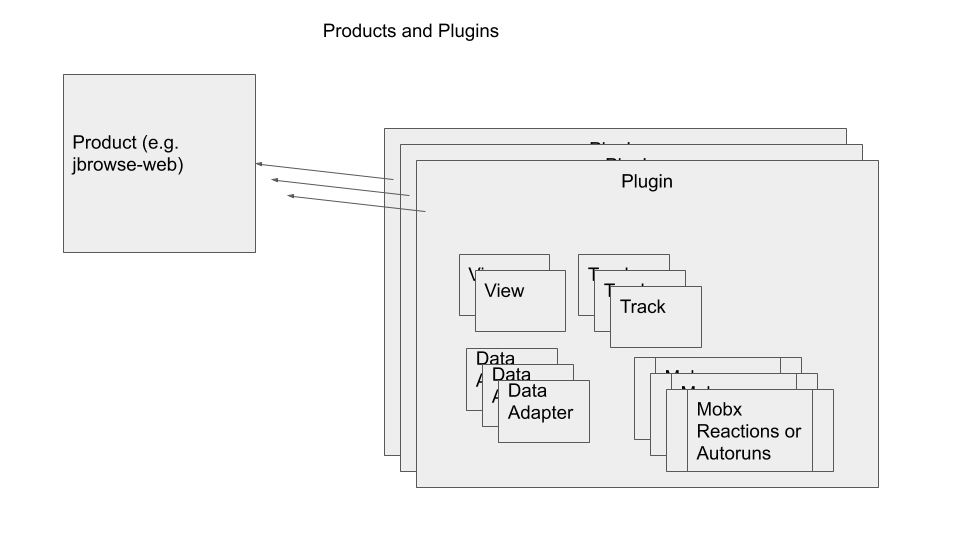
A "product" is an application of some kind that is published on its own (a web
app, an electron app, a CLI app, etc). jbrowse-web
, jbrowse-desktop
, and
jbrowse-cli
are products.
A "plugin" is a package of functionality that is designed to "plug in" to a product at runtime to add functionality. These can be written and published by anyone, not just the JBrowse core team. Not all of the products use plugins, but most of them do.
Also, most of the products are pretty standard in the way they are constructed. For example, jbrowse-web is a React web application that is made with Create React App (CRA), and jbrowse-cli is a command-line tool implemented with OCLIF.

Example plugins
You can follow this guide for developing plugins, but you might also want to refer to working versions of plugins on the web now
This repo contains a template for creating new plugins https://github.com/GMOD/jbrowse-plugin-template.
Here are some examples of working plugins.
- jbrowse-plugin-ucsc-api probably the simplest plugin example, it demonstrates accessing data from UCSC REST API
- jbrowse-plugin-gwas a custom plugin to display manhattan plot GWAS data
- jbrowse-plugin-biothings-api demonstrates accessing data from mygene.info, part of the "biothings API" family
- jbrowse-plugin-msaview - demonstrates creating a custom view type that doesn't use any conventional tracks
- jbrowse-plugin-gdc demonstrates accessing GDC cancer data GraphQL API, plus a custom drawer and track type for coloring variants by impact score
- jbrowse-plugin-systeminformation demonstrates using desktop specific functionality, accessing system node libraries. This desktop specific functionality should use the CJS bundle type (electron doesn't support ESM yet)
You can use these to see how plugins are generally structured, and can use the pluggable elements in them as templates for your own pluggable elements.
Now, let's explore what plugins can do and how they are structured.
What's in a plugin
A plugin is an independently distributed package of code that is designed to "plug in" to a JBrowse application.
It's implemented as a class that extends @jbrowse/core/Plugin
. It gets
instantiated by the application that it plugs into, and it has an install
method and a configure
method that the application calls. This class is
distributed as a webpack bundle that exports it to a namespace on the browser's
window
object specifically for JBrowse plugins1.
It's common for a plugin to use its configure
method to set up mobx
autoruns or reactions that react to
changes in the application's state to modify its behavior.
Plugins often also have their install
method add "pluggable elements" into
the host JBrowse application. This is how plugins can add new kinds of views,
tracks, renderers, and so forth.
Pluggable elements
Pluggable elements are pieces of functionality that plugins can add to JBrowse. Examples of pluggable types include:
- Adapter types
- Track types
- View types
- Display types
- Renderer types
- Widgets
- RPC calls
- Extension points
- Internet account types
- Connection types
- Text search adapter types
- Extension points
In additional to creating plugins that create new adapters, track types, etc. note that you can also wrap the behavior of another track so these elements are composable
For example we can have adapters that perform calculations on the results of another adapter, views that contains other subviews, and tracks that contain other tracks, leading to a lot of interesting behavior. Details and examples below
Adapters
Adapters basically are parsers for a given data format. We will review what adapters the alignments plugin has (to write your own adapter, see creating adapters)
Example adapters: the @jbrowse/plugin-alignments
plugin creates
multiple adapter types
BamAdapter
- This adapter uses the@gmod/bam
NPM module, and adapts it for use by the browser.CramAdapter
- This adapter uses the@gmod/cram
NPM module. Note that CramAdapter also takes a sequenceAdapter as a subadapter configuration, and uses getSubAdapter to instantiate itSNPCoverageAdapter
- this adapter takes aBamAdapter
orCramAdapter
as a subadapter, and calculates feature coverage from it
Track types
Track types are a high level type that controls how features are drawn. In most cases, a track combines a renderer and an adapter, and can do additional things like
- Control what widget pops up on feature click
- Add extra menu items to the track menu
- Create subtracks (See
AlignmentsTrack
) - Choose "static-blocks" rendering styles, which keeps contents stable while the user scrolls, or "dynamic-blocks" that update on each scroll
Example tracks: the @jbrowse/plugin-alignments
exports multiple track
types
SNPCoverageTrack
- this track type actually derives from the WiggleTrack typePileupTrack
- a track type that draws alignment pileup resultsAlignmentsTrack
- combinesSNPCoverageTrack
andPileupTrack
as "subtracks"
Displays
A display is a method for displaying a particular track in a particular view
For example, we have a notion of a synteny track type, and the synteny track type has two display models
DotplotDisplay
, which is used in the dotplot viewLinearSyntenyDisplay
, which is used in the linear synteny view
This enables a single track entry to be used in multiple view types e.g. if I
run jbrowse add-track myfile.paf
, this automatically creates a SyntenyTrack
entry in the tracklist, and when this track is opened in the dotplot view, the
DotplotDisplay
is used for rendering
Another example of a track type with multiple display types is VariantTrack
,
which has two display methods
LinearVariantDisplay
- used in linear genome viewChordVariantDisplay
- used in the circular view to draw breakends and structural variants
Renderers
Renderers are a new concept in JBrowse 2, and are related to the concept of server side rendering (SSR), but can be used not just on the server but also in contexts like the web worker (e.g. the webworker can draw the features to an OffscreenCanvas). For more info see creating renderers
Example renderers: the @jbrowse/plugin-alignments
exports several
renderer types
PileupRenderer
- a renderer type that renders Pileup type display of alignments fetched from theBamAdapter
/CramAdapter
SNPCoverageRenderer
- a renderer that draws the coverage. Note that this renderer derives from the wiggle renderer, but does the additional step of drawing the mismatches over the coverage track
Widgets
Widgets are custom info panels that can show up in side panels, modals, or other places in an app
Widgets can do multiple types of things including
- Configuration widget
- Feature detail widget
- Add track widget
- Add connection widget
- etc.
These widgets can be extended via plugins, so for example, the
@jbrowse/plugin-alignments
extends the BaseFeatureDetailWidget
to
have custom display of the alignments
AlignmentsFeatureDetailWidget
- this provides a custom widget for viewing the feature details of alignments features that customizes the basic feature detail widget
View types
Creating view types is one of the most powerful features of JBrowse 2, because it allows us to put entirely different visualizations in the same context as the standard linear-genome-view.
We have demonstrated a couple new view types in JBrowse 2 already including
LinearGenomeView
- the classic linear view of a genomeCircularView
- a Circos-like circular whole genome viewDotplotView
- a comparative 2-D genome viewSvInspectorView
- superview containingCircularView
andSpreadsheetView
subviews- And more!
We think the boundaries for this are just your imagination, and there can also be interplay between view types e.g. popup dotplot from a linear view, etc.
RPC methods
Plugins can register their own RPC methods, which can allow them to offload custom behaviors to a web-worker or server side process.
The wiggle plugin, for example, registers two custom RPC method types
WiggleGetGlobalStats
WiggleGetMultiRegionStats
These methods can run in the webworker when available
Extension points
Extension points are a pluggable element type which allows users to add a callback that is called at an appropriate time.
See example for adding context menu items for an example of using extension points
The basic API is that producers can say
const ret = pluginManager.evaluateExtensionPoint('ExtensionPointName', {
value: 1,
})
And consumers can say
pluginManager.addToExtensionPoint('ExtensionPointName', arg => {
return arg.value + 1
})
pluginManager.addToExtensionPoint('ExtensionPointName', arg => {
return arg.value + 1
})
In this case, arg that is passed in evaluateExtensionPoint calls all the callbacks that have been registered by addToExtensionPoint. If multiple extension points are registered, the return value of the first extension point is passed as the new argument to the second and so on (they are chained together)
So in the example above, ret would be {value:3}
after evaluating the
extension point
Common plugin use cases
Adding a top-level menu
These are the menus that appear in the top bar of JBrowse Web and JBrowse
Desktop. By default there are File
and Help
menus. You can add your own
menu, or you can add menu items or sub-menus to the existing menus and
sub-menus.

You add menus in the configure
method of your plugin. Not all JBrowse
products will have top-level menus, though. JBrowse Web and JBrowse Desktop
have them, but something like JBrowse Linear View (which is an just a single
view designed to be embedded in another page) does not. This means you need to
check whether or not menus are supported using isAbstractMenuManager
in the
configure
method. This way the rest of the plugin will still work if there is
not a menu. Here's an example that adds an "Open My View" item to the File -> Add
menu.
import Plugin from '@jbrowse/core/Plugin'
import { isAbstractMenuManager } from '@jbrowse/core/util'
import InfoIcon from '@material-ui/icons/Info'
class MyPlugin extends Plugin {
name = 'MyPlugin'
install(pluginManager) {
// install MyView here
}
configure(pluginManager) {
if (isAbstractMenuManager(pluginManager.rootModel)) {
pluginManager.rootModel.appendToSubMenu(['File', 'Add'], {
label: 'Open My View',
icon: InfoIcon,
onClick: session => {
session.addView('MyView', {})
},
})
}
}
}
This example uses rootModel.appendToSubMenu
. See top-level menu
API for more details on available functions.
Adding menu items to a custom track
If you create a custom track, you can populate the track menu items in it using
the trackMenuItems
property in the track model. For example:
types
.model({
// model
})
.views(self => ({
trackMenuItems() {
return [
{
label: 'Menu Item',
icon: AddIcon,
onClick: () => {},
},
]
},
}))
Note that it is also common to use this scenario, because the base display may implement track menu items so this is like getting the superclasses track menu items
types
.model({
// model
})
.views(self => {
const { trackMenuItems: superTrackMenuItems } = self
return {
get trackMenuItems() {
return [
...superTrackMenuItems(),
{
label: 'Menu Item',
icon: AddIcon,
onClick: () => {},
},
]
},
}
})
Adding track context-menu items
When you right-click in a linear track, a context menu will appear if there are
any menu items defined for it. It's possible to add items to that menu, and you
can also have different menu items based on if the click was on a feature or
not, and based on what feature is clicked. This is done by extending the
contextMenuItems
view of the display model. Here is an example:
class SomePlugin extends Plugin {
name = 'SomePlugin'
install(pluginManager) {
pluginManager.addToExtensionPoint(
'Core-extendPluggableElement',
pluggableElement => {
if (pluggableElement.name === 'LinearPileupDisplay') {
const { stateModel } = pluggableElement
const newStateModel = stateModel.extend(self => {
const superContextMenuItems = self.contextMenuItems
return {
views: {
contextMenuItems() {
const feature = self.contextMenuFeature
if (!feature) {
// we're not adding any menu items since the click was not
// on a feature
return superContextMenuItems()
}
return [
...superContextMenuItems(),
{
label: 'Some menu item',
icon: SomeIcon,
onClick: () => {
// do some stuff
},
},
]
},
},
}
})
pluggableElement.stateModel = newStateModel
}
return pluggableElement
},
)
}
}
Configuration model concepts
Configuration slot types
Our configuration system is "typed" to facilitate graphical editing of the configuration. Each configuration has a "schema" that lists what "configuration slots" it has. Each configuration slot has a name, description, a type, and a value.
Here is a mostly comprehensive list of config types
stringEnum
- allows assigning one of a limited set of entries, becomes a dropdown box in the GUIcolor
- allows selecting a color, becomes a color picker in the GUInumber
- allows entering any numeric valuestring
- allows entering any stringinteger
- allows entering a integer value- `boolean
frozen
- an arbitrary JSON can be specified in this config slot, becomes textarea in the GUIfileLocation
- refers to a URL, local file path on desktop, or file blob object in the browsertext
- allows entering a string, becomes textarea in the GUIstringArray
- allows entering a list of strings, becomes a "todolist" style editor in the GUI where you can add or delete thingsstringArrayMap
- allows entering a list of key-value entries
Let's examine the PileupRenderer
configuration as an example.
Example config with multiple slot types
This PileupRenderer
config contains an example of several different slot types
import { types } from 'mobx-state-tree'
export default ConfigurationSchema('PileupRenderer', {
color: {
type: 'color',
description: 'the color of each feature in a pileup alignment',
defaultValue: `jexl:get(feature,'strand') == - 1 ? '#8F8FD8' : '#EC8B8B'`,
contextVariable: ['feature'],
},
displayMode: {
type: 'stringEnum',
model: types.enumeration('displayMode', ['normal', 'compact', 'collapse']),
description: 'Alternative display modes',
defaultValue: 'normal',
},
minSubfeatureWidth: {
type: 'number',
description: `the minimum width in px for a pileup mismatch feature. use for
increasing mismatch marker widths when zoomed out to e.g. 1px or
0.5px`,
defaultValue: 0,
},
maxHeight: {
type: 'integer',
description: 'the maximum height to be used in a pileup rendering',
defaultValue: 600,
},
})
Accessing config values
So instead of accessing config.displayMode
, we say
readConfObject(config, 'displayMode')
You might also see in the code like this
getConf(track, 'maxHeight')
Which would be equivalent to calling
readConfObject(track.configuration, 'maxHeight')`
Using config callbacks
Config callbacks allow you to have a dynamic color based on some function logic you provide. All config slots can actually become config callback. The arguments that are given to the callback are listed by the 'contextVariable' but must be provided by the calling code (the code reading the config slot). To pass arguments to the a callback we say
readConfObject(config, 'color', { feature })
That implies the color configuration callback will be passed a feature, so the config callback can be a complex function determining the color to use based on various feature attributes
Example of a config callback
We use Jexl to express callbacks. See https://github.com/TomFrost/Jexl for more details.
If you had an variant track in your config, and wanted to make a custom config callback for color, it might look like this
{
"type": "VariantTrack",
"trackId": "variant_colors",
"name": "volvox filtered vcf (green snp, purple indel)",
"category": ["VCF"],
"assemblyNames": ["volvox"],
"adapter": {
"type": "VcfTabixAdapter",
"vcfGzLocation": {
"uri": "volvox.filtered.vcf.gz",
"locationType": "UriLocation"
},
"index": {
"location": {
"uri": "volvox.filtered.vcf.gz.tbi",
"locationType": "UriLocation"
}
}
},
"displays": [
{
"type": "LinearVariantDisplay",
"displayId": "volvox_filtered_vcf_color-LinearVariantDisplay",
"renderer": {
"type": "SvgFeatureRenderer",
"color1": "jexl:get(feature,'type')=='SNV'?'green':'purple'"
}
}
]
}
This draws all SNV (single nucleotide variants) as green, and other types as purple (insertion, deletion, other structural variant).
Configuration internals
A configuration is a type of mobx-state-tree model, in which leaf nodes are ConfigSlot types, and other nodes are ConfigurationSchema types.
Schema
/ | \
Slot Schema Slot
| \
Slot Slot
Configurations are all descendants of a single root configuration, which is
root.configuration
.
Configuration types should always be created by the ConfigurationSchema
factory, e.g.
import { ConfigurationSchema } from '@jbrowse/core/utils/configuration'
const ThingStateModel = types.model('MyThingsState', {
foo: 42,
configuration: ConfigurationSchema('MyThing', {
backgroundColor: {
defaultValue: 'white',
type: 'string',
},
}),
})
An example of a config schema with a sub-config schema is the BamAdapter
, with
the index sub-config schema
ConfigurationSchema(
'BamAdapter',
{
bamLocation: {
type: 'fileLocation',
defaultValue: { uri: '/path/to/my.bam', locationType: 'UriLocation' },
},
// this is a sub-config schema
index: ConfigurationSchema('BamIndex', {
indexType: {
model: types.enumeration('IndexType', ['BAI', 'CSI']),
type: 'stringEnum',
defaultValue: 'BAI',
},
location: {
type: 'fileLocation',
defaultValue: {
uri: '/path/to/my.bam.bai',
locationType: 'UriLocation',
},
},
}),
},
{ explicitlyTyped: true },
)
Reading the sub-config schema is as follows
const indexType = readConfObject(config, ['index', 'indexType'])
Alternatively can use
const indexConf = readConfObject(config, ['index'])
indexConf.indexType
However, this may miss default values from the slot, the readConfObject has special logic to fill in the default value
Creating adapters
What is an adapter
An adapter is essentially a class that fetches and parses your data and returns it in a format JBrowse understands.
For example, if you have some data source that contains genes, and you want to display those genes using JBrowse's existing gene displays, you can write a custom adapter to do so. If you want to do a custom display of your data, though, you'll probably need to create a custom display and/or renderer along with your adapter.
What types of adapters are there
- Feature adapter - This is the most common type of adapter. Essentially, it takes a request for a region (a chromosome, starting position, and ending position) and returns the features (e.g. genes, reads, variants, etc.) that are in that region. Examples of this in JBrowse include adapters for BAM and VCF file formats.
- Regions adapter - This type of adapter is used to define what regions are in an assembly. It returns a list of chromosomes/contigs/scaffolds and their sizes. An example of this in JBrowse is an adapter for a chrome.sizes file.
- Sequence adapter - This is basically a combination of a regions adapter and a feature adapter. It can give the list of regions in an assembly, and can also return the sequence of a queried region. Examples of this in JBrowse include adapters for FASTA and .2bit file formats.
- RefName alias adapter - This type of adapter is used to return data about aliases for reference sequence names, for example to define that "chr1" is an alias for "1". An example of this in JBrowse is an adapter for (alias files)[http://software.broadinstitute.org/software/igv/LoadData/#aliasfile]
- Text search adapter - This type of adapter is used to search through text search indexes. Returns list of search results. An example of this in JBrowse is the trix text search adapter.
Note about refname alias adapter: the first column must match what is seen in your FASTA file
Skeleton of a feature adapter
A basic feature adapter might look like this (with implementation omitted for simplicity):
class MyAdapter extends BaseFeatureDataAdapter {
constructor(config) {
// config
}
async getRefNames() {
// return refNames used in your adapter, used for refName renaming
}
getFeatures(region, opts) {
// region: {
// refName:string, e.g. chr1
// start:number, 0-based half open start coord
// end:number, 0-based half open end coord
// assemblyName:string, assembly name
// originalRefName:string the name of the refName from the fasta file, e.g. 1 instead of chr1
// }
// opts: {
// signal?: AbortSignal
// ...rest: all the renderProps() object from the display type
// }
}
freeResources(region) {
// can be empty
}
}
So to make a feature adapter, you implement the getRefNames function (optional), the getFeatures function (returns an rxjs observable stream of features, discussed below) and freeResources (optional)
Example feature adapter
To take this a little slow let's look at each function individually
This is a more complete description of the class interface that you can implement
import { BaseFeatureDataAdapter } from '@jbrowse/core/data_adapters/BaseAdapter'
import SimpleFeature from '@jbrowse/core/util/simpleFeature'
import { readConfObject } from '@jbrowse/core/configuration'
import { ObservableCreate } from '@jbrowse/core/util/rxjs'
class MyAdapter extends BaseFeatureDataAdapter {
// your constructor gets a config object that you can read with readConfObject
// if you use "subadapters" then you can initialize those with getSubAdapter
constructor(config, getSubAdapter) {
const fileLocation = readConfObject(config, 'fileLocation')
const subadapter = readConfObject(config, 'sequenceAdapter')
const sequenceAdapter = getSubAdapter(subadapter)
}
// use rxjs observer.next(new SimpleFeature(...your feature data....) for each
// feature you want to return
getFeatures(region, options) {
return ObservableCreate(async observer => {
try {
const { refName, start, end } = region
const response = await fetch(
'http://myservice/genes/${refName}/${start}-${end}',
options,
)
if (response.ok) {
const features = await result.json()
features.forEach(feature => {
observer.next(
new SimpleFeature({
uniqueID: `${feature.refName}-${feature.start}-${feature.end}`,
refName: feature.refName,
start: feature.start,
end: feature.end,
}),
)
})
observer.complete()
} else {
throw new Error(`${response.status} - ${response.statusText}`)
}
} catch (e) {
observer.error(e)
}
})
}
async getRefNames() {
// returns the list of refseq names in the file, used for refseq renaming
// you can hardcode this if you know it ahead of time e.g. for your own
// remote data API or fetch this from your data file e.g. from the bam header
return ['chr1', 'chr2', 'chr3'] /// etc
}
freeResources(region) {
// optionally remove cache resources for a region
// can just be an empty function
}
}
What is needed from a feature adapter
getRefNames
Returns the refNames that are contained in the file, this is used for "refname renaming" and is optional but highly useful in scenarios like human chromosomes which have, for example, chr1 vs 1.
Returning the refNames used by a given file or resource allows JBrowse to automatically smooth these small naming disparities over. See reference renaming
getFeatures
A function that returns features from the file given a genomic range query e.g.
getFeatures(region, options)
The region parameter contains
interface Region {
refName: string
start: number
end: number
originalRefName: string
assemblyName: string
}
The refName, start, end specify a simple genomic range. The "assemblyName" is used to query a specific assembly if your adapter responds to multiple assemblies e.g. for a synteny data file or a REST API that queries a backend with multiple assemblies.
The "originalRefName" are also passed, where originalRefName is the queried refname before ref renaming e.g. in BamAdapter, if the BAM file uses chr1, and your reference genome file uses 1, then originalRefName will be 1 and refName will be chr1
The options parameter to getFeatures can contain any number of things
interface Options {
bpPerPx: number
signal: AbortSignal
statusCallback: Function
headers: Record<string, string>
}
bpPerPx
- number: resolution of the genome browser when the features were fetchedsignal
- can be used to abort a fetch request when it is no longer needed, from AbortControllerstatusCallback
- not implemented yet but in the future may allow you to report the status of your loading operationsheaders
- set of HTTP headers as a JSON object
We return an rxjs Observable from getFeatures. This is similar to a JBrowse 1 getFeatures call, where we pass each feature to a featureCallback, tell it when we are done with finishCallback, and send errors to errorCallback, except we do all those things with the Observable
Here is a "conversion" of JBrowse 1 getFeatures callbacks to JBrowse 2 observable calls
featureCallback(new SimpleFeature(...))
->observer.next(new SimpleFeature(...))
finishCallback()
->observer.complete()
errorCallback(error)
->observer.error(error)
freeResources
This is uncommonly used, so most adapters make this an empty function
Most adapters in fact use an LRU cache to make resources go away over time instead of manually cleaning up resources
Writing your own plugin
JBrowse 2 plugins can be used to add new pluggable elements (views, tracks, adapters, etc), and to modify behavior of the application by adding code that watches the application's state. For the full list of what kinds of pluggable element types plugins can add, see the pluggable elements page.
The first thing that we have is a src/index.js
which exports a default class
containing the plugin registration code
src/index.js
import AdapterType from '@jbrowse/core/pluggableElementTypes/AdapterType'
import Plugin from '@jbrowse/core/Plugin'
import { AdapterClass, configSchema } from './UCSCAdapter'
export default class UCSCPlugin extends Plugin {
name = 'UCSCPlugin'
install(pluginManager) {
pluginManager.addAdapterType(
() =>
new AdapterType({
name: 'UCSCAdapter',
configSchema,
AdapterClass,
}),
)
}
}
src/UCSCAdapter/index.ts
import {
ConfigurationSchema,
readConfObject,
} from '@jbrowse/core/configuration'
import { ObservableCreate } from '@jbrowse/core/util/rxjs'
import { BaseFeatureDataAdapter } from '@jbrowse/core/data_adapters/BaseAdapter'
import SimpleFeature from '@jbrowse/core/util/simpleFeature'
import stringify from 'json-stable-stringify'
export const configSchema = ConfigurationSchema(
'UCSCAdapter',
{
base: {
type: 'fileLocation',
description: 'base URL for the UCSC API',
defaultValue: {
uri: 'https://cors-anywhere.herokuapp.com/https://api.genome.ucsc.edu/',
locationType: 'UriLocation',
},
},
track: {
type: 'string',
description: 'the track to select data from',
defaultValue: '',
},
},
{ explicitlyTyped: true },
)
export class AdapterClass extends BaseFeatureDataAdapter {
constructor(config) {
super(config)
this.config = config
}
getFeatures(region) {
const { assemblyName, start, end, refName } = region
return ObservableCreate(async observer => {
const { uri } = readConfObject(this.config, 'base')
const track = readConfObject(this.config, 'track')
try {
const result = await fetch(
`${uri}/getData/track?` +
`genome=${assemblyName};track=${track};` +
`chrom=${refName};start=${start};end=${end}`,
)
if (result.ok) {
const data = await result.json()
data[track].forEach(feature => {
observer.next(
new SimpleFeature({
...feature,
start: feature.chromStart,
end: feature.chromEnd,
refName: feature.chrom,
uniqueId: stringify(feature),
}),
)
})
observer.complete()
}
} catch (e) {
observer.error(e)
}
})
}
async getRefNames() {
const arr = []
for (let i = 0; i < 23; i++) {
arr.push(`chr${i}`)
}
return arr
}
freeResources() {}
}
Adding this track to our configuration
We can create a track.json like this
track.json
{
"type": "FeatureTrack",
"trackId": "genehancer_ucsc",
"name": "UCSC GeneHancer",
"assemblyNames": ["hg38"],
"adapter": {
"type": "UCSCAdapter",
"track": "geneHancerInteractionsDoubleElite"
}
}
Then use the jbrowse CLI tool add-track-json
jbrowse add-track-json file.json
This will automatically add this track to the tracks array of our config.json
Alternatively, we can manually edit this JSON into the config.json.
When we open this track, we should see the GeneHancer regions are drawn as orange blocks.
Creating a custom renderer type
Let's say we want to create a track that connects a gene to it's enhancer. On UCSC the GeneHancer tracks do exactly this. An instance of the UCSC with the GeneHancer tracks is here.
We can see data that we can get for the GeneHancer interactions from the UCSC API like this
curl 'https://api.genome.ucsc.edu/getData/track?genome=hg19;\
track=geneHancerInteractionsDoubleElite;chrom=chr1;start=750000;\
end=505700000'|less
Given that the functionality of rendering arcs is so distinct from UCSC API adaptation, we can actually make this a new plugin. Let's imagine starting a new plugin from scratch again
src/index.js
import Plugin from '@jbrowse/core/Plugin'
import PluginManager from '@jbrowse/core/PluginManager'
import ArcRenderer, {
configSchema as ArcRendererConfigSchema,
ReactComponent as ArcRendererReactComponent,
} from './ArcRenderer'
export default class ArcRendererPlugin extends Plugin {
name = 'ArcPlugin'
install(pluginManager) {
pluginManager.addRendererType(
() =>
new ArcRenderer({
name: 'ArcRenderer',
ReactComponent: ArcRendererReactComponent,
configSchema: ArcRendererConfigSchema,
pluginManager,
}),
)
}
}
src/ArcRenderer/index.js
import React from 'react'
// prettier-ignore
import {
ServerSideRendererType
} from '@jbrowse/core/pluggableElementTypes/renderers/ServerSideRendererType'
import {
ConfigurationSchema,
readConfObject,
} from '@jbrowse/core/configuration'
import { PrerenderedCanvas } from '@jbrowse/core/ui'
import { bpSpanPx } from '@jbrowse/core/util'
import {
createCanvas,
createImageBitmap,
} from '@jbrowse/core/util/offscreenCanvasPonyfill'
// Our config schema for arc track will be basic, include just a color
export const configSchema = ConfigurationSchema(
'ArcRenderer',
{
color: {
type: 'color',
description: 'color for the arcs',
defaultValue: 'darkblue',
},
},
{ explicitlyTyped: true },
)
// This ReactComponent is the so called "rendering" which is the component
// that contains the contents of what was rendered.
export const ReactComponent = props => {
return (
<div style={{ position: 'relative' }}>
<PrerenderedCanvas {...props} />
</div>
)
}
// Our ArcRenderer class does the main work in it's render method
// which draws to a canvas and returns the results in a React component
export default class ArcRenderer extends ServerSideRendererType {
async render(renderProps) {
const { features, config, regions, bpPerPx, highResolutionScaling } =
renderProps
const region = regions[0]
const width = (region.end - region.start) / bpPerPx
const height = 500
const canvas = createCanvas(
width * highResolutionScaling,
height * highResolutionScaling,
)
const ctx = canvas.getContext('2d')
ctx.scale(highResolutionScaling, highResolutionScaling)
for (const feature of features.values()) {
const [left, right] = bpSpanPx(
feature.get('start'),
feature.get('end'),
region,
bpPerPx,
)
ctx.beginPath()
ctx.strokeStyle = readConfObject(config, 'color', { feature })
ctx.lineWidth = 3
ctx.moveTo(left, 0)
ctx.bezierCurveTo(left, 200, right, 200, right, 0)
ctx.stroke()
}
const imageData = await createImageBitmap(canvas)
const reactElement = React.createElement(
this.ReactComponent,
{
...renderProps,
width,
height,
imageData,
},
null,
)
return { reactElement, imageData, width, height }
}
}
The above code is relatively simple but it is fairly quirky. Here are some notes:
- renderers can be run in offscreen or even a node.js canvas, so we do not
assume the
document.createElement
exists to create our canvas, instead using a utility function that makes a OffscreenCanvas or node-canvas (depends on context, e.g. webworker or node.js) - the "rendering" component contains the results of our renderer. in this case
it delegates to the
PrerenderedCanvas
component, a component we use in other places throughout the codebase
Bringing the two together
We can bring these two contexts together with a new track in our config.json.
Remember our previous track.json? Now we can edit it to use our own ArcRenderer
track.json
{
"type": "BasicTrack",
"trackId": "genehancer_ucsc",
"name": "UCSC GeneHancer",
"assemblyNames": ["hg38"],
"adapter": {
"type": "UCSCAdapter",
"track": "geneHancerInteractionsDoubleElite"
},
"renderer": {
"type": "ArcRenderer"
}
}
Then add the track
jbrowse add-track-json track.json --update
Creating custom renderers
What is a renderer
In JBrowse 1, a track type typically would directly call the data parser and do it's own rendering. In JBrowse 2, the data parsing and rendering is offloaded to a web-worker or other RPC. This allows things to be faster in many cases. This is conceptually related to "server side rendering" or SSR in React terms.

Important note: you can make custom tracks types that do not use this workflow, but it is a built in workflow that works well for the core track types in JBrowse 2.
How to create a new renderer
The fundamental aspect of creating a new renderer is creating a class that implements the "render" function. A renderer is actually a pair of a React component that contains the renderer's output, which we call the "rendering" and the renderer itself
class MyRenderer implements ServerSideRendererType {
render(props) {
const { width, height, regions, features } = props
const canvas = createCanvas(width, height)
const ctx = canvas.getContext('2d')
ctx.fillStyle = 'red'
ctx.drawRect(0, 0, 100, 100)
const imageData = createImageBitmap(canvas)
return {
reactElement: React.createElement(this.ReactComponent, { ...props }),
imageData,
height,
width,
}
}
}
In the above simplified example, our renderer creates a canvas using width and
height that are supplied via arguments, and draw a rectangle. We then return a
React.createElement
call which creates a "rendering" component that will
contain the output
Note that the above canvas operations use an OffscreenCanvas
for Chrome, or in
other browsers serialize the drawing commands to be drawn in the main thread
What are the props passed to the renderer
The typical props that a renderer receives
export interface PileupRenderProps {
features: Map<string, Feature>
layout: { addRect: (featureId, leftBp, rightBp, height) => number }
config: AnyConfigurationModel
regions: Region[]
bpPerPx: number
height: number
width: number
highResolutionScaling: number
}
The layout is available on BoxRendererType renderers so that it can layout things in pileup format, and has an addRect function to get the y-coordinate to render your data at
The features argument is a map of feature ID to the feature itself. To iterate over the features Map, we can use an iterator or convert to an array
class MyRenderer extends ServerSideRendererType {
render(props) {
const { features, width, height } = props
// iterate over the ES6 map of features
for (const feature in features.values()) {
// render each feature to canvas or output SVG
}
// alternatively
const feats = Array.from(features.values())
feats.forEach(feat => {})
}
}
Adding custom props to the renderer
Note that track models themselves can extend this using their renderProps function
For example the WiggleTrack
has code similar to this, which adds a scaleOpts
prop that gets passed to the renderer
const model = types
.compose(
'WiggleTrack',
blockBasedTrack,
types.model({
type: types.literal('WiggleTrack'),
}),
)
.views(self => {
const { renderProps: superRenderProps } = self
return {
renderProps() {
return {
...superRenderProps(),
scaleOpts: {
domain: this.domain,
stats: self.stats,
autoscaleType: getConf(self, 'autoscale'),
scaleType: getConf(self, 'scaleType'),
inverted: getConf(self, 'inverted'),
},
}
},
}
})
Rendering SVG
Our SVG renderer is an example, where it extends the existing built in renderer type with a custom ReactComponent only
export default class SVGPlugin extends Plugin {
install(pluginManager: PluginManager) {
pluginManager.addRendererType(
() =>
new BoxRendererType({
name: 'SvgFeatureRenderer',
ReactComponent: SvgFeatureRendererReactComponent,
configSchema: svgFeatureRendererConfigSchema,
pluginManager,
}),
)
}
}
Then, we have our Rendering component just be plain React code. This is a highly simplified SVG renderer just to illustrate
export default function SvgFeatureRendering(props) {
const { width, features, regions, layout, bpPerPx } = props
const region = regions[0]
const feats = Array.from(features.values())
const height = readConfObject(config, 'height', { feature })
return (
<svg>
{feats.map(feature => {
// our layout determines at what y-coordinate to
// plot our feature, given all the other features
const top = layout.addRect(
feature.id(),
feature.get('start'),
feature.get('end'),
height,
)
const [left, right] = bpSpanPx(
feature.get('start'),
feature.get('end'),
region,
bpPerPx,
)
return <rect x={left} y={top} height={height} width={right - left} />
})}
</svg>
)
}
Notes:
- The above SVG renderer is highly simplified but serves an example, but it
shows that you can have a simple React component that leverages the existing
BoxRendererType
, so that you do not have to necessarily create your own renderer class - The renderers receive an array of regions to render, but if they are only
equipped to handle one region at a time then they can select only rendering
to
regions[0]
Overriding the renderer's getFeatures method
Normally, it is sufficient to override the getFeatures
function in your
dataAdapter
If you want to drastically modify the feature fetching behavior, you can modify the renderer's getFeatures call
The base ServerSideRendererType
class has a built-in getFeatures
function that,
in turn, calls your adapter's getFeatures function, but if you need
tighter control over how your adapter's getFeatures method is called then
your renderer. The Hi-C renderer type does not operate on conventional
features and instead works with contact matrices, so the Hi-C renderer has a
custom getFeatures function
import { toArray } from 'rxjs/operators'
class HicRenderer extends ServerSideRendererType {
async getFeatures(args) {
const { dataAdapter, regions } = args
const features = await dataAdapter
.getFeatures(regions[0])
.pipe(toArray())
.toPromise()
return features
}
}
Creating custom track types
At a high level the track types are just "ReactComponents" that contain rendered track contents. Oftentimes, for custom drawing, we create a renderer instead of a track, but here are some reasons you might want a custom track
- Drawing custom things over the rendered content (e.g. drawing the Y-scale bar in the wiggle track)
- Implementing custom track menu items (e.g. Show soft clipping in the alignments track)
- Adding custom widgets (e.g. custom
VariantFeatureWidget
in variant track) - You want to bundle your renderer and adapter as a specific thing that is
automatically initialized rather than the
BasicTrack
(which combines any adapter and renderer)
For examples of custom track types, refer to things like
HicTrack
, which uses a custom HicRenderer to draw contact matrixGDCPlugin
, which has a custom track type that registers custom feature detail widgetsVariantTrack
, which also registers custom widgets, and hasChordVariantDisplay
andLinearVariantDisplay
SyntenyTrack
, which can be displayed withDotplotDisplay
orLinearSyntenyDisplay
- This means it's only possible to have one version of a particular plugin loaded on any given webpage, even if multiple products are loaded and using it on the same page.↩