Installing and using plugins
The following will provide a short tutorial on how to use some of the many plugins available for JBrowse 2.
Those plugins featured here are a part of the cancer-related database plugins on the cancer portal.
Prerequisites
- JBrowse 2 is installed on web or desktop
- Familiarity editing JSON
- Optionally, the JBrowse CLI installed
Installing plugins with one click
Some plugins provide all of their available functionality via the JBrowse interface, and thus can be fully accessed after utilizing the one-click install plugin store within the application.
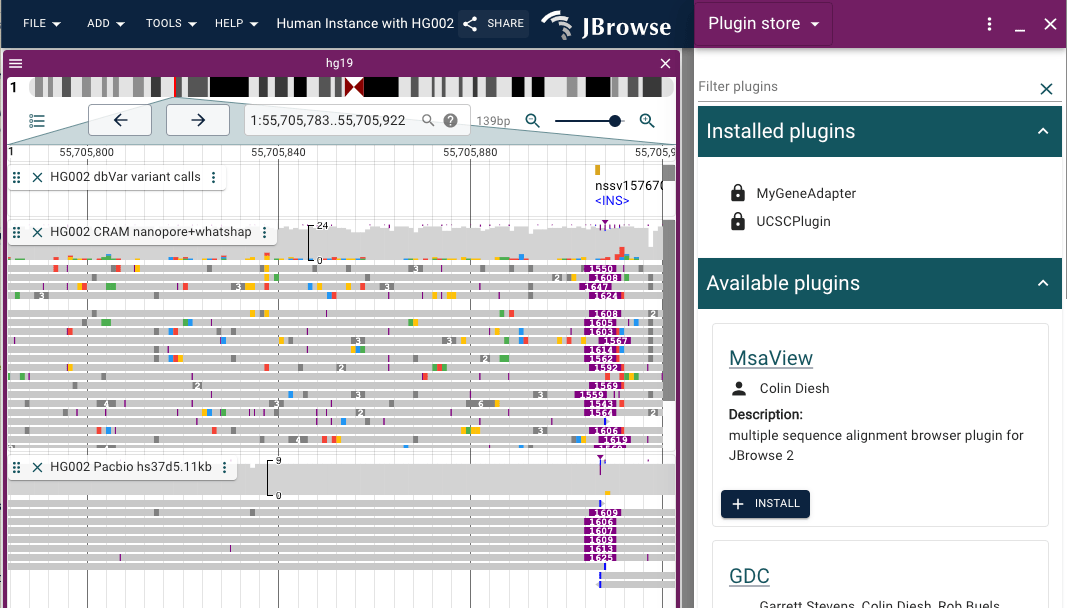
GDC plugin
The GDC plugin adapts the resources available through NCI's Genomic Data Commons.
The GDC plugin provides data adapters for the GDC API to retrieve cancer-related mutations and genes and for unique file types available via the GDC data store. The GDC plugin also provides a new internet account type that permits users to enter their GDC token to authenticate against protected data.
Adding the GDC plugin to a JBrowse session
The GDC plugin is fully accessible through the JBrowse interface. Utilize the plugin store's one-click install, or add the plugin to your configuration file, like so:
{
  "plugins": [
    {
      "name": "GDC",
      "url": "https://unpkg.com/jbrowse-plugin-gdc/dist/jbrowse-plugin-gdc.umd.production.min.js"
    }
  ]
}
Optionally, you can add a GDC Track to your configuration like so:
{
  "type": "GDCTrack",
  "trackId": "gdc_plugin_track",
  "name": "GDC Explore",
  "assemblyNames": ["hg38"],
  "category": ["Annotation"],
  "adapter": {
    "GDCAdapterId": "DefaultGDCAdapter",
    "type": "GDCAdapter"
  },
  "displays": [
    {
      "type": "LinearGDCDisplay",
      "displayId": "gdc_plugin_track_linear",
      "renderer": {
        "color1": "jexl:cast({LOW: 'blue', MODIFIER: 'goldenrod', MODERATE: 'green', HIGH: 'red'})[get(feature,'consequence').hits.edges[.node.transcript.is_canonical == true][0].node.transcript.annotation.vep_impact] || 'lightgray'",
        "labels": {
          "name": "jexl:get(feature,'genomicDnaChange')"
        },
        "type": "SvgFeatureRenderer"
      }
    }
  ]
}
However these track types are also available to be added to a session via the GDC data import panel.
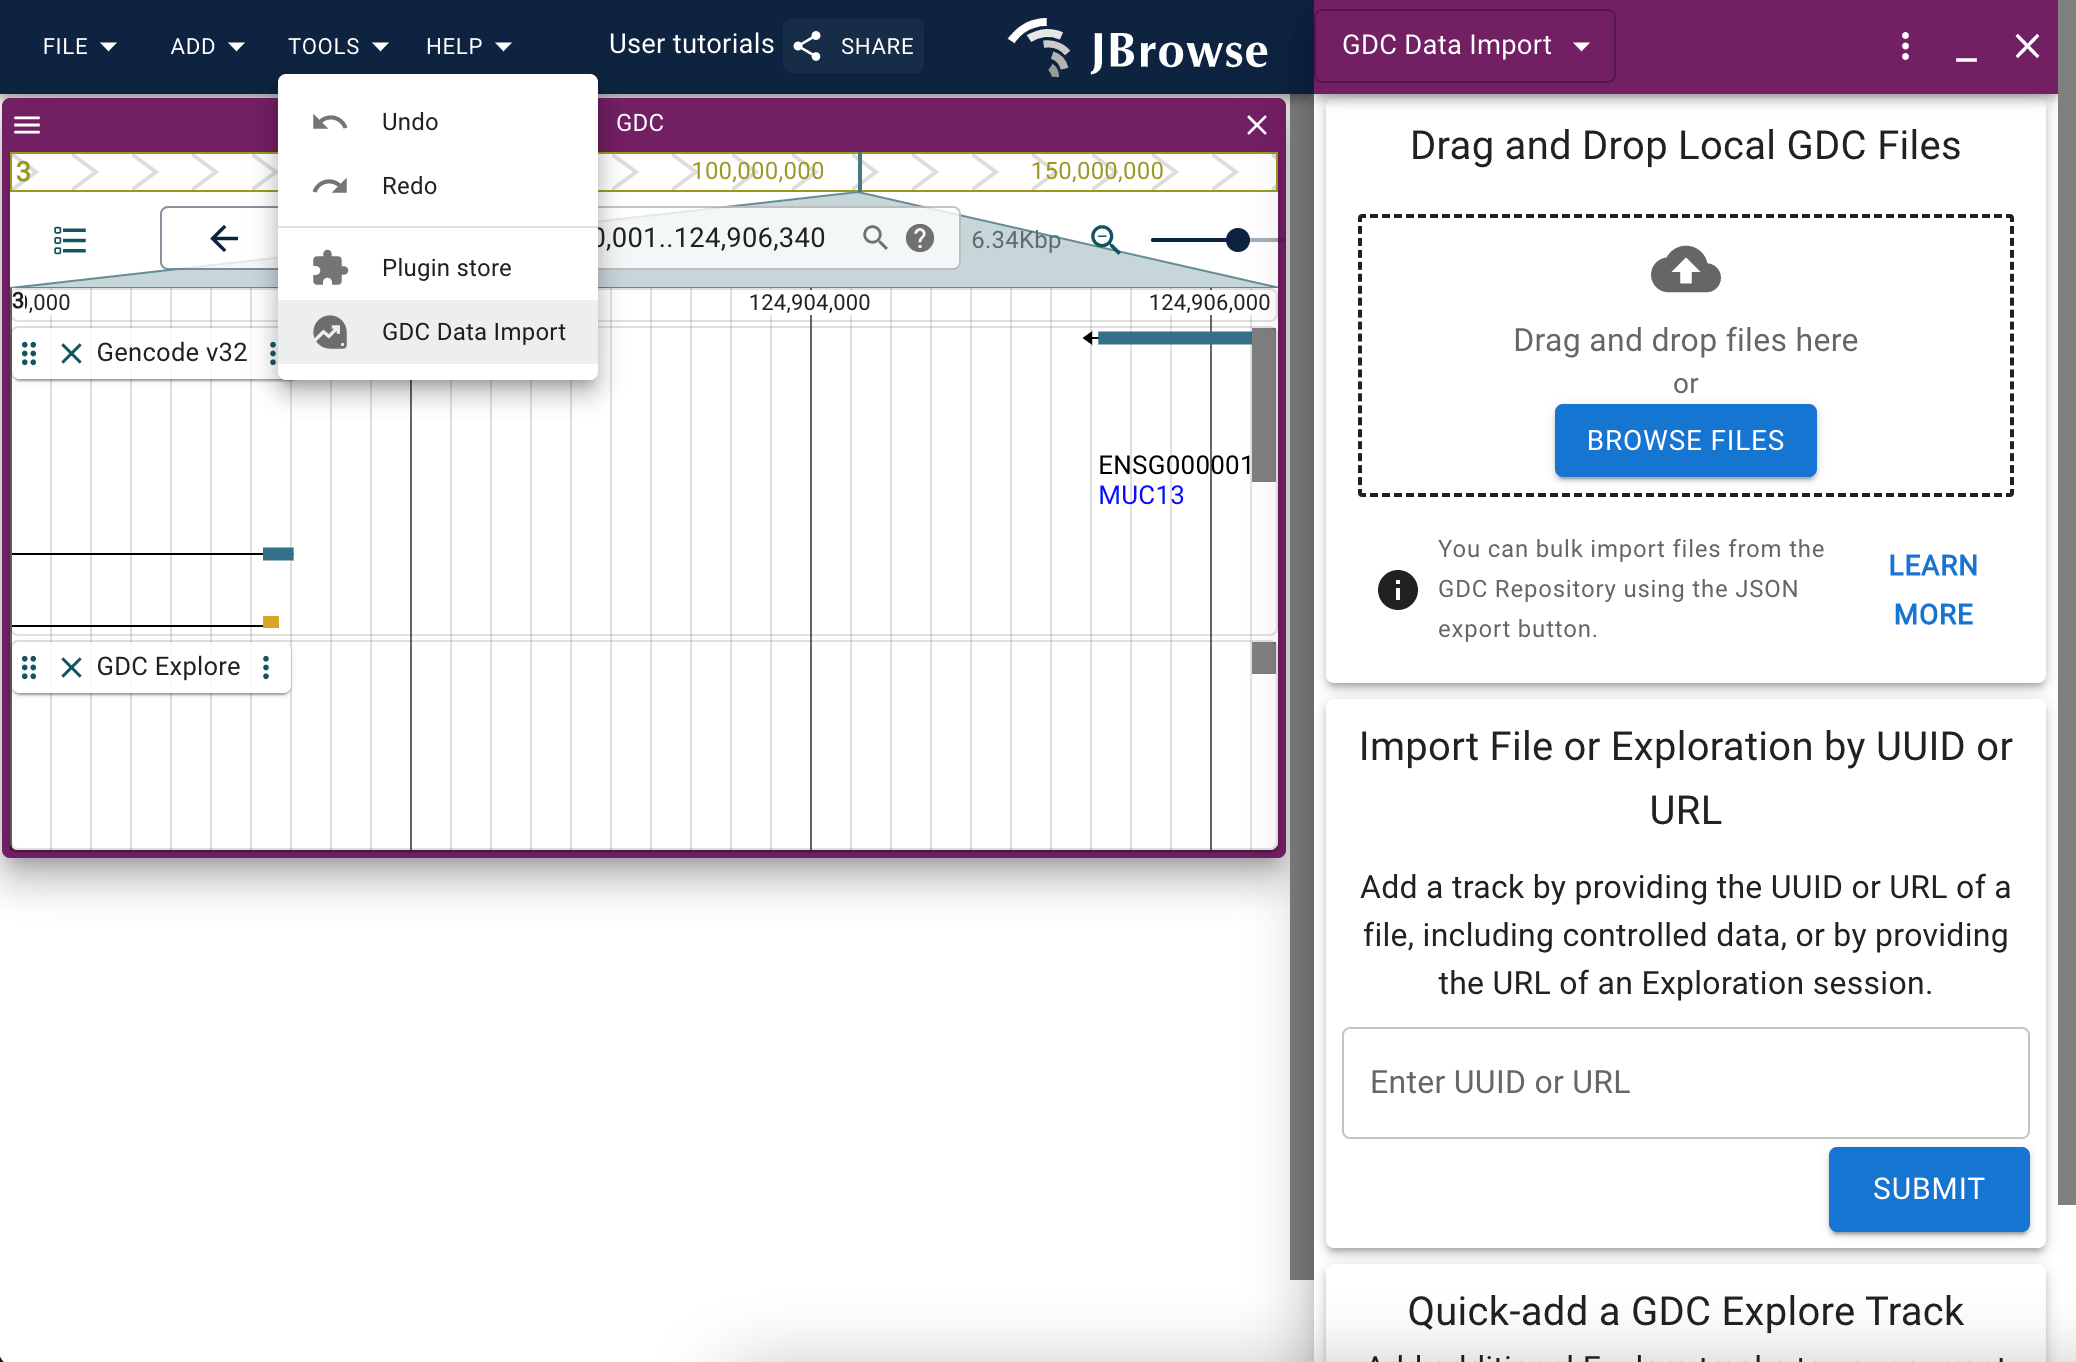
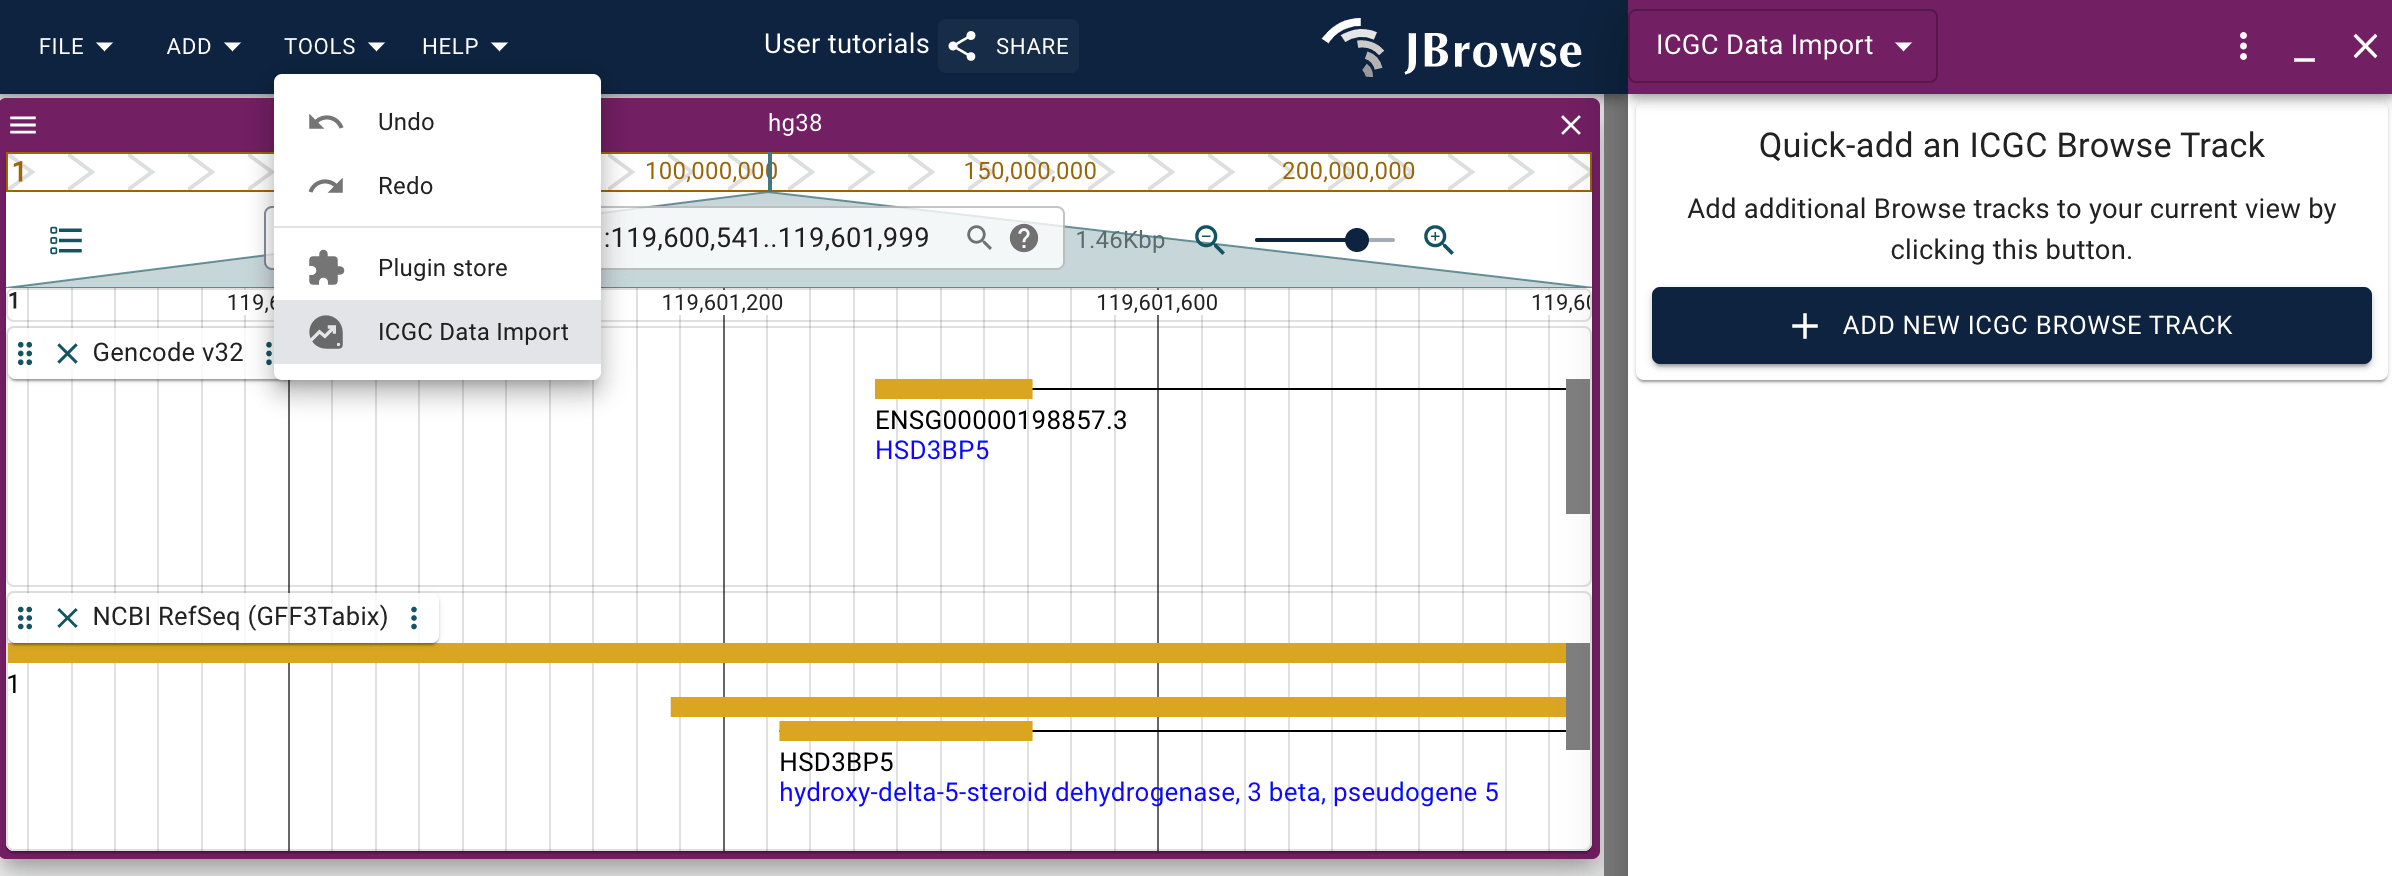
The GDC data import panel
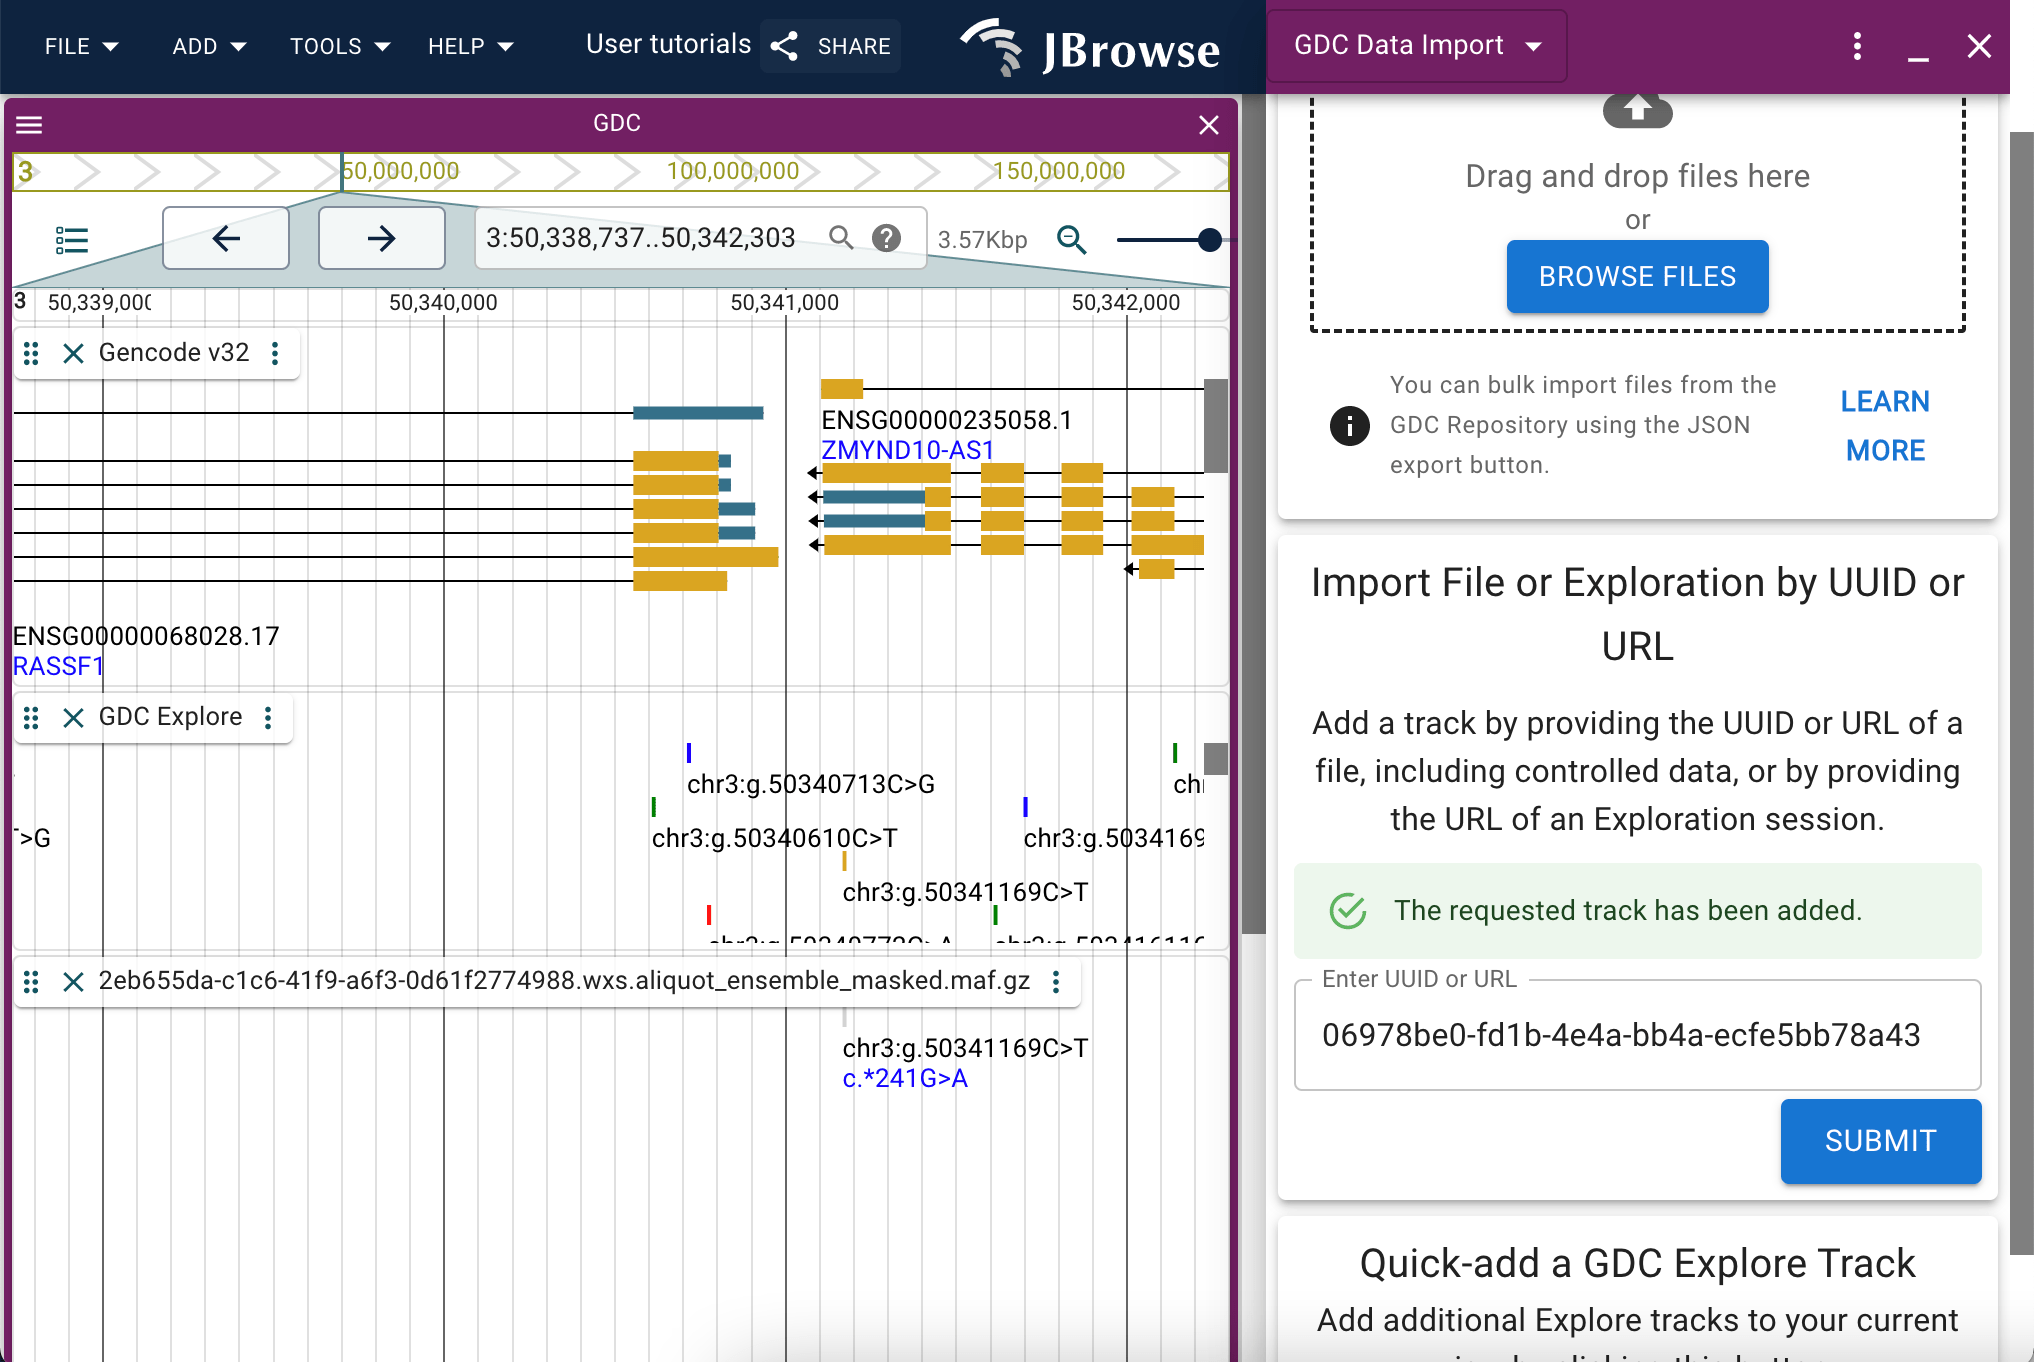
The data import panel provides several options to import data originating from the GDC into JBrowse.
If you have GDC files downloaded locally, you can drag and drop them into the first Drag and Drop panel to populate your JBrowse session with them.
You can also utilize an export functionality available via the GDC to bulk-import files if you drag that file into the panel. More detailed instructions are provided via the 'more info' button on the panel.
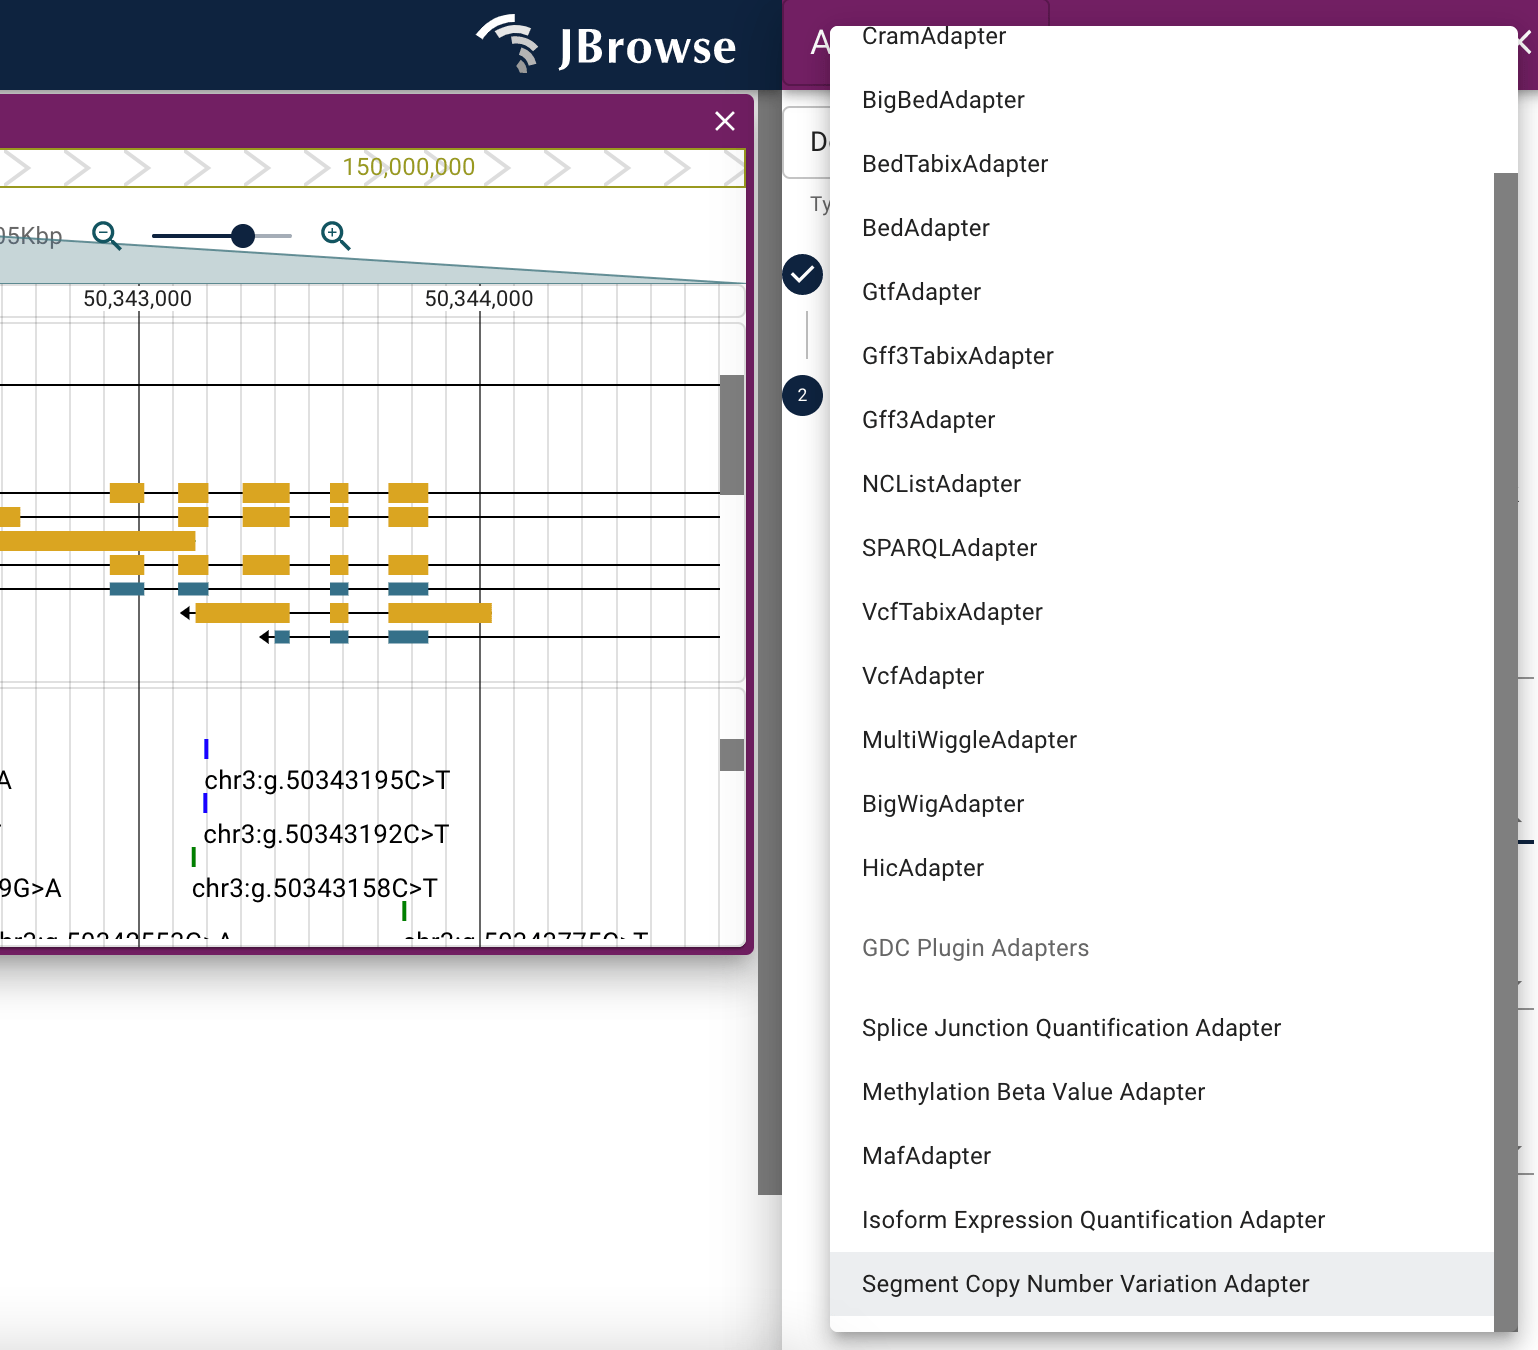
Adding files via the add track menu
Once installed, the track types and adapters provided by the GDC plugin are also available via the typical add track workflow.
How do I authenticate protected resources
Ensure that you have added the GDC internet account type to your configuration file. Presently, this must be done manually. Open the config file in a text processor and add the following:
{
  "type": "GDCInternetAccount",
  "internetAccountId": "GDCExternalToken",
  "name": "GDC",
  "description": "GDC External Token",
  "domains": ["portal.gdc.cancer.gov", "api.gdc.cancer.gov"],
  "customEndpoint": "http://localhost:8010/proxy"
}
When you attempt to add a protected resource to your session either via the add track menu or the GDC data import panel, you will be prompted with a modal overlay to add your GDC token to the session. This token will be retained for other resources you add such that you will not have to add your token every time.
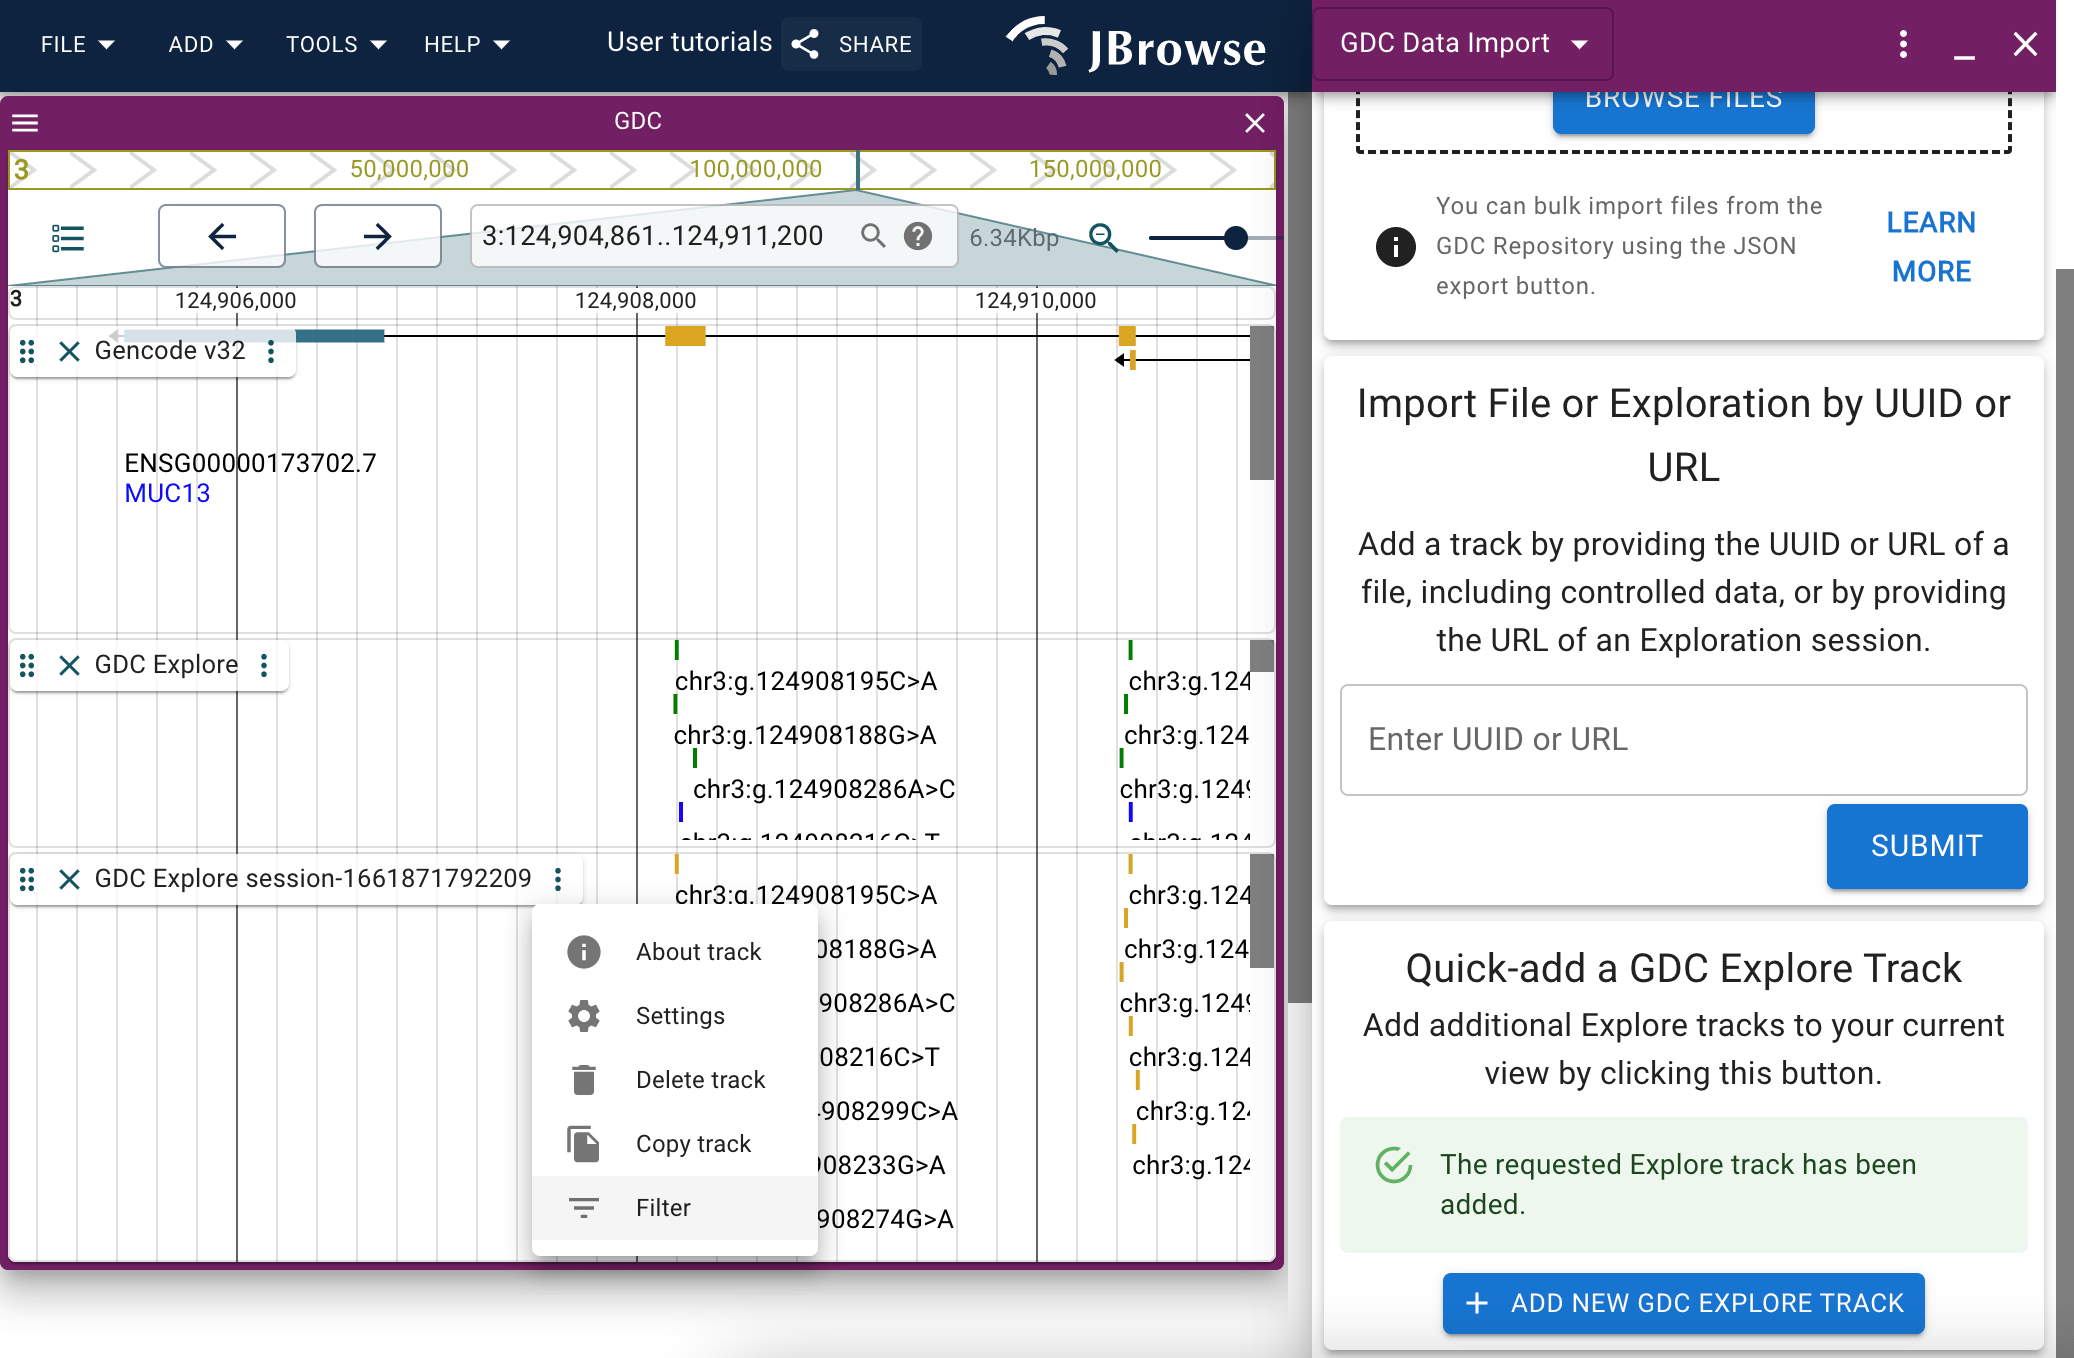
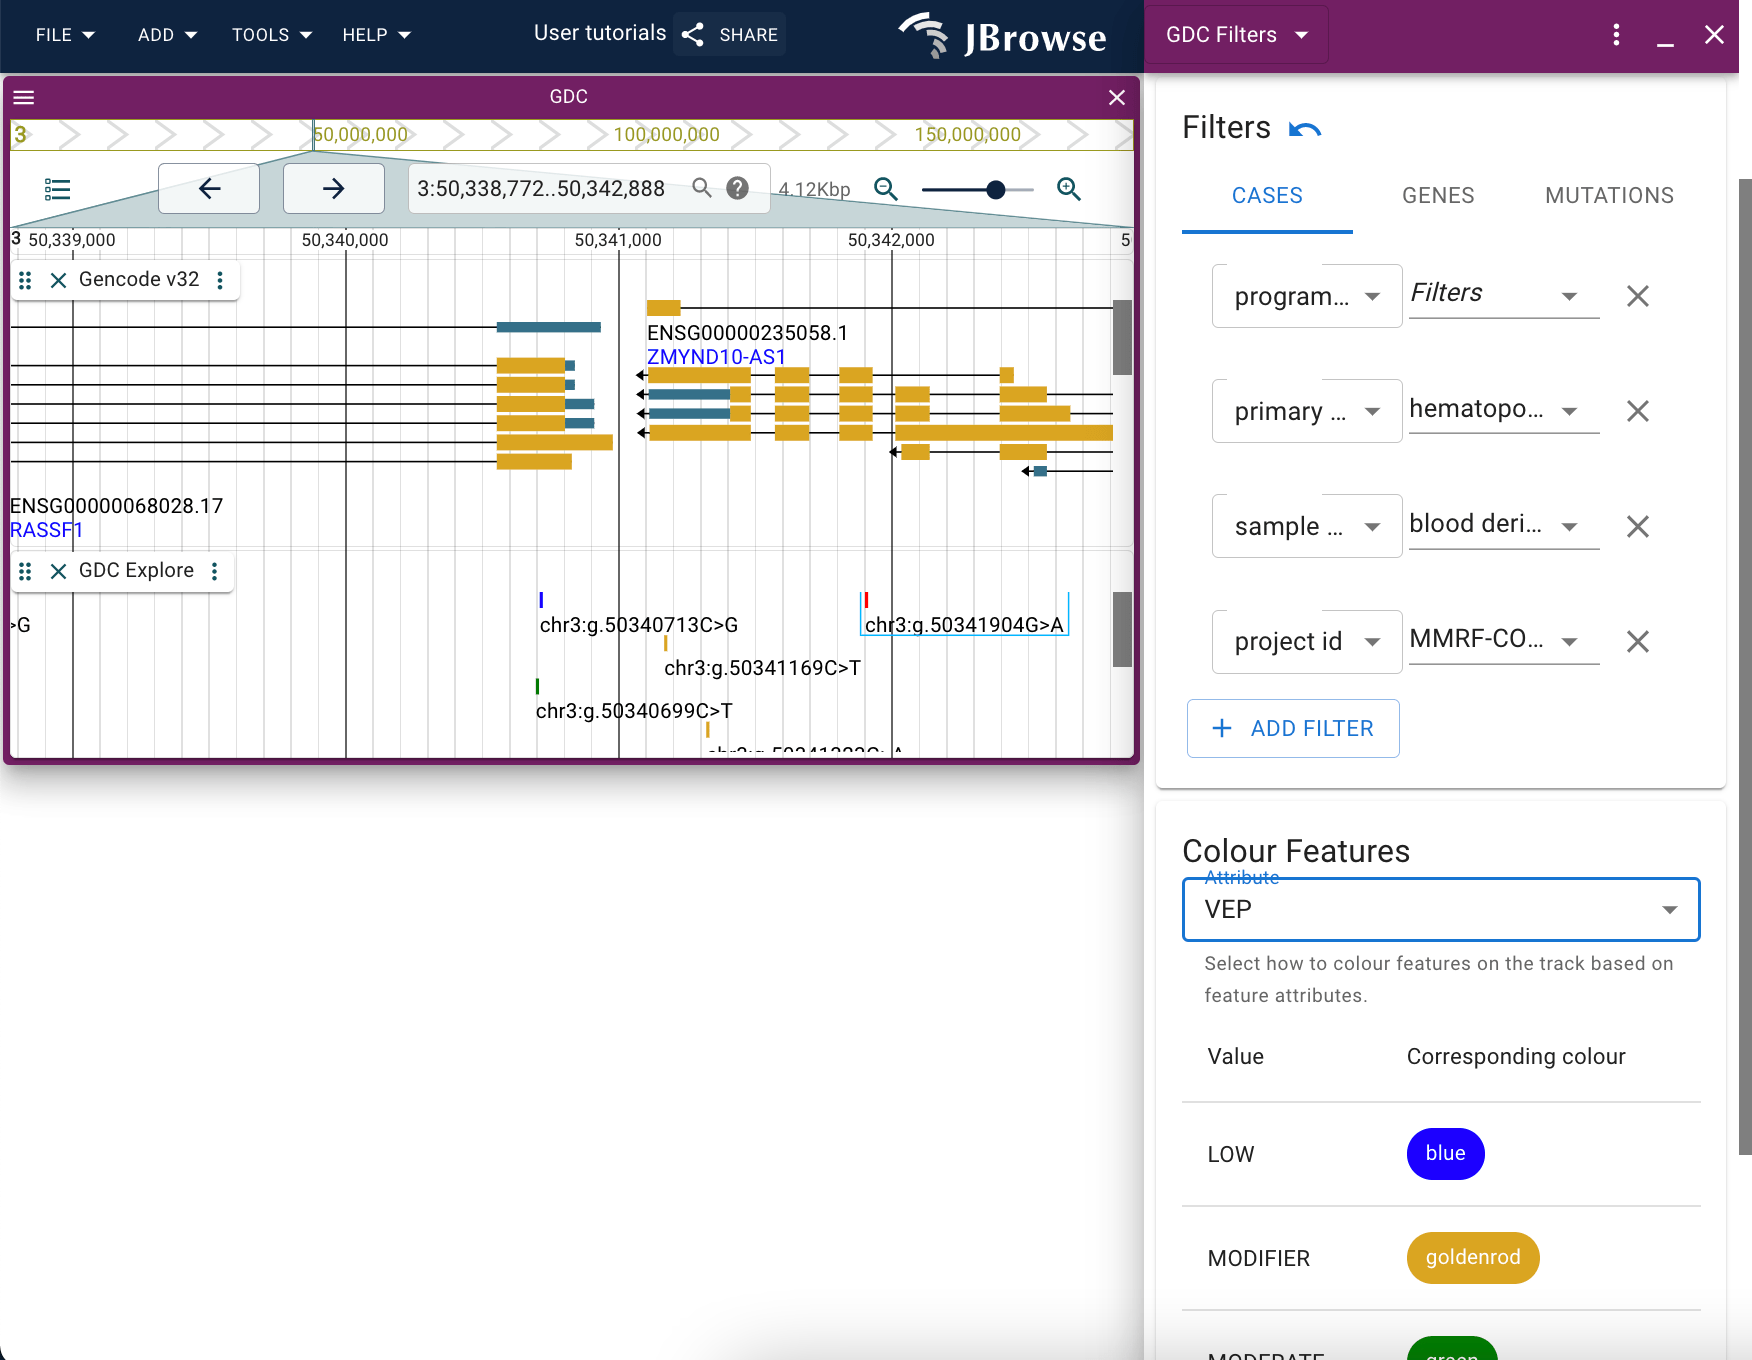
Filtering the GDC Explore track
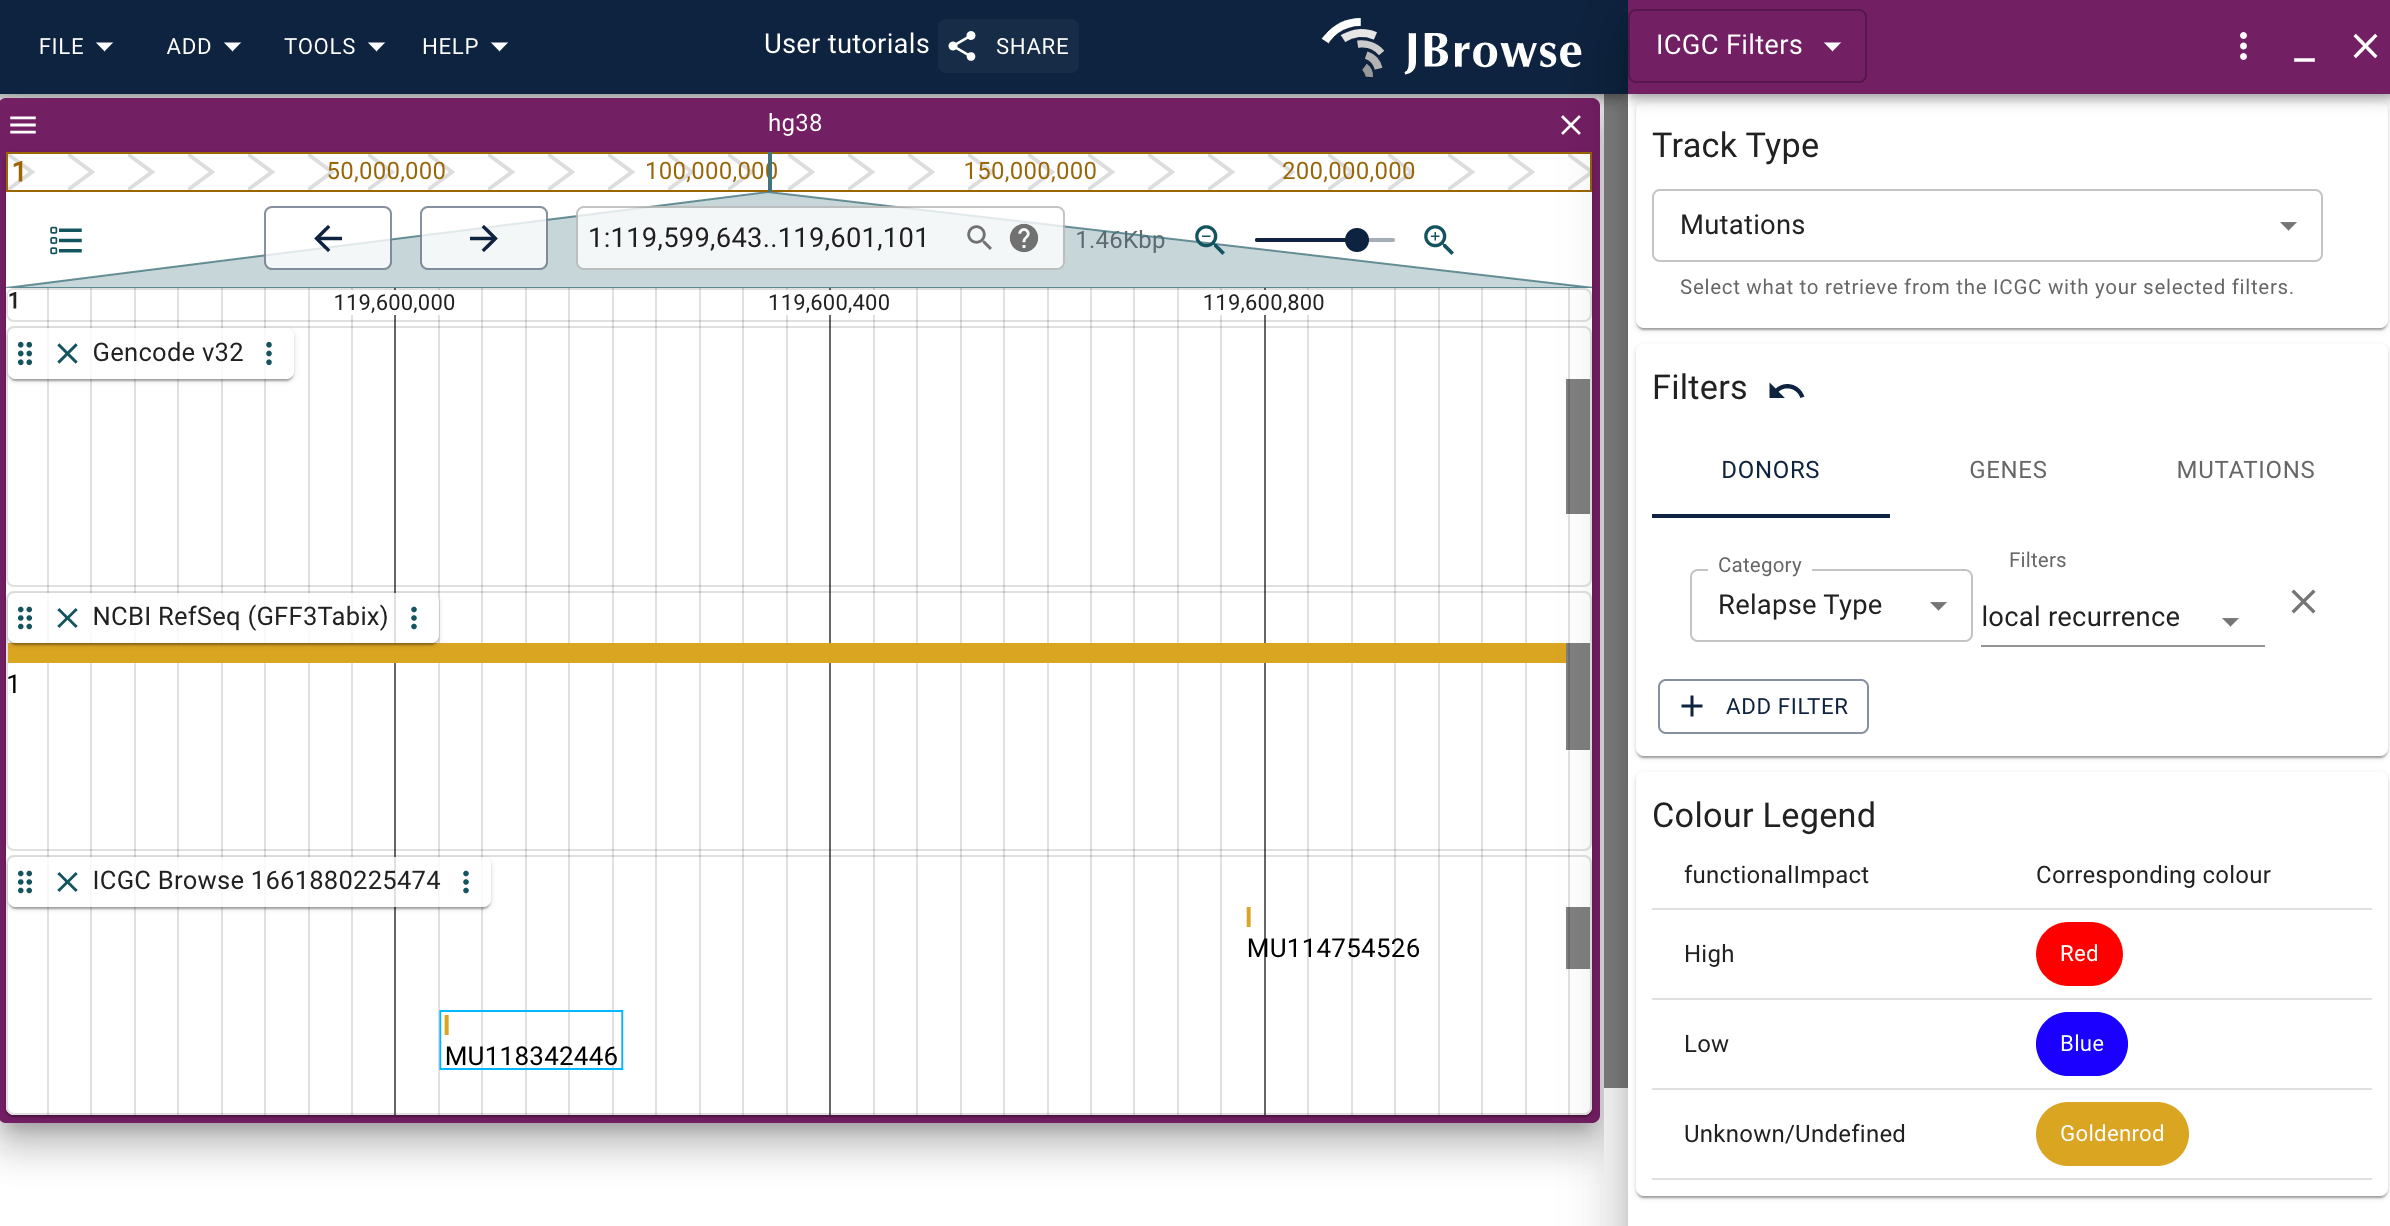
When you have a GDC Explore track added to a session either via the config file or via the data import panel, you will be able to filter the features displayed on the track using the Filter option available through the track menu.
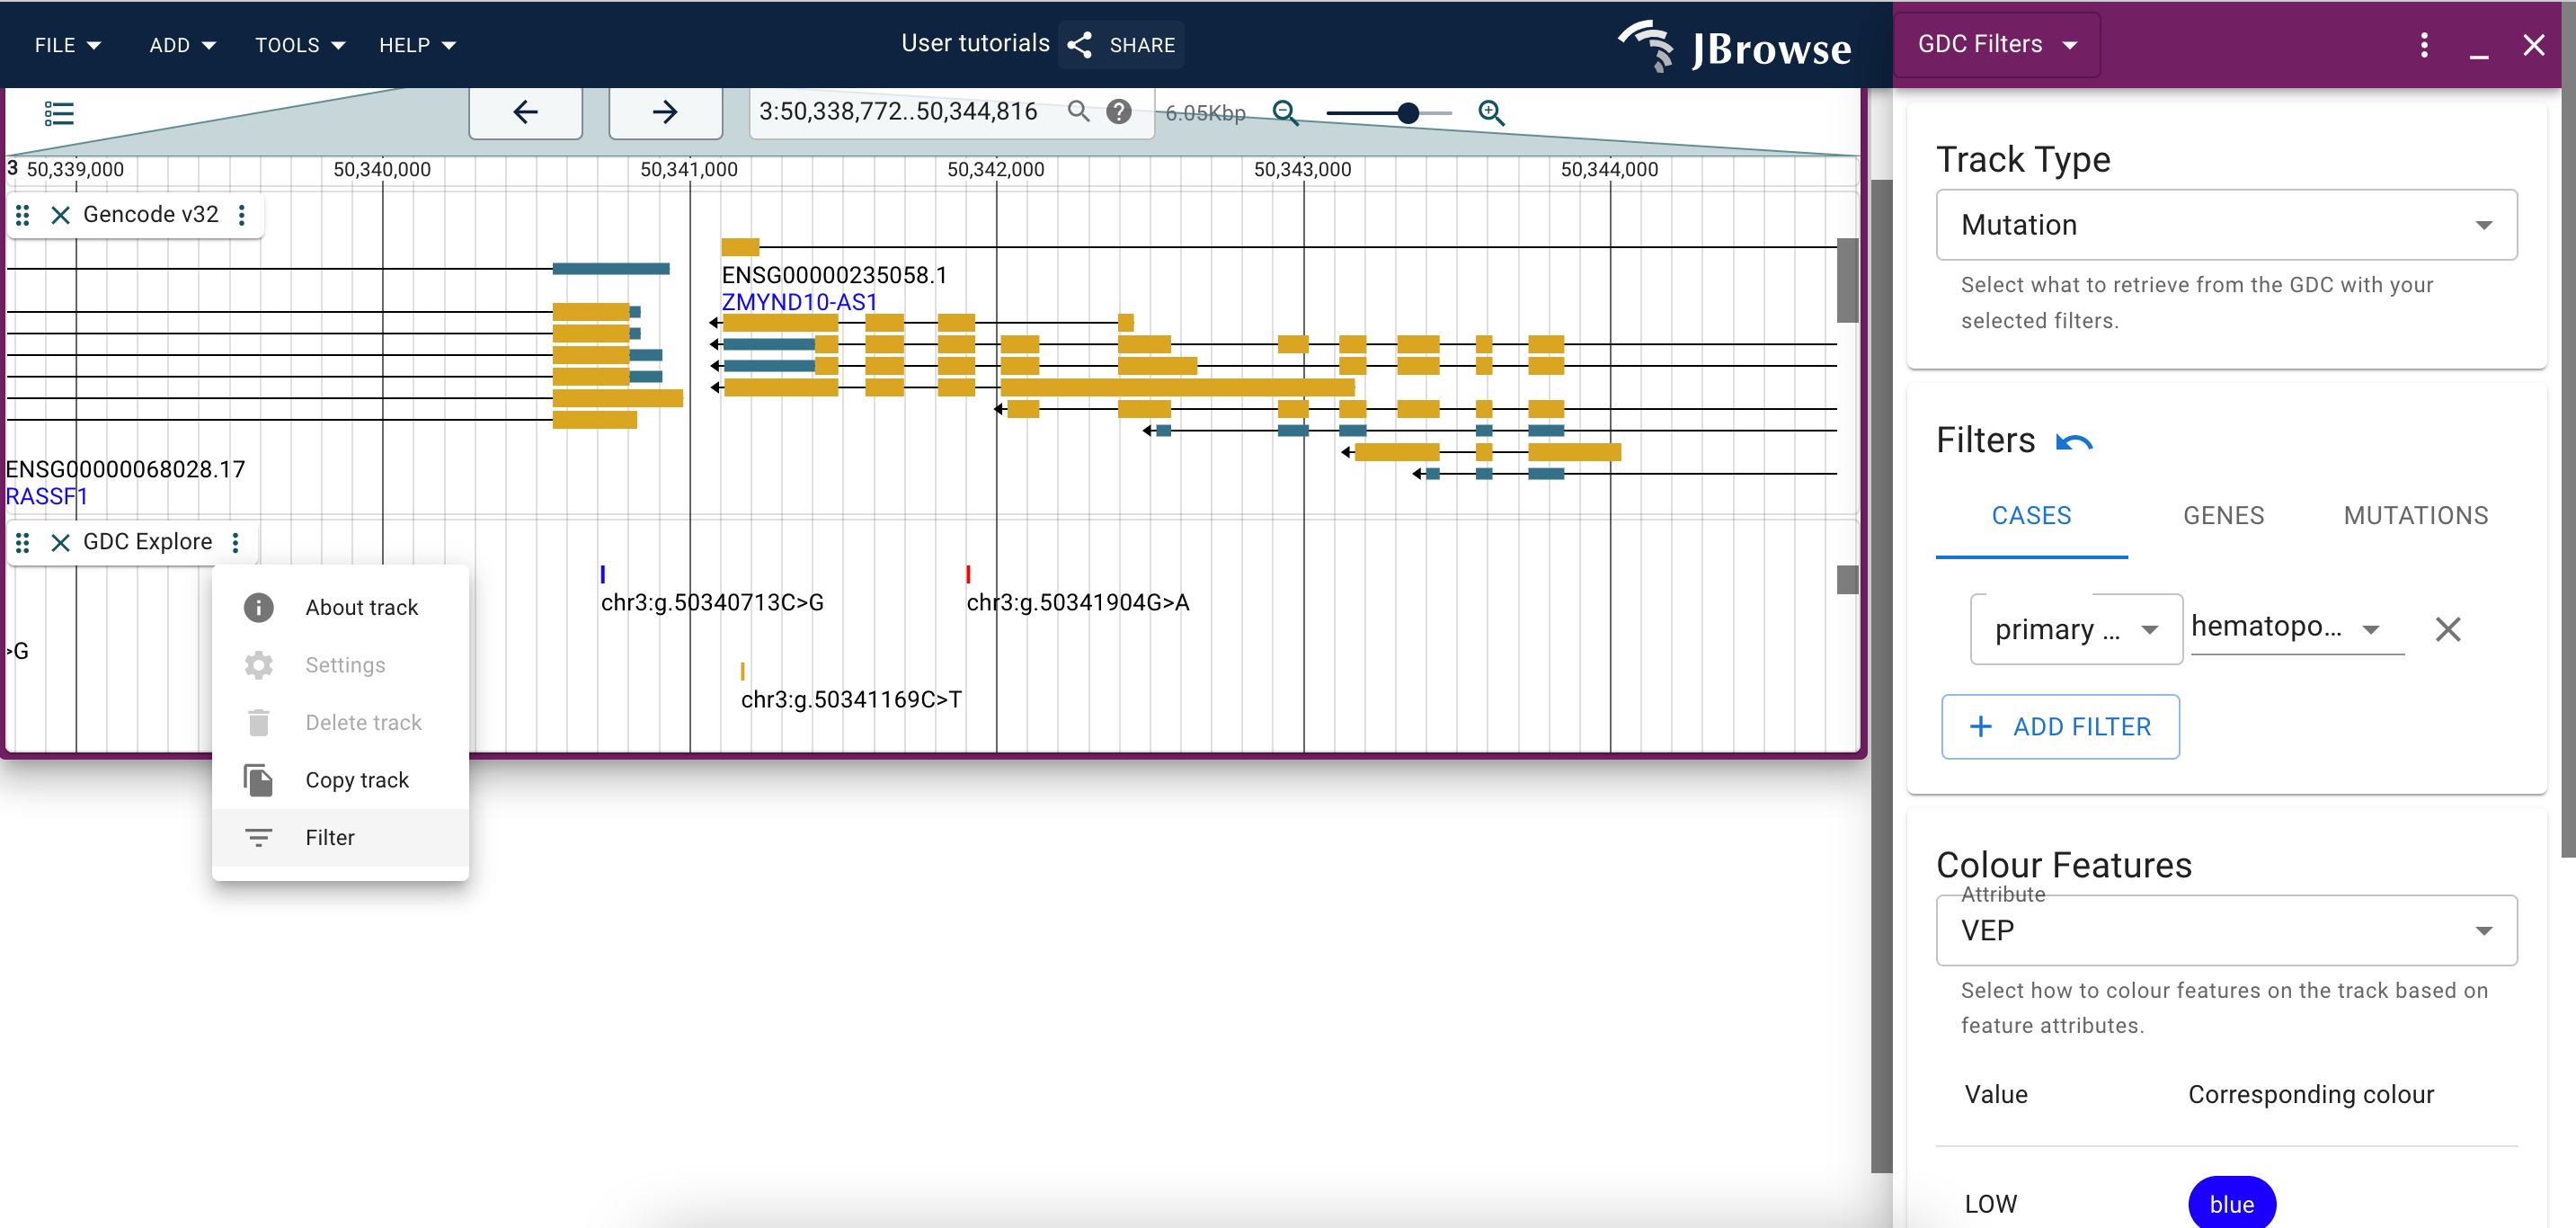
You can change whether you're seeing mutations or genes using the topmost dropdown menu.
You can browse through the various filters via the tabs, and add new filters by clicking the 'add' button on the interface.
Changes made through the filter widget will populated automatically on the track it was opened for.
The bottom-most dropdown menu provides coloration options for the track, such that you can change the color in which features are represented based on a certain trait. A legend is provided to guide which color corresponds to which feature.
ICGC plugin
The ICGC plugin adapts the resources available through the International Cancer Genome Consortium.
Adding the ICGC plugin to a JBrowse session
The ICGC plugin is fully accessible through the JBrowse interface. Utilize the plugin store's one-click install, or add the plugin to your configuration file, like so:
{
  "plugins": [
    {
      "name": "ICGC",
      "url": "https://unpkg.com/jbrowse-plugin-icgc/dist/jbrowse-plugin-icgc.umd.production.min.js"
    }
  ]
}
Optionally, you can add an ICGC Track to your configuration like so:
    {
      "type": "ICGCTrack",
      "trackId": "icgc_plugin_track",
      "name": "ICGC Browse",
      "assemblyNames": ["hg38"],
      "category": ["Annotation"],
      "adapter": {
        "ICGCAdapterId": "DefaultICGCAdapter",
        "type": "ICGCAdapter"
      },
      "displays": [
        {
          "type": "LinearICGCDisplay",
          "displayId": "icgc_plugin_track_linear"
        }
      ]
    },
However these track types are also available to be added to a session via the ICGC data import panel.
Filtering the ICGC track
The instructions for how to use the filtering functionality of the ICGC track are essentially the same as those for the GDC Explore track. Please refer to those instructions.
Configuring plugins
Some plugins require their tracks to be configured via the config file because they access remote resources and do not otherwise provide a way to add these tracks to a session. After these plugins have been configured, you can use them with the appropriate assembly like any other track.
UCSC plugin
The UCSC plugin provides access to resources available through the UCSC API.
You can add the UCSC plugin to your JBrowse config file as follows:
{
  "plugins": [
    {
      "name": "UCSC",
      "url": "https://unpkg.com/jbrowse-plugin-ucsc/dist/jbrowse-plugin-ucsc.umd.production.min.js"
    }
  ]
}
Then add the available tracks that are relevant to you under your "tracks" configuration, for example:
{
  "type": "FeatureTrack",
  "trackId": "genehancer_ucsc_hg38",
  "name": "UCSC GeneHancer",
  "category": ["Annotation"],
  "assemblyNames": ["hg38"],
  "adapter": {
    "type": "UCSCAdapter",
    "track": "geneHancerInteractionsDoubleElite"
  }
}
Make sure to reference the many other available tracks in the UCSC example config
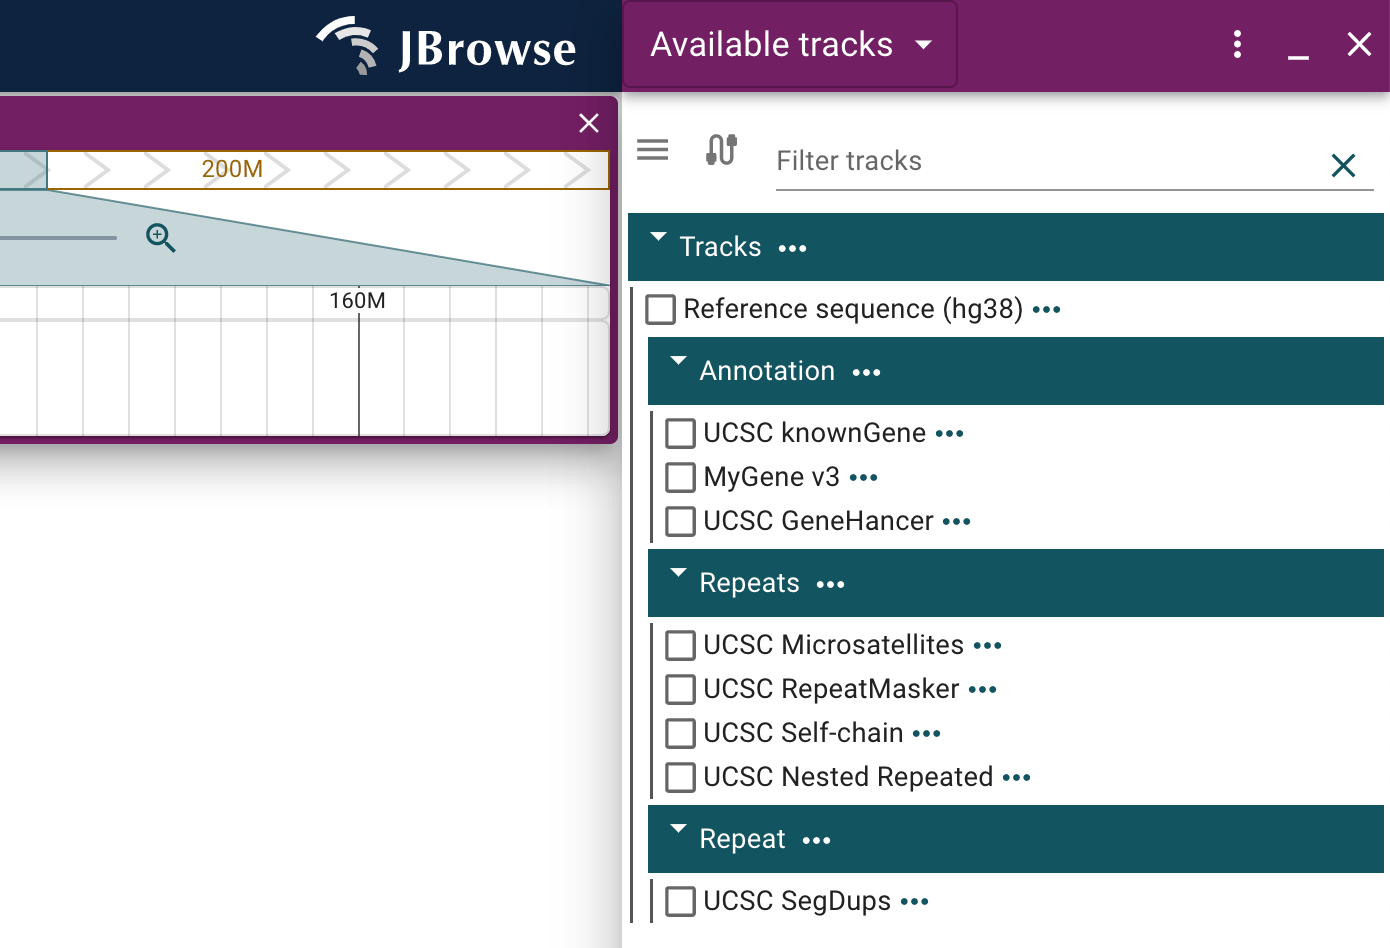
After adding one or more of these tracks to your configuration with the UCSC plugin installed, you will be able to freely enable them on linear genome views opened to the appropriate assembly using the track menu.
Biothings plugin
The Biothings plugin provides access to resources such as myvariant.info and mygene.info.
You can add the Biothings plugin to your JBrowse config file as follows:
{
  "plugins": [
    {
      "name": "Biothings",
      "url": "https://unpkg.com/jbrowse-plugin-biothings/dist/jbrowse-plugin-biothings.umd.production.min.js"
    }
  ]
}
Then add the available tracks that are relevant to you under your "tracks" configuration, for example:
{
  "type": "FeatureTrack",
  "trackId": "myvariant_hg19_evs",
  "name": "MyVariant v1 (evs)",
  "assemblyNames": ["hg19"],
  "category": ["Annotation"],
  "adapter": {
    "query": "query?q={ref}:{start}-{end} AND _exists_:evs&size=1000&size=1000&fields=gwassnps&email=colin.diesh@gmail.com",
    "baseUrl": "https://myvariant.info/v1/",
    "type": "MyVariantV1Adapter"
  }
}
Make sure to reference the many other available tracks in the Biothings example config
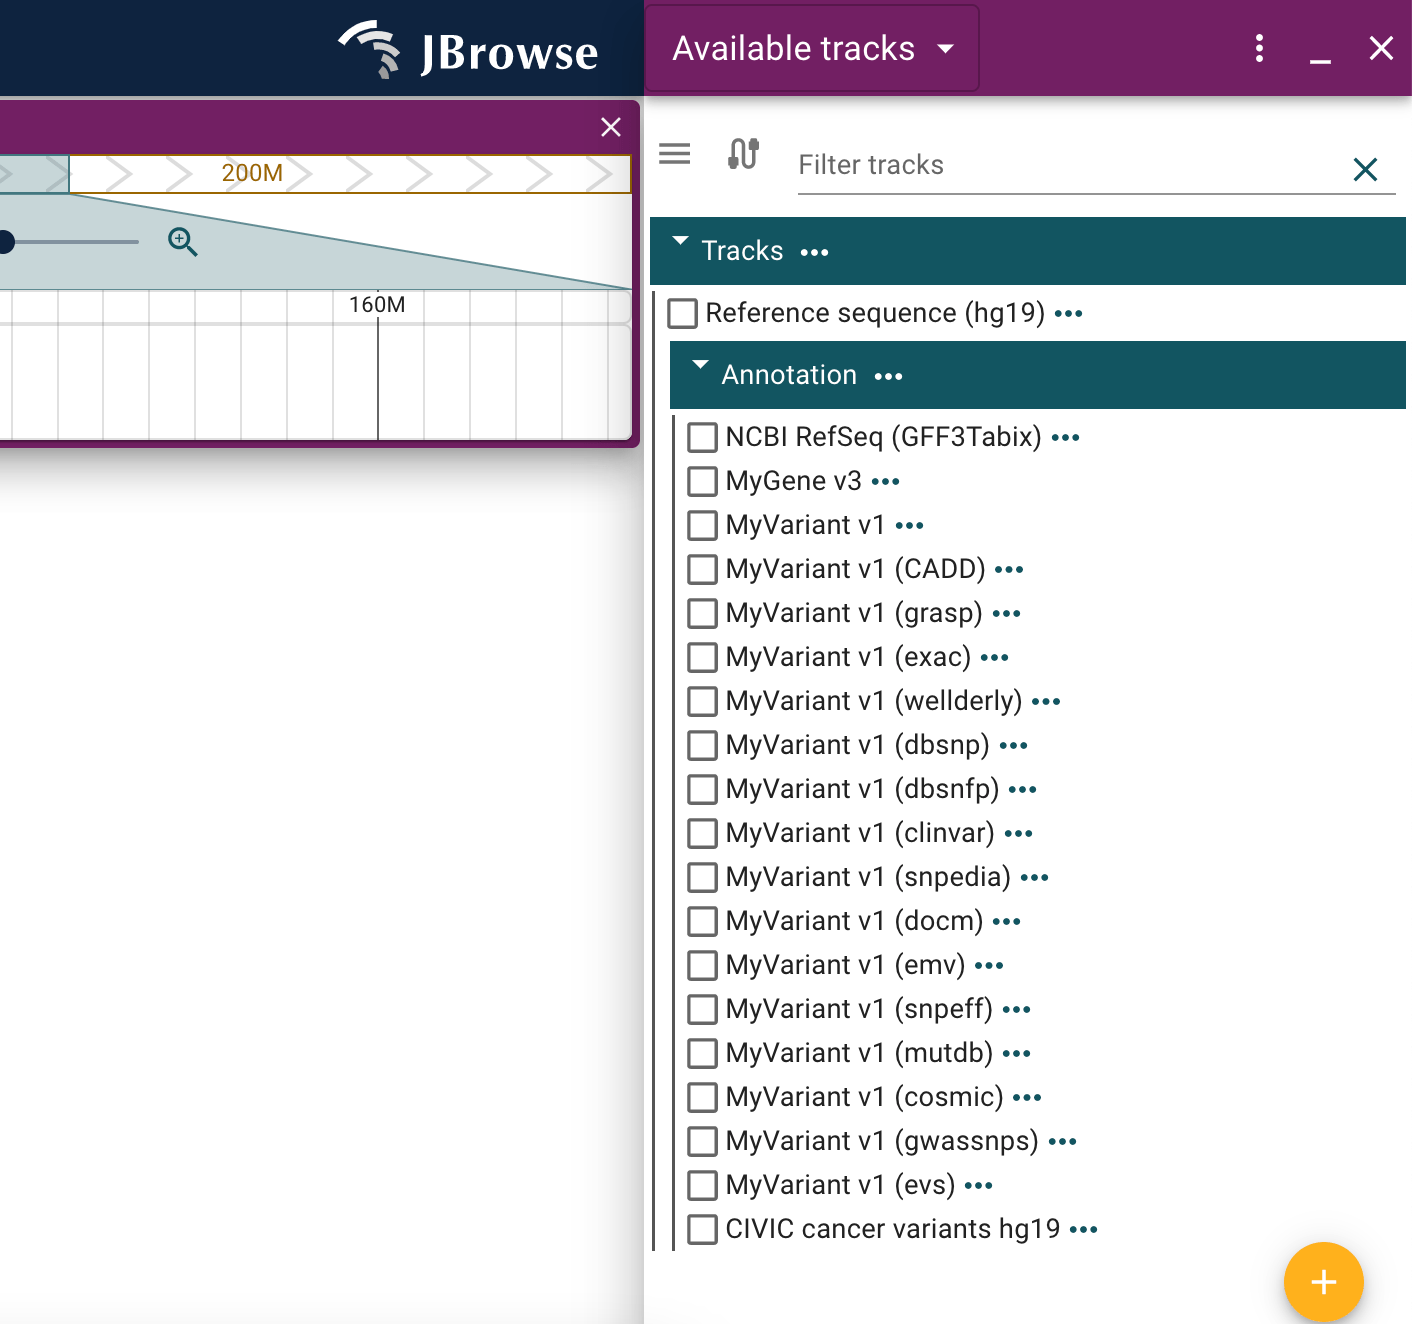
After adding one or more of these tracks to your configuration with the UCSC plugin installed, you will be able to freely enable them on linear genome views opened to the appropriate assembly using the track menu.
CIVIC plugin
The CIVIC plugin provides access to resources available through the CIVIC API.
You can add the CIVIC plugin to your JBrowse config file as follows:
{
  "plugins": [
    {
      "name": "CIVIC",
      "url": "https://unpkg.com/jbrowse-plugin-civic/dist/jbrowse-plugin-civic.umd.production.min.js"
    }
  ]
}
Then add the relevant track to the "tracks" configuration:
{
  "type": "FeatureTrack",
  "trackId": "ncbi_gff_hg19",
  "name": "NCBI RefSeq (GFF3Tabix)",
  "assemblyNames": ["hg19"],
  "category": ["Annotation"],
  "metadata": {
    "source": "https://www.ncbi.nlm.nih.gov/genome/guide/human/",
    "dateaccessed": "12/03/2020"
  },
  "adapter": {
    "type": "Gff3TabixAdapter",
    "gffGzLocation": {
      "uri": "https://s3.amazonaws.com/jbrowse.org/genomes/hg19/ncbi_refseq/GRCh37_latest_genomic.sort.gff.gz"
    },
    "index": {
      "location": {
        "uri": "https://s3.amazonaws.com/jbrowse.org/genomes/hg19/ncbi_refseq/GRCh37_latest_genomic.sort.gff.gz.tbi"
      }
    }
  }
}
Make sure to reference the many other available tracks in the CIVIC example config.
After adding one or more of these tracks to your configuration with the UCSC plugin installed, you will be able to freely enable them on linear genome views opened to the appropriate assembly using the track menu.
Conclusion
You should now have an understanding of how to add a plugin to a JBrowse session, and, if applicable, configure a track such that the adapter provided by the plugin is utilized.
Plugins such as those highlighted in this tutorial provide essential annotations and datasets to a user's JBrowse session and as demonstrated can be accessed in a variety of ways.