Developing a simple JBrowse plugin
JBrowse 2 plugins can be used to add new pluggable elements (views, tracks, adapters, etc), and to modify behavior of the application by adding code that watches the application's state.
For the full list of what kinds of pluggable element types plugins can add, see the pluggable elements page.
The following tutorial will walk you through establishing your developer environment, spinning up a plugin, and running a local JBrowse instance with your custom plugin functionality.
Prerequisites
- git
- A stable and recent version of node
- yarn or npm
- basic familiarity with the command line, React, package management, and npm
First we're going to install and set up the project for development.
Use git to clone the plugin template
The easiest way to start developing your plugin for JBrowse 2 is to use the plugin template.
To clone the plugin template project, on the command line run:
# change jbrowse-plugin-my-project to whatever you wish
git clone https://github.com/GMOD/jbrowse-plugin-template.git jbrowse-plugin-my-project
cd jbrowse-plugin-my-project
Initialize the project
To initialize your project run,
yarn init
You'll be asked a few questions relating to your new project.
Most fields can be left blank, but make sure to enter a descriptive name for your plugin in the first field.
A typical naming convention for JBrowse plugins is "jbrowse-plugin-", or, if you are going to publish to an NPM organization, we advise "@myscope/jbrowse-plugin-".
You also need to install the dependencies:
yarn # or npm i
Setup JBrowse 2
Finally, we're going to run:
yarn setup
which will grab the latest release version of JBrowse 2 (in the .jbrowse
directory) and make it easy for you to run within your plugin project.
To run JBrowse:
yarn browse
You should see something like the following:
yarn run v1.22.10
$ npm-run-all jbrowse:*
$ shx cp jbrowse_config.json .jbrowse/config.json
$ cross-var serve --listen $npm_package_config_browse_port .jbrowse
We still need to run the plugin though; we need both to be running to test our plugin.
Open a new tab in your terminal and navigate again to your plugin project, then we're going to run our plugin:
cd jbrowse-plugin-my-project
yarn start
Now you can navigate to http://localhost:8999/, and see your running JBrowse instance!
At this point, you must be running your plugin on port 9000 to see a running
JBrowse instance, otherwise you will meet a screen asking you to configure your
instance.
If you'd like to change this port, you can edit the "port" fields under "config"
in the package.json file.
We can verify our plugin has been added to our JBrowse session by clicking the
first square on the splash screen "Empty," and then navigating Add ->
Hello View in the menu bar. This is the example pluggable element that is
added in the template plugin project.
Next, we're going to add our own pluggable element to the plugin.
If you're building a small plugin, or only want to develop against the latest release version.
However, if you:
- want to run your plugin on JBrowse desktop
- would like more descriptive stack traces and debugging
- want to test your plugin against the most recent developer build
You can develop against the latest JBrowse core build by taking a quick detour to our developing with JBrowse web and desktop tutorial.
Now that our environment is set up and running, we're going to add our own pluggable element to the project and observe it running in JBrowse.
For this tutorial, we're going to be creating a custom widget, and using a Jexl callback to open it when we click a chord on the circular genome view.
Add new files, stubs, and install dependencies
Add a new directory under src called CircularViewChordWidget with two files
CircularViewChordWidget.tsx, and index.tsx.
This component is essentially just a react component we're going to embed in a JBrowse widget.
A widget's index.tsx
The index file is going to export what our pluginManager needs to recognize
the widget: a ReactComponent, a configSchema, and a stateModelFactory.
CircularViewChordWidget/index.tsx
import { ConfigurationSchema } from '@jbrowse/core/configuration'
import PluginManager from '@jbrowse/core/PluginManager'
import { ElementId } from '@jbrowse/core/util/types/mst'
import { types } from 'mobx-state-tree'

export { default as ReactComponent } from './CircularViewChordWidget'
export const configSchema = ConfigurationSchema('CircularViewChordWidget', {})

export function stateModelFactory(pluginManager: PluginManager) {
  const stateModel = types
    .model('CircularViewChordWidget', {
      id: ElementId,
      type: types.literal('CircularViewChordWidget'),
      featureData: types.frozen({}),
    })
    .actions(self => ({
      setFeatureData(data: any) {
        self.featureData = data
      },
      clearFeatureData() {
        self.featureData = {}
      },
    }))

  return stateModel
}
With mobx-state-tree, you can observe here we're defining the properties of our widget and some actions it can take.
Within the .model method, we're defining that the model of our
CircularViewChordWidget has an id, a type, and featureData. We can
define whatever we want in here. For example, we could add a "widgetByline"
string property, and be able to use it later in our React component.
To add the new property and some functions:
// ...
export function stateModelFactory(pluginManager: PluginManager) {
  const stateModel = types
    .model('CircularViewChordWidget', {
      id: ElementId,
      type: types.literal('CircularViewChordWidget'),
      featureData: types.frozen({}),
      widgetByline: 'Default widget byline', // NEW
    })
    .actions(self => ({
      setFeatureData(data: any) {
        self.featureData = data
      },
      clearFeatureData() {
        self.featureData = {}
      },
      // NEW
      setWidgetByline(byline: string) {
        self.widgetByline = byline
      },
      // NEW
      getWidgetByline() {
        return self.widgetByline
      },
    }))

  return stateModel
}
// ...
Within the .actions method, we're defining methods for the model. These can be
far more complex than just accessors and mutators (anything you want really).
If you have a particularly complex model, consider moving your component's model
into a model.ts, and then exporting the stateModel from index.ts similar to
how the ReactComponent is exported.
A widget's ReactComponent
Now that we have our model set up, let's build a simple widget that will open when we click the circular genome view chord.
CircularViewChordWidget.tsx
import React, { useState } from 'react'
import { observer } from 'mobx-react'

const CircularViewChordWidget = observer(({ model }: { model: any }) => {
  return (
    <div></div>
  )
}

export default CircularViewChordWidget
It's important to note the use of the mobx observer here: when making
modifications to the model, you'll see those changes populated in your widget,
thanks to the observer. We export the widget such that it can be seen by
CircularViewChordWidget/index.tsx.
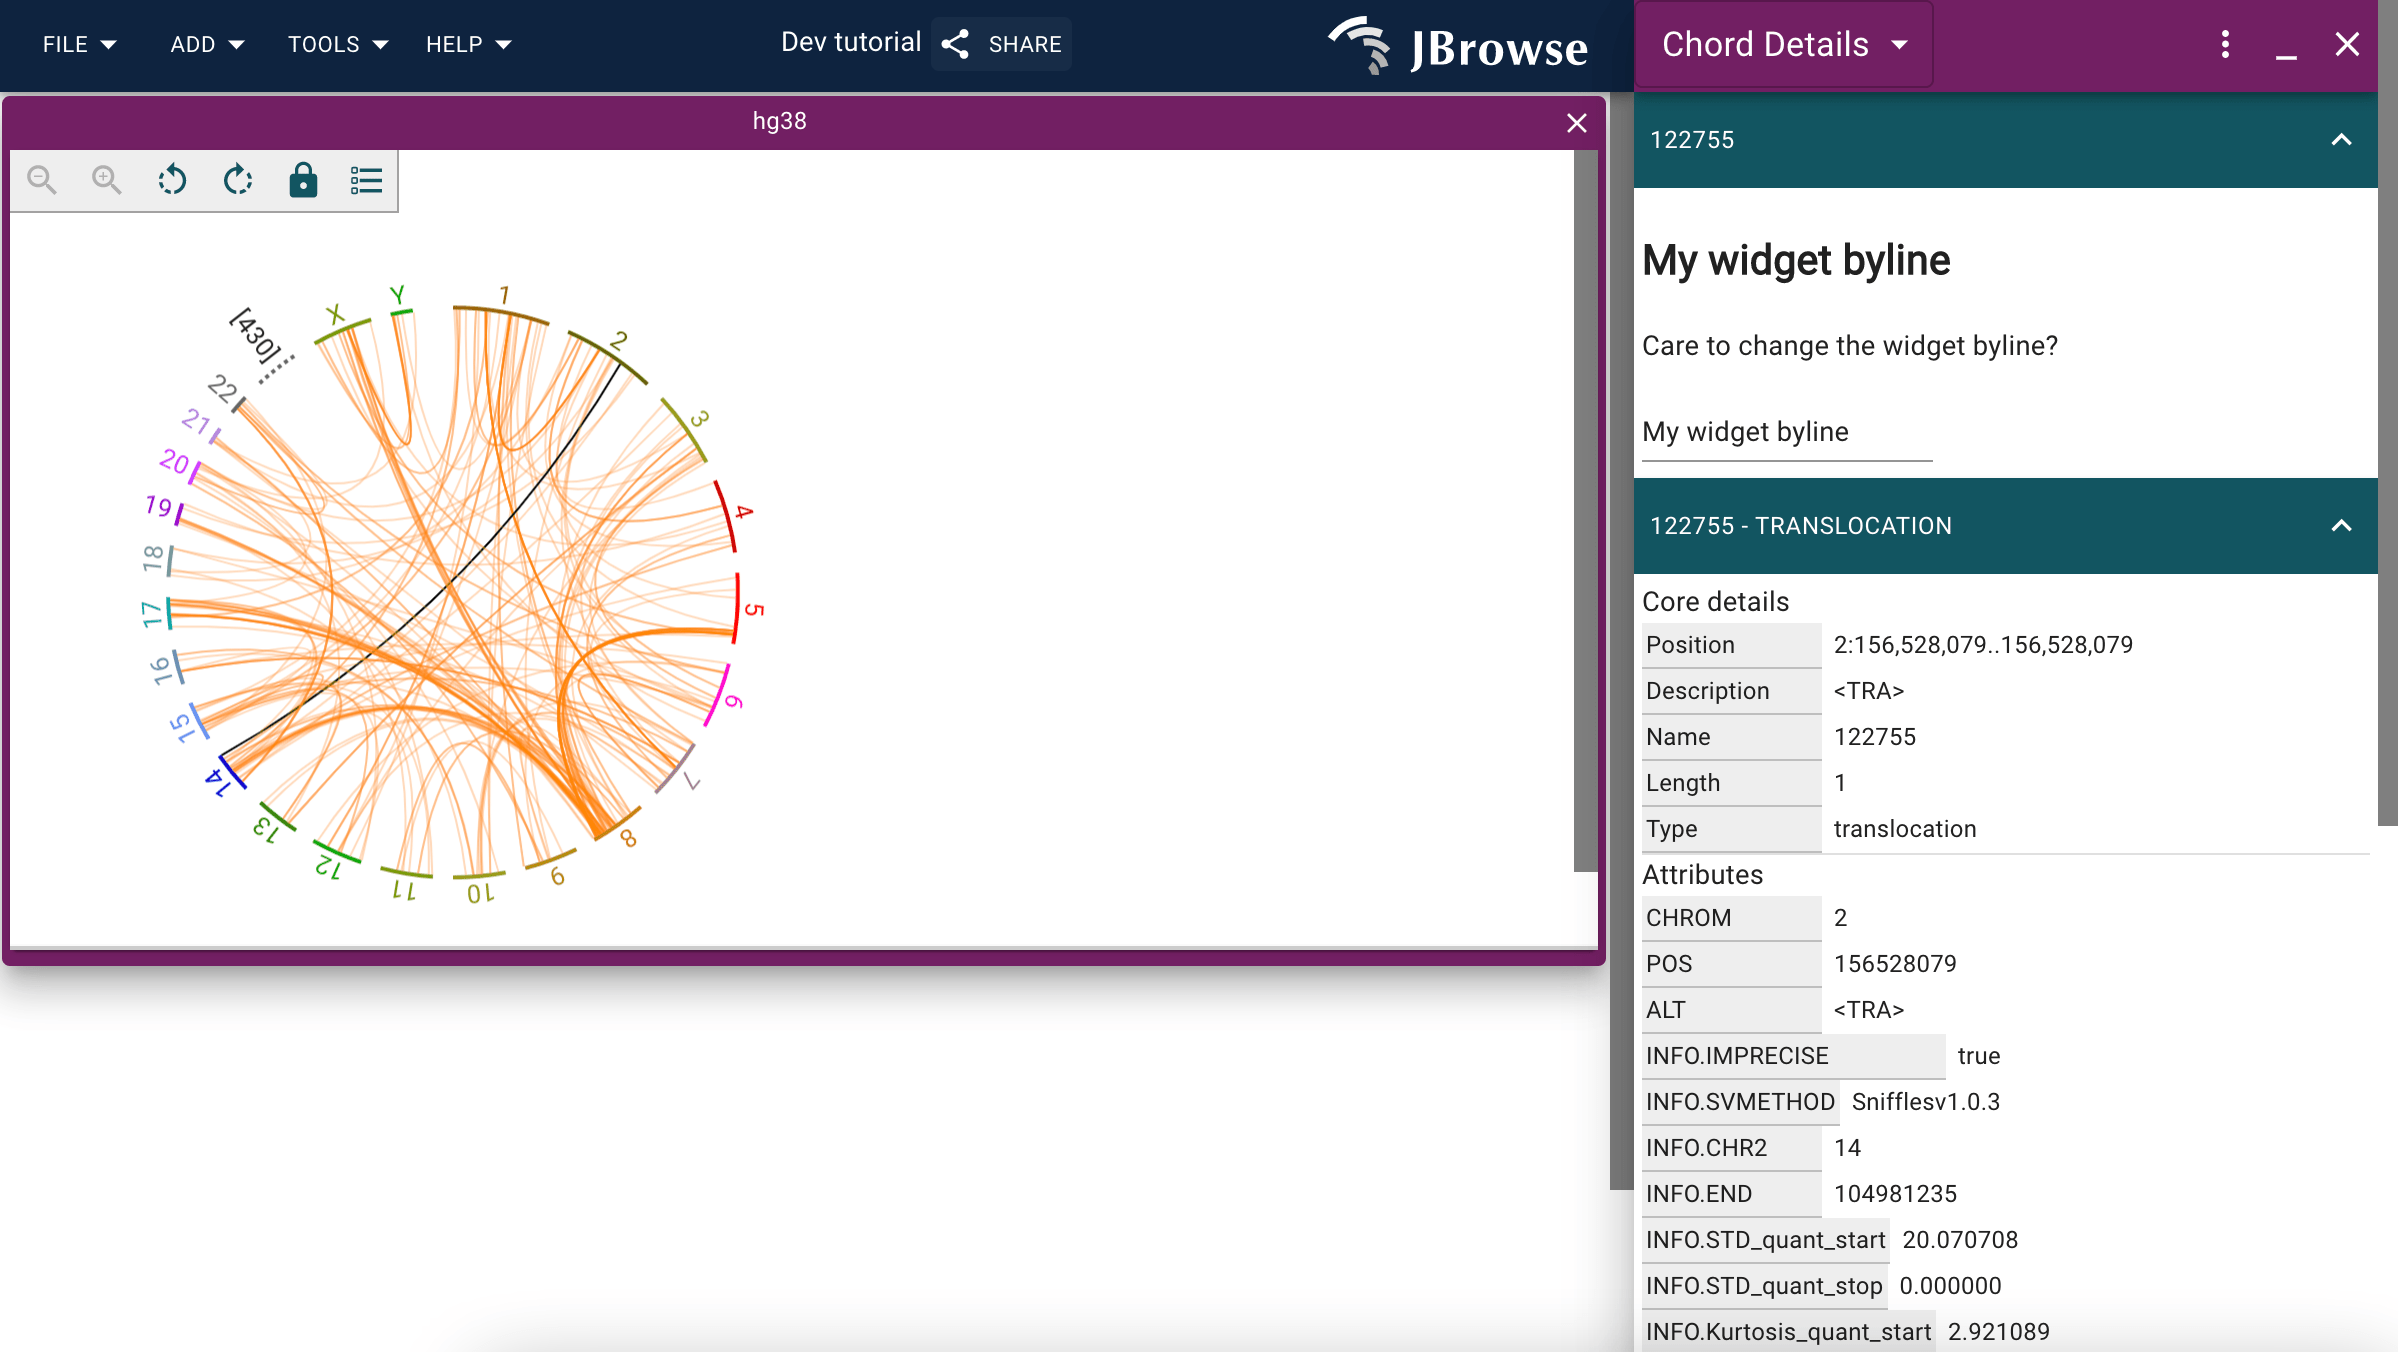
We'll make our widget do something basic: display the chord's information and a message we can edit.
import React from 'react'
import { observer } from 'mobx-react'
// JBrowse uses material-ui where possible for basic components
import { TextField } from '@material-ui/core'
// @jbrowse/core also has some reusable components available
import {
  FeatureDetails,
  BaseCard,
} from '@jbrowse/core/BaseFeatureWidget/BaseFeatureDetail'

const CircularViewChordWidget = observer(({ model }: { model: any }) => {
  // these are two properties we have in our model
  // widgetByline is going to start out as an empty string
  // but featureData will be populated with the information from our chord;
  // we'll talk about how that happens more later
  const { featureData, widgetByline } = model
  return (
    <div>
      {/* features will always have a name, start, end, and id; they can
      have additional information too */}
      <BaseCard title={featureData.name}>
        {/* here we're just demonstrating using a basic property from the
        model and updating it with observer */}
        <h2>{widgetByline}</h2>
        <p>Care to change the widget byline?</p>
        <TextField
          onChange={(e: any) => model.setWidgetByline(e.target.value)}
        />
      </BaseCard>
      {/* the FeatureDetails component is a proprietary JBrowse component
      for displaying feature details clearly */}
      <FeatureDetails feature={featureData} model={model} />
    </div>
  )
})

export default CircularViewChordWidget
As noted in the codeblock, @jbrowse/core has some reusable UI components exported. If you see something proprietary in the application you'd like to reuse, investigate whether it's exported by @jbrowse/core, and if not make a request for that component to be exported for use in your plugin.
Now that we have our component built, we can install it into our plugin and test it out.
Install the plugin to JBrowse at runtime
The file src/index.ts exports your plugin and installs all the necessary
components to JBrowse at runtime such that it runs properly.
Your src/index.ts file is going to look something like the following right
now:
import Plugin from '@jbrowse/core/Plugin'
import PluginManager from '@jbrowse/core/PluginManager'
import { ViewType } from '@jbrowse/core/pluggableElementTypes'
import { SessionWithWidgets, isAbstractMenuManager } from '@jbrowse/core/util'
import { version } from '../package.json'
import {
  ReactComponent as HelloViewReactComponent,
  stateModel as helloViewStateModel,
} from './HelloView'

export default class SomeNewPluginPlugin extends Plugin {
  name = 'SomeNewPluginPlugin'
  version = version

  install(pluginManager: PluginManager) {
    pluginManager.addViewType(() => {
      return new ViewType({
        name: 'HelloView',
        stateModel: helloViewStateModel,
        ReactComponent: HelloViewReactComponent,
      })
    })
  }

  configure(pluginManager: PluginManager) {
    if (isAbstractMenuManager(pluginManager.rootModel)) {
      pluginManager.rootModel.appendToMenu('Add', {
        label: 'Hello View',
        onClick: (session: SessionWithWidgets) => {
          session.addView('HelloView', {})
        },
      })
    }
  }
}
You'll notice we're already adding a new view type and configuring the rootModel in the template's project. We can use these patterns to add our widget.
src/index.ts
// imports
// ...
import { ViewType, WidgetType } from '@jbrowse/core/pluggableElementTypes'
// notice we're importing the components we exported from src/CircularViewChordWidget/index.ts
import {
  configSchema as circularViewChordWidgetConfigSchema,
  stateModelFactory as circularViewChordWidgetStateModelFactory,
  ReactComponent as CircularViewChordWidgetComponent
} from './CircularViewChordWidget'
// ...
  install(pluginManager: PluginManager) {
    // ...
    pluginManager.addWidgetType(() => {
      return new WidgetType({
        name: 'CircularViewChordWidget',
        heading: 'Chord Details',
        configSchema: circularViewChordWidgetConfigSchema,
        stateModel: circularViewChordWidgetStateModelFactory(pluginManager),
        ReactComponent: CircularViewChordWidgetComponent,
      })
    })
  }
// ...
This is also where we'll add our Jexl callback function:
src/index.ts
// ...
import { getSession } from '@jbrowse/core/util'
// ...
  // Jexl callback functions are adding inside configure in the plugin class
  configure(pluginManager: PluginManager) {
    // ...
    /* .jexl.addFunction is the method to add a function
       the first parameter is the name of your jexl function, and how you'll
       call it
       the second parameter is the supplementary properties the function
       needs, here, we need these three properties for
       the circular view's chord click function */
    pluginManager.jexl.addFunction(
      'openWidgetOnChordClick',
      (feature: any, chordTrack: any) => {
        // the session contains a ton of necessary information about the
        // present state of the app, here we use it to call the
        // showWidget function to show our widget upon chord click
        const session = getSession(chordTrack)

        if (session) {
          // @ts-expect-error
          session.showWidget(
            // @ts-expect-error
            session.addWidget(
              'CircularViewChordWidget',
              'circularViewChordWidget',
              { featureData: feature.toJSON() },
            ),
          )
          session.setSelection(feature)
        }
      },
    )
  }
// ...
Now that we've configured the jexl function to our JBrowse session, we can use it essentially anywhere.
While we could programmatically tell certain displays to use this jexl function when they perform an action, for our use case (clicking a chord on the circular view), we can simply write it into our config file.
Setup the configuration for proper testing
To open a view in JBrowse, we need an assembly configured, append the following
to your jbrowse_config.json file (i.e. after the "plugins" field):
{
  "assemblies": [
    {
      "name": "hg38",
      "aliases": ["GRCh38"],
      "sequence": {
        "type": "ReferenceSequenceTrack",
        "trackId": "P6R5xbRqRr",
        "adapter": {
          "type": "BgzipFastaAdapter",
          "fastaLocation": {
            "uri": "https://jbrowse.org/genomes/GRCh38/fasta/hg38.prefix.fa.gz",
            "locationType": "UriLocation"
          },
          "faiLocation": {
            "uri": "https://jbrowse.org/genomes/GRCh38/fasta/hg38.prefix.fa.gz.fai",
            "locationType": "UriLocation"
          },
          "gziLocation": {
            "uri": "https://jbrowse.org/genomes/GRCh38/fasta/hg38.prefix.fa.gz.gzi",
            "locationType": "UriLocation"
          }
        }
      },
      "refNameAliases": {
        "adapter": {
          "type": "RefNameAliasAdapter",
          "location": {
            "uri": "https://jbrowse.org/genomes/GRCh38/hg38_aliases.txt",
            "locationType": "UriLocation"
          }
        }
      }
    }
  ]
}
Take some time to dissect what's being added here:
- we're adding the assembly GRCh38
- it can be referenced either by its name (hg38) or its aliases (GRCh38)
- it has a sequence, which has a BgzipFastaAdapter from which the reference sequence is derived
- these FASTA's are hosted on jbrowse.org, referenced as a UriLocation
- there is also a refNameAliases text file being used to derive the reference names of the assembly
We're now going to add a track that will make use of our jexl function. As mentioned previously, you could add your jexl function programmatically to all tracks of this type, but for now we're just adding it to our assembly for this specific track.
  "tracks": [
    {
      "type": "VariantTrack",
      "trackId": "demo_vcf",
      "name": "demo_vcf",
      "assemblyNames": ["hg38"],
      "category": ["Annotation"],
      "adapter": {
        "type": "VcfAdapter",
        "vcfLocation": {
          "locationType": "UriLocation",
          "uri": "https://s3.amazonaws.com/jbrowse.org/genomes/hg19/skbr3/reads_lr_skbr3.fa_ngmlr-0.2.3_mapped.bam.sniffles1kb_auto_l8_s5_noalt.new.vcf"
        }
      },
      "displays": [
        {
          "type": "ChordVariantDisplay",
          "displayId": "demo_ch_v_disp",
          "onChordClick": "jexl:openWidgetOnChordClick(feature, track, pluginManager)",
          "renderer": { "type": "StructuralVariantChordRenderer" }
        }
      ]
    }
  ]
Take some time to dissect what's being added here:
- this is a track that will appear in our track list when we run JBrowse against this assembly
- it's a VariantTrack called "demo_vcf"
- it derives its data from a given UriLocation, the file is a
.vcffile using the VcfAdapter - it declares its display, the
ChordVariantDisplay, and specifies itsonChordClickcallback function - the specified
onChordClickcallback function is that which we defined in our plugin class, the jexl function
Testing it out
Run JBrowse with your new plugin and manually test
Everything is in place to test this widget we've added to the plugin project out.
If you shut your instance down, restart JBrowse and your plugin (yarn browse
and yarn start).
Navigate to localhost:8999/?config=localhost:3000/jbrowse_config.json or equivalent to see JBrowse running with your config.
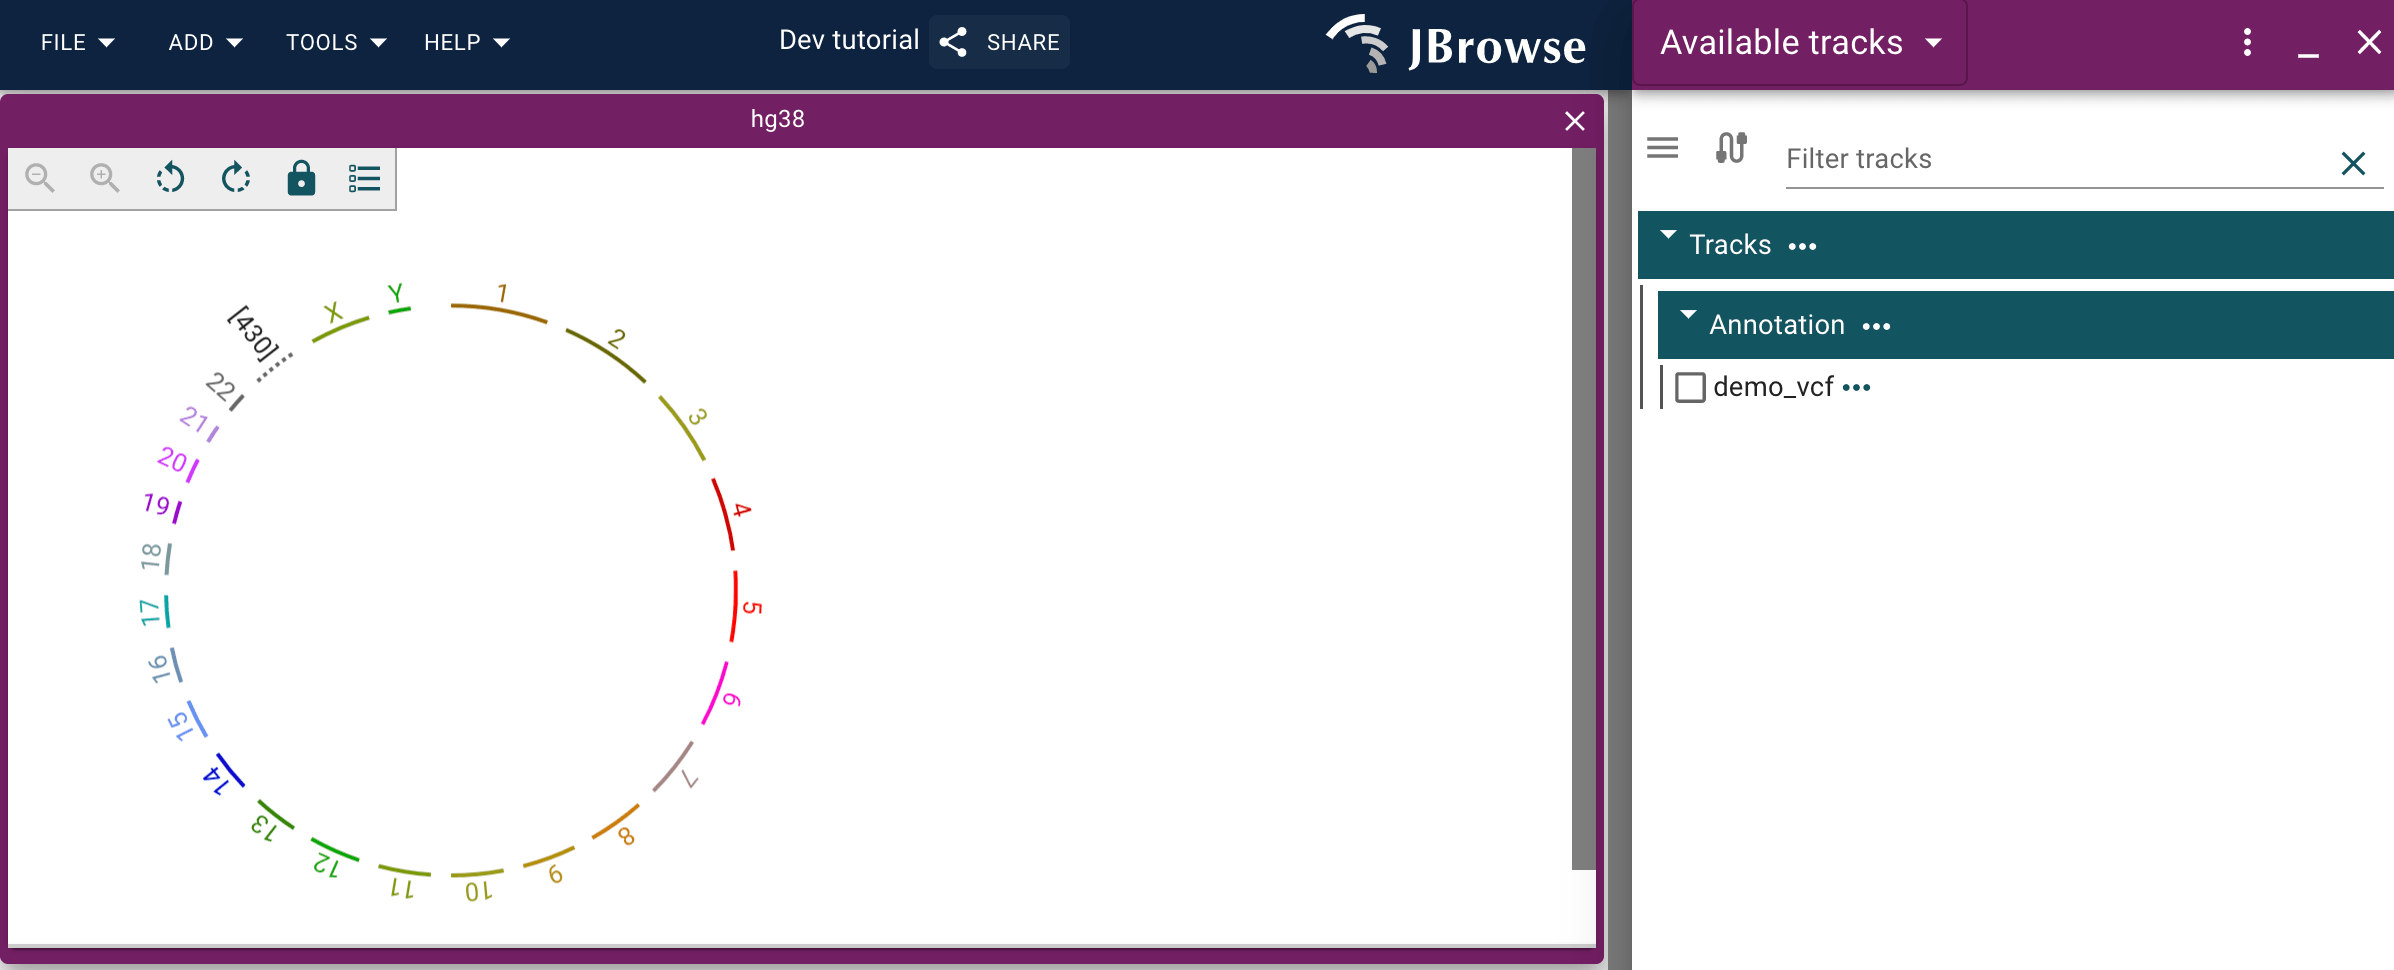
Now navigate:
- Click
Start a new session->Empty - In the top menu bar, click
Add->Circular view - When the view is open, click
Openbeside the assembly - Click the far right three rows of rectangles icon in the top left of the
circular view,
Open track selector - Select the track we populated from our config
- Click any chord in the circular view
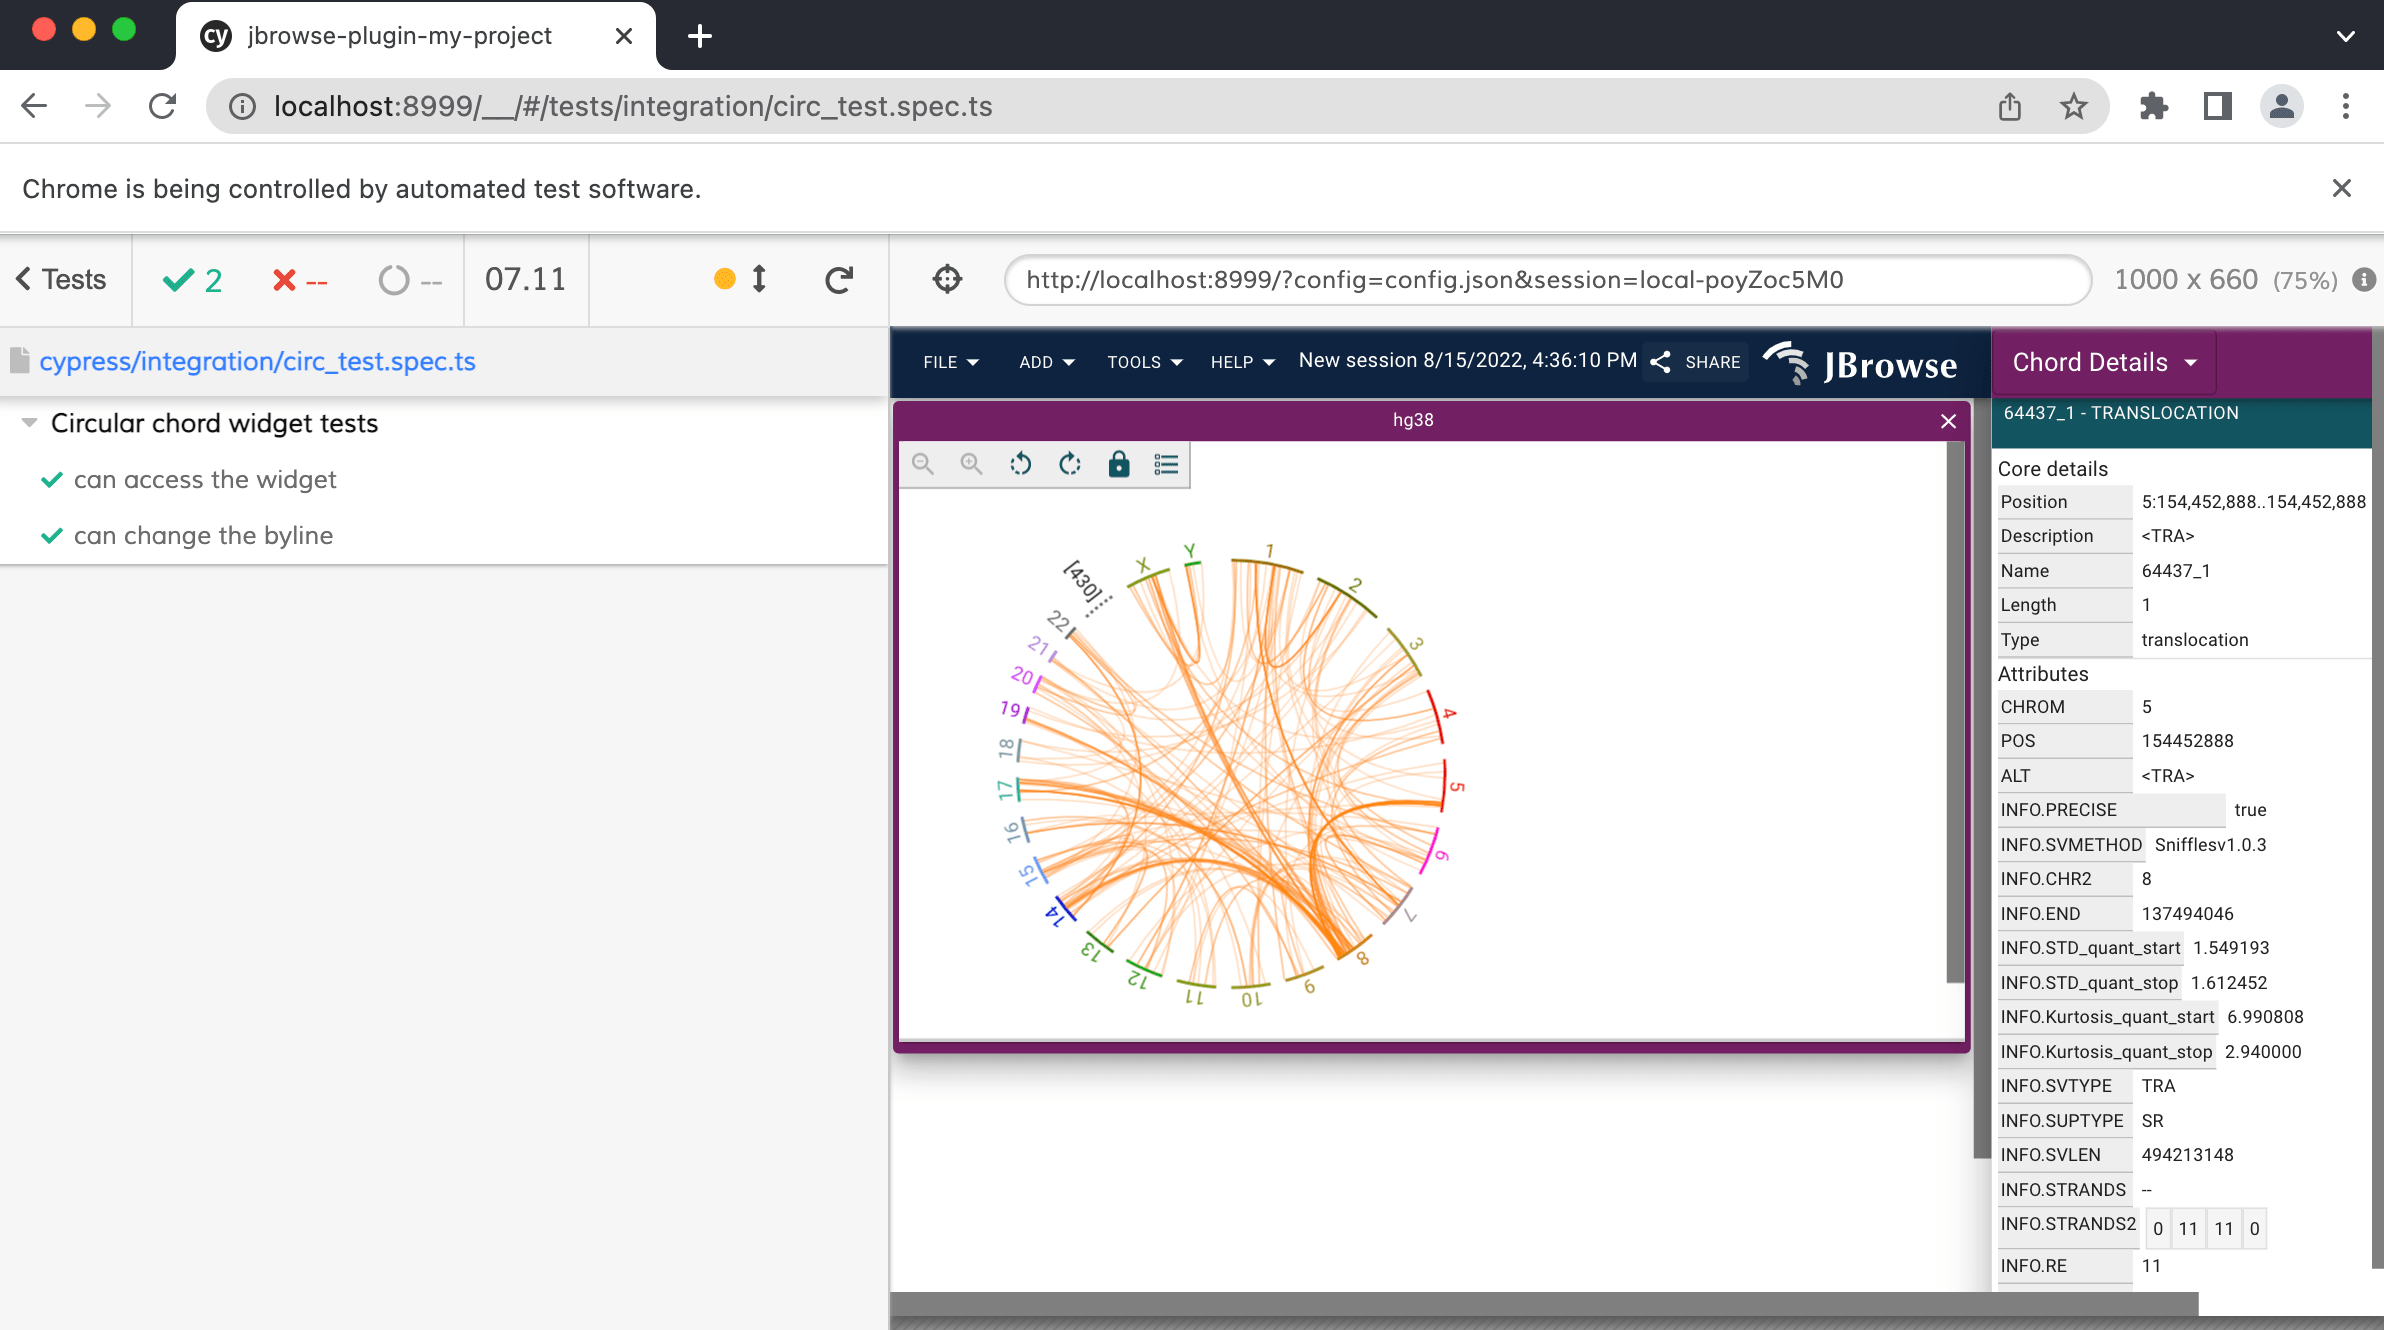
Expected result:
The widget opens on the right hand side with two panels, one with our editable widget byline, and one with our feature data.
Troubleshooting If you get to this point and note that nothing happens, open the developer tools in your browser and investigate the console errors. Also check your running process in your terminal for any errors. Review the code you added to ensure you didn't miss any imports or statements. Check over your config file to ensure that "plugins", "assemblies", and "tracks" are all present for the configuration to work properly.
Writing a simple integration test with cypress
For completeness, we might want to write a few tests for our plugin to ensure that future changes we make do not break the application.
The jbrowse-plugin-template uses cypress to write its integration tests. For
plugins, integration tests are a particularly good way to test functionality, as
a failing test might indicate the plugin needs to be updated for a new version
of JBrowse, or, if interfacing with a third-party API or toolset, that the
plugin might have to be tweaked to suit these changes.
We're going to write a simple integration test suite that executes the action we tested above.
Add a cypress test
See the cypress documentation for a dive into options and best practices for writing cypress tests. The following is a very brief overview to get you started.
Within the directory cypress, you'll see a number of folders; you'll likely
only need to make use of fixtures and integration.
fixtures: This directory is where you might place testing files or a testing config.json file.integration: This directory is where all your integration tests go. You can organize them however you want. Using the template project, there will be two in there already you can use as an example, but we'll write one of our own.
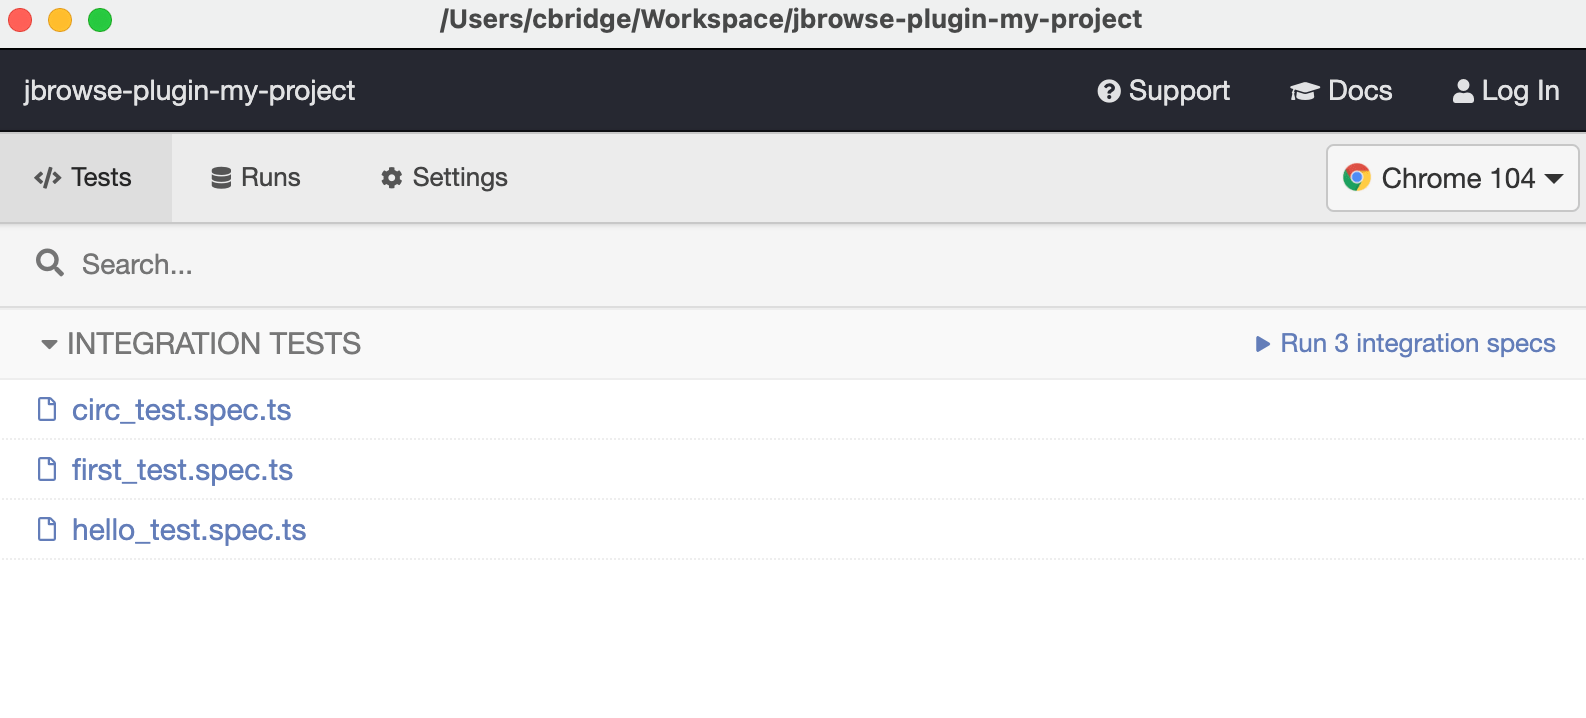
Make your own circ_test.spec.ts file within cypress/integration, and
populate it with the following to start:
describe('Circular chord widget tests', () => {
  it('can access the widget', () => {
    cy.exec('shx cp cypress/fixtures/hello_view.json .jbrowse')
    cy.visit(
      '/?config=hello_view.json&session=spec-{"views": [{"type": "CircularView"}]}',
    )
  })
})
Right now our test does two things:
- copies our fixture
hello_view.jsoninto.jbrowseand, - visits our JBrowse URL (default configured to
localhost:8999) with that configuration and a circular view open
Notice the use of URL params to speed up the test setup; using URL params like this can come in handy for larger suites.
Take a moment to add the track specification to hello_view.json for testing
purposes:
  "tracks": [
    {
      "type": "VariantTrack",
      "trackId": "demo_vcf",
      "name": "demo_vcf",
      "assemblyNames": ["hg38"],
      "category": ["Annotation"],
      "adapter": {
        "type": "VcfAdapter",
        "vcfLocation": {
          "locationType": "UriLocation",
          "uri": "https://s3.amazonaws.com/jbrowse.org/genomes/hg19/skbr3/reads_lr_skbr3.fa_ngmlr-0.2.3_mapped.bam.sniffles1kb_auto_l8_s5_noalt.new.vcf"
        }
      },
      "displays": [
        {
          "type": "ChordVariantDisplay",
          "displayId": "demo_ch_v_disp",
          "onChordClick": "jexl:openWidgetOnChordClick(feature, track, pluginManager)",
          "renderer": { "type": "StructuralVariantChordRenderer" }
        }
      ]
    }
  ],
Running cypress
First, ensure both your plugin (yarn start) and JBrowse (yarn browse) are
running. Open a third tab in your terminal at your project directory, and run
yarn cypress:open. A cypress browser will open, click on the test you just
wrote to run it.
Now that we have a visual on our test running, let's add some more complexity:
// ...
it('can access the widget', () => {
  // ...
  // .contains checks elements for one which displays the provided text
  cy.contains('Open').click()
  // .get can retrieve a given property of an element, data-testid is used for testing with jest and works well
  cy.get('[data-testid="circular_track_select"]').click()
  cy.contains('demo_vcf').click()
  // if any asynchronous calls are made it might be pertinent to .wait
  cy.wait(2000)
  // we use force: true here to make sure we can click the chord, that's an svg overlaid over many other svg's
  cy.get('[data-testid="chord-1591034956-148"]').click({ force: true })
  // we can see this text, so we know we've accomplished our goal
  cy.contains('Care to change the widget byline?')
})
We can add one more small test to check data input:
it('can change the byline', () => {
  // you can use the share functionality to generate a session at any point you might want to revisit for future tests
  cy.visit(
    'http://localhost:8999/?config=config.json&session=share-V0PG_1mjHJ&password=ho4Uq',
  )
  cy.wait(2000)
  // .get can be used to nab elements of a certain type as well, here we're referencing the third 'input'
  cy.get('input').eq(3).type('Some testing string')
  cy.get('input').eq(3).type('{enter}')
  cy.contains('Some testing string')
})
This test will check the functionality of our input field and updating the property on the widget model.
Run your suite again for completeness (you may have to reset your instance of
cypress, then run yarn cypress:open again).
Next steps
We have a complete and tested plugin, so now we're ready to publish it to NPM and request that it be added to the plugin store.
Sometimes you might write a plugin that is specific to you or your organization's needs, but you also might want to share it with the greater community. That's where the plugin store shows off its strengths.
As a plugin developer, you can publish your plugin to NPM, and then request that your plugin be added to the plugin store. After your plugin is successfully whitelisted, you will see it within the JBrowse app's plugin store widget and you and others can freely install the plugin into their JBrowse session. Any further publications you make to the plugin via NPM will automatically be updated for the plugin available through the plugin store.
The following document will describe how to accomplish this.
Publish your plugin to NPM
The following will guide you through publishing with NPM. You'll need an NPM account and token to do this, so please set that up first through the NPM site.
If you'd prefer not to publish to NPM, you can host your plugin files elsewhere, just ensure the link is accessible publicly.
When your plugin is in a publishable state and you have NPM credentials, you can
run the following within your plugin's root directory (where package.json is
found):
yarn publish
Set the version to whatever you'd like, enter your credentials, and then complete the publication process. Once you can see your package on NPM, move on to the next step.
Request your plugin be added to the plugin store
To populate your plugin to the plugin store, it must be added to the plugin list, a whitelist of JBrowse plugins.
Navigate to the plugin list repository and use the github UI to Fork the repository.

It's easy enough to edit the files required using the github UI, but feel free to clone and push to the forked repo using your local environment as well.
Optional: create an image for your plugin
An image helps communicate the capabilities of your plugin to adopters at a
glance. Consider creating an 800 x 200 .png screenshot of a core feature of
your plugin to show off.
We recommend using pngquant to compress your image to keep the repo manageable.
Once your image is all set, you can upload it to your forked repo (ideally in ~/jbrowse-plugin-list/img/) using the Github UI or pushing the file from your computer.
Adding the details for your plugin to the list
Once forked, you can edit the plugins.json file to include the following
information regarding your new plugin:
plugins.json
{
  "plugins": [
    // ...other plugins already published,
    {
      // this plugin name needs to match what is in your package.json
      "name": "SomeNewPlugin",
      "authors": ["You, dear reader!"],
      "description": "JBrowse 2 plugin that demonstrates adding a simple pluggable element",
      // change this to your github repo for your plugin
      "location": "https://github.com/ghost/jbrowse-plugin-some-new-plugin",
      // assuming you published to NPM, this url is going to be mostly the same, other than the correct name of your project
      "url": "https://unpkg.com/jbrowse-plugin-some-new-plugin/dist/jbrowse-plugin-some-new-plugin.umd.production.min.js",
      // make sure the license is accurate, otherwise use "NONE"
      "license": "MIT",
      // the image url will be wherever you placed it in the repo earlier, img is appropriate
      "image": "https://raw.githubusercontent.com/GMOD/jbrowse-plugin-list/main/img/plugin-screenshot-fs8.png"
    }
  ]
}
Push your changes to the main branch of your forked repo when you're done.
Make a pull request
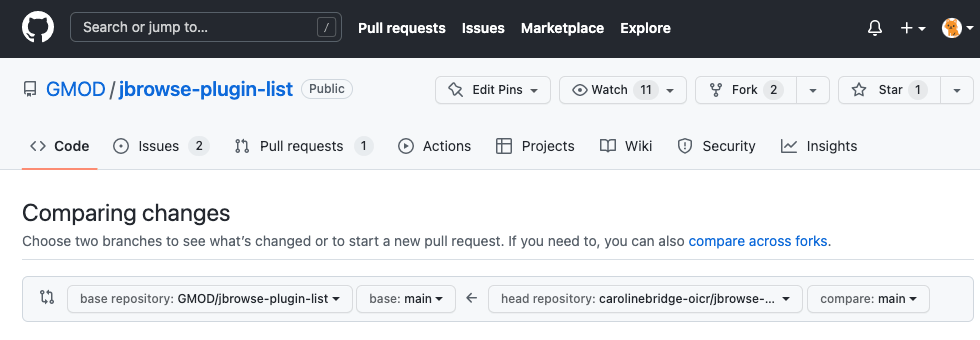
Now that your plugin's information is accurate, navigate again to the plugin list repository, and create a new pull request.
In the pull request UI, click "compare across forks" and select your fork as the
head repository to merge into the main of jbrowse-plugin-list. Your changes
should show in the editor, and you can create your PR.
Next steps
The JBrowse development team will review your plugin to ensure that it is functional, then when it is merged in the plugin will be available on the plugin store.
In this tutorial, we set up a development environment for JBrowse 2 and added a custom pluggable element to a plugin.
We also published the plugin to NPM and requested that it be added to the JBrowse plugin store so others can access our plugin.
To learn more about the various pluggable elements available in JBrowse (and thus more that you can do with plugins!) checkout our developer guide documentation.
If you have further questions about plugin development, or development with JBrowse in general, stop by the JBrowse team gitter channel, or start a discssion on the jbrowse-components discussions forum.