Basic usage
Linear genome view
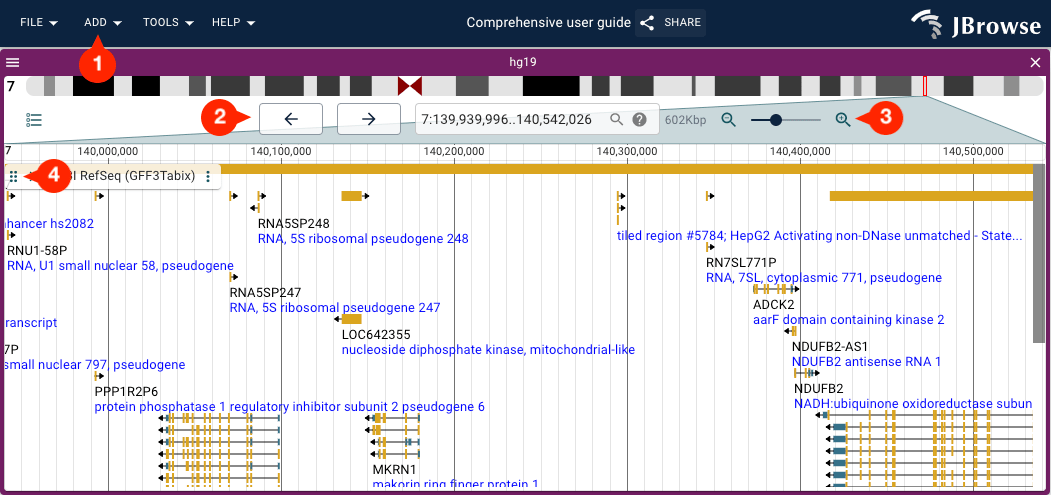
To open a linear genome view (LGV), use the menu bar: Add →
Linear genome view
Scrolling
You can scroll using the mouse wheel or by clicking and dragging. The pan buttons in the LGV header also scroll left and right.
Zooming
The zoom buttons and slider in the LGV header can be used to zoom in and out. You can also:
- hold
Ctrland use the mousewheel to zoom (on Mac, trackpad pinch-to-zoom also works) - hold
Shiftand click-and-drag to create a rubberband selection - hold
Shiftwithout dragging to reveal a red vertical guide bar
Re-ordering tracks
Click and drag up or down on the drag handle on the track labels (indicated by six vertical dots) to reorder tracks.
Re-ordering views
Unlike tracks, views cannot be reordered by drag-and-drop. Instead, use the view menu (hamburger icon) and select "Move up"/"Move down".
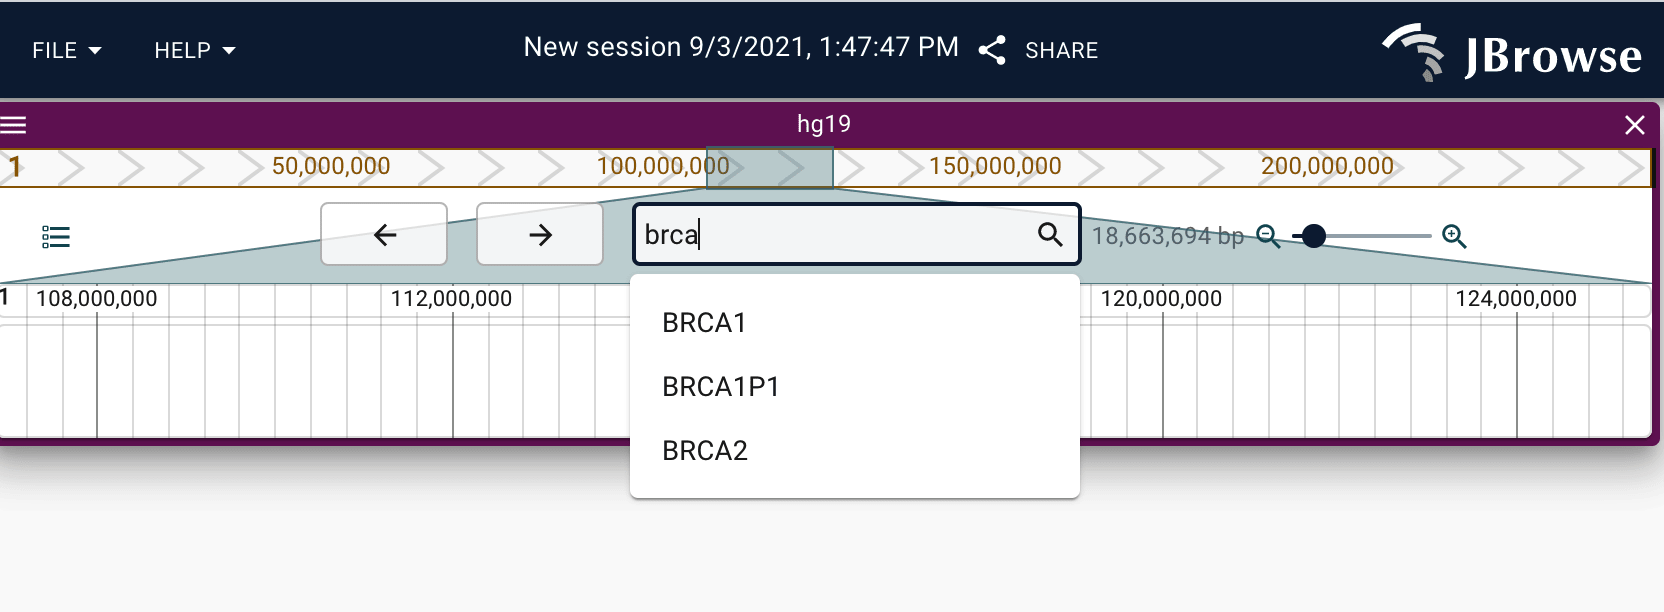
Using the location search box
The location search box at the top of the LGV accepts several search formats:
- Region and location, e.g.
chr1:1..100orchr1:1-100orchr1 1 100 - Assembly, region, and location, e.g.
{hg19}chr1:1-100 - Discontinuous regions (space-delimited, opened side-by-side), e.g.
chr1:1..100 chr2:1..100 - Any of the above with
\[rev\]appended to horizontally flip the region, e.g.chr1:1-100\[rev\] - Gene name or feature keyword (if a text index is configured), e.g.
BRCA1
To enable name searching, you or the instance admin will need to create a text index. See the configuration guide for more information.
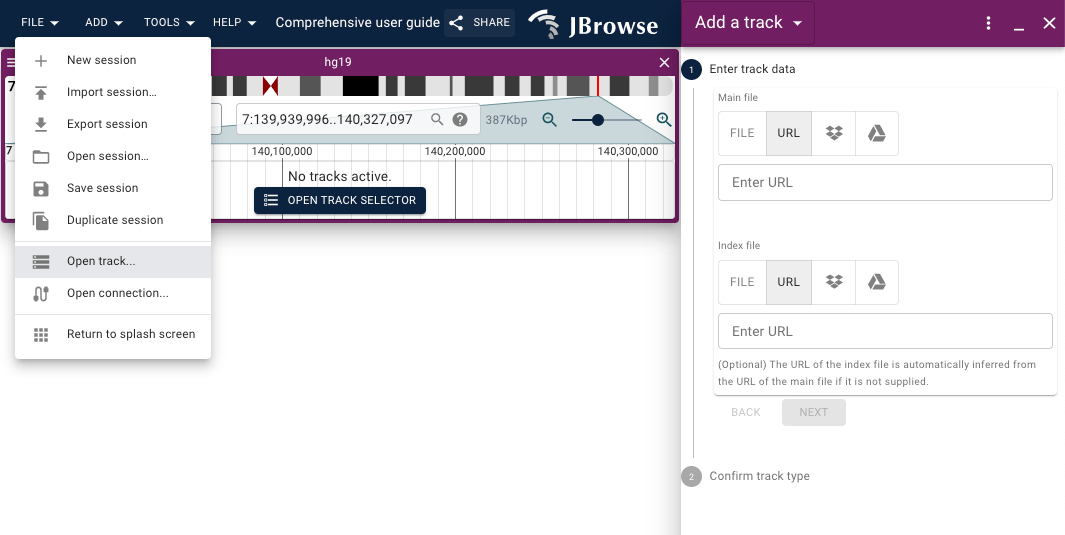
Opening tracks
To open a new track or connection, use the menu bar: File → Open track...
To load an entire track hub (UCSC track hub or JBrowse 1 data directory) at
once, use File → Open connection.... See the
Connections guide for details.
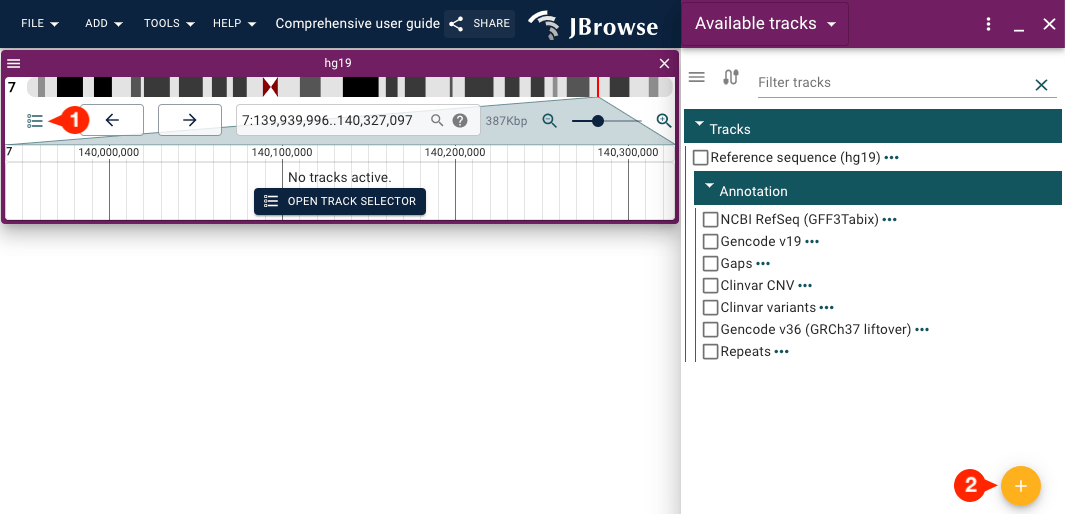
There is a circular plus (+) icon button inside the "Available tracks" widget that can also be used to access the "Add a track" form.
In the "Add a track" form, you can provide a URL or open a file from your local
machine. Some formats require an index (BAM/CRAM and tabix-indexed files like
VCF/GFF/BED do; BigWig does not). For remote files, the index is inferred
automatically when the filename follows standard conventions (e.g. file.bam →
file.bam.bai), but must be supplied manually for local files or non-standard
names.
File format support
The following file formats are supported in core JBrowse 2:
General
- CRAM
- BAM
- htsget (requires hand-edited config)
- VCF (Tabix-indexed)
- GFF3 (Tabix-indexed)
- BED (Tabix-indexed)
- BigBed
- BigWig
- BEDPE
- JBrowse 1 nested containment lists (NCList)
- .hic (Hi-C contact matrix visualization)
SV inspector
- plain text VCF, BED, CSV, TSV, BEDPE, STAR-fusion output (tabular formats)
Synteny and dotplot
- PAF (e.g. minimap2)
- .delta (MUMmer)
- .anchors (MCScan python version)
- .out (MashMap)
Sequence adapters
- Indexed FASTA
- BGZip indexed FASTA
- 2bit
Additional data formats can be supported via plugins; check out the plugin store.
For tabix files, TBI or CSI indexes are allowed. CSI or BAI is allowed for BAM.
Only CRAI is allowed for CRAM. The index will be inferred for BAI or TBI files
as filename+'.bai' for example, but if it is different from this, make sure to
specify the index file explicitly.
If you are an administrator, you can add tracks with the command line (CLI) or with the admin server (GUI).
Undo and redo
You can undo any action via Tools → Undo/Redo, or with the keyboard shortcuts
ctrl+z/cmd+z (undo) and ctrl+y/cmd+shift+z (redo).
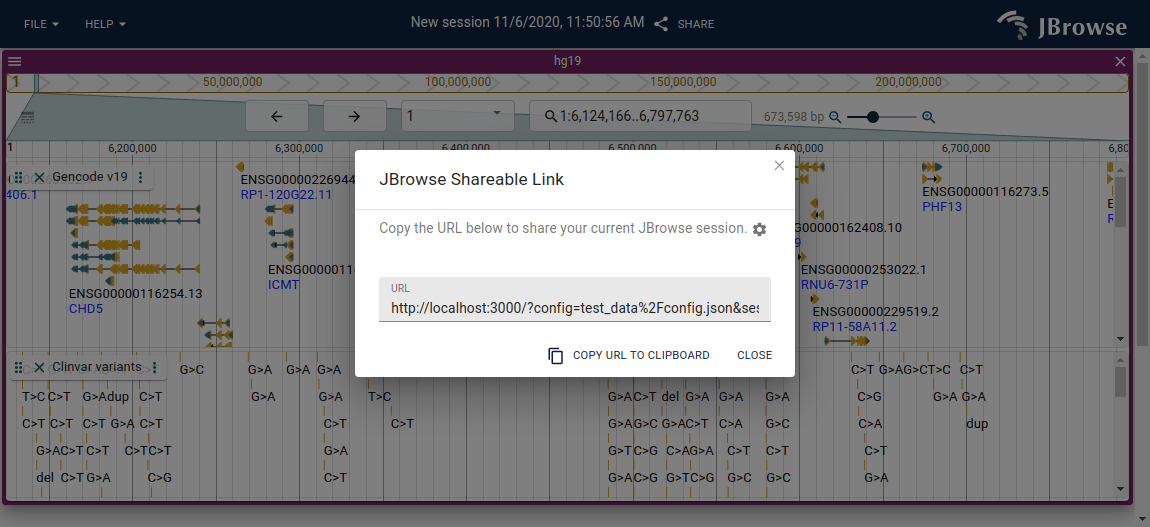
Sharing sessions
On JBrowse Web, the "Share" button in the main menu bar generates a URL you can send to other users.
The browser's address bar URL does not encode the full session state, so copying it will not work for sharing — always use the Share button to get a proper shareable link.
Sharing sessions is not available for JBrowse Desktop.
The session URL will contain the following:
- what views are on the screen, and settings for the views (e.g. track labels overlapping or offset)
- what tracks are in the view
- extra tracks that you added with the "Add track workflow"
- for the alignments track, the show soft clipping and sort settings on the pileup
- ...and more
This means you can share links with custom tracks without being a JBrowse admin.
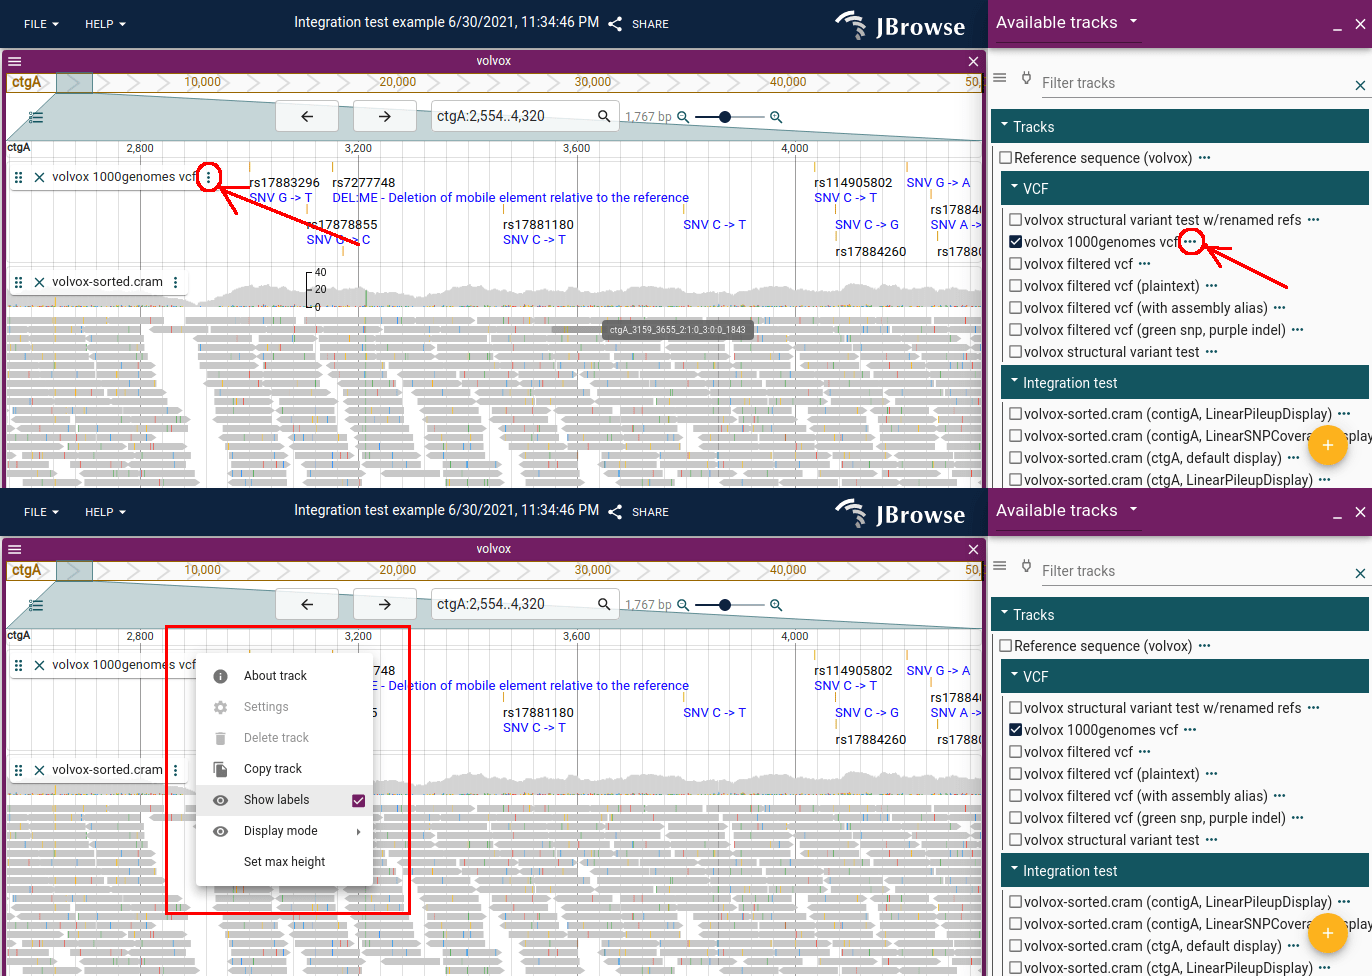
Track menu
The track menu (vertical "..." on the track selector or track label) provides access to track-specific functions. Some options are only available when the track is open (from the track label); basic options like "About track" are always available from the track selector.
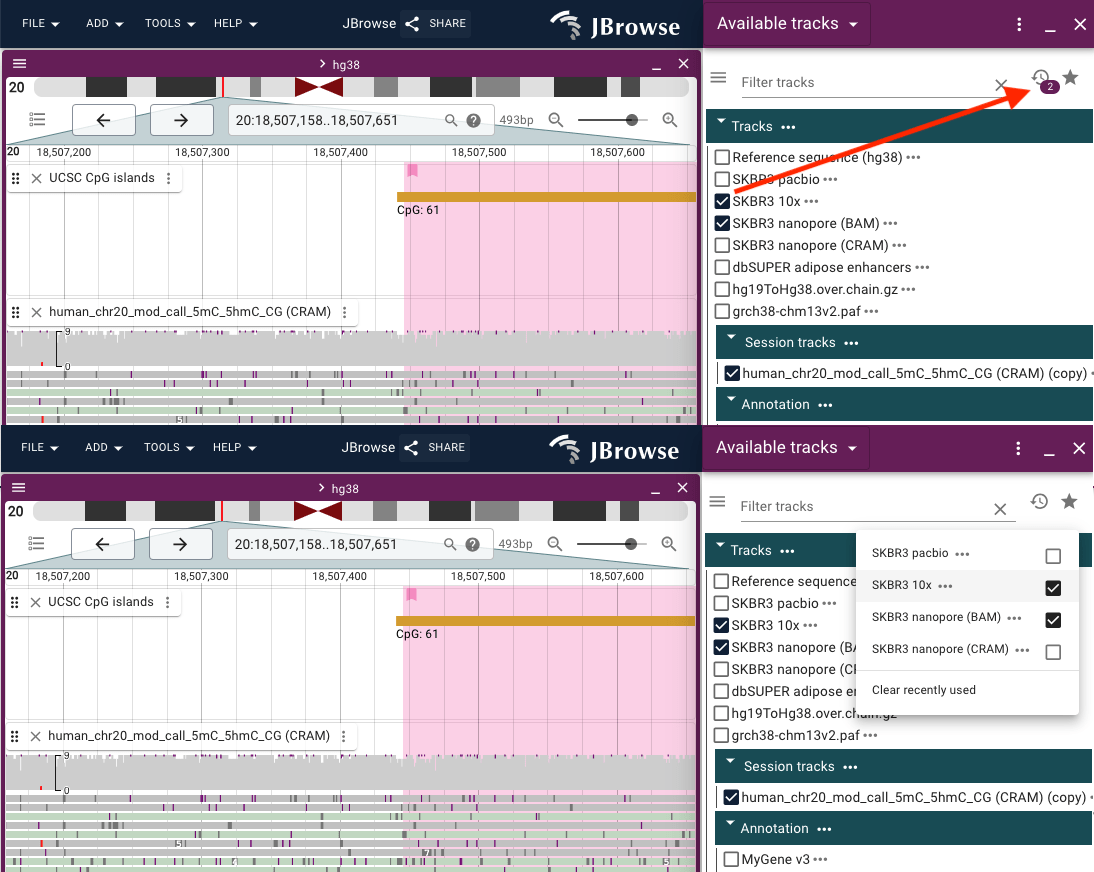
Recently used and Favorite tracks
You can mark favorite tracks from the Track menu and view them using the star icon in the top right corner of the Available tracks widget.
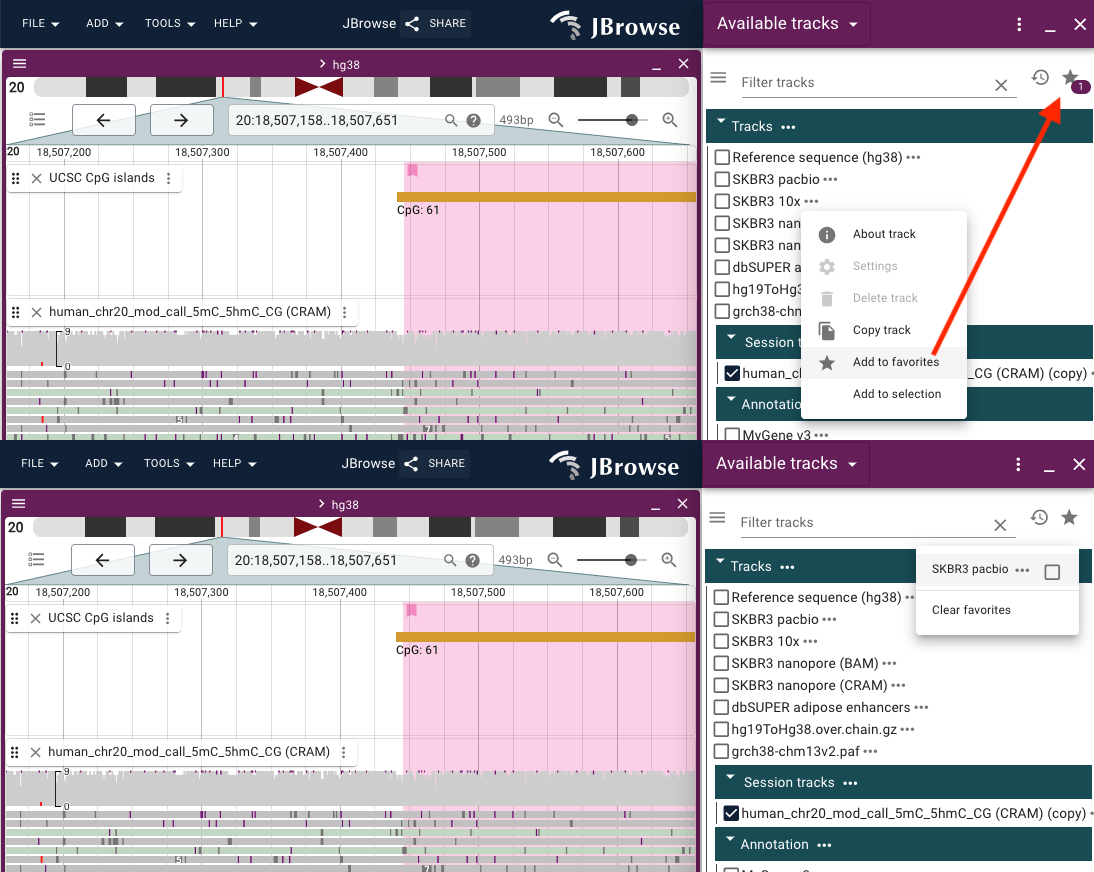
Recently opened tracks are automatically added to the recently used list, viewable via the clock icon in the Available tracks widget.
About track dialog
The track menu provides access to the "About track" dialog.
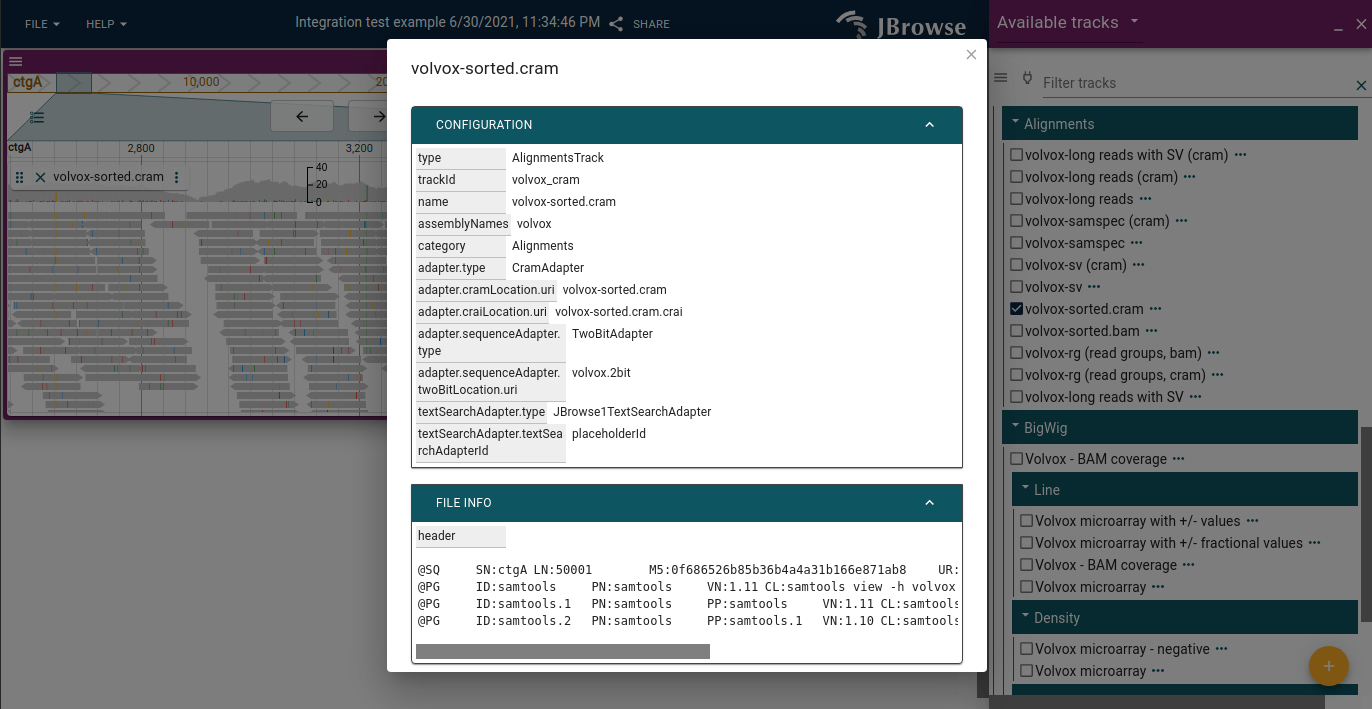
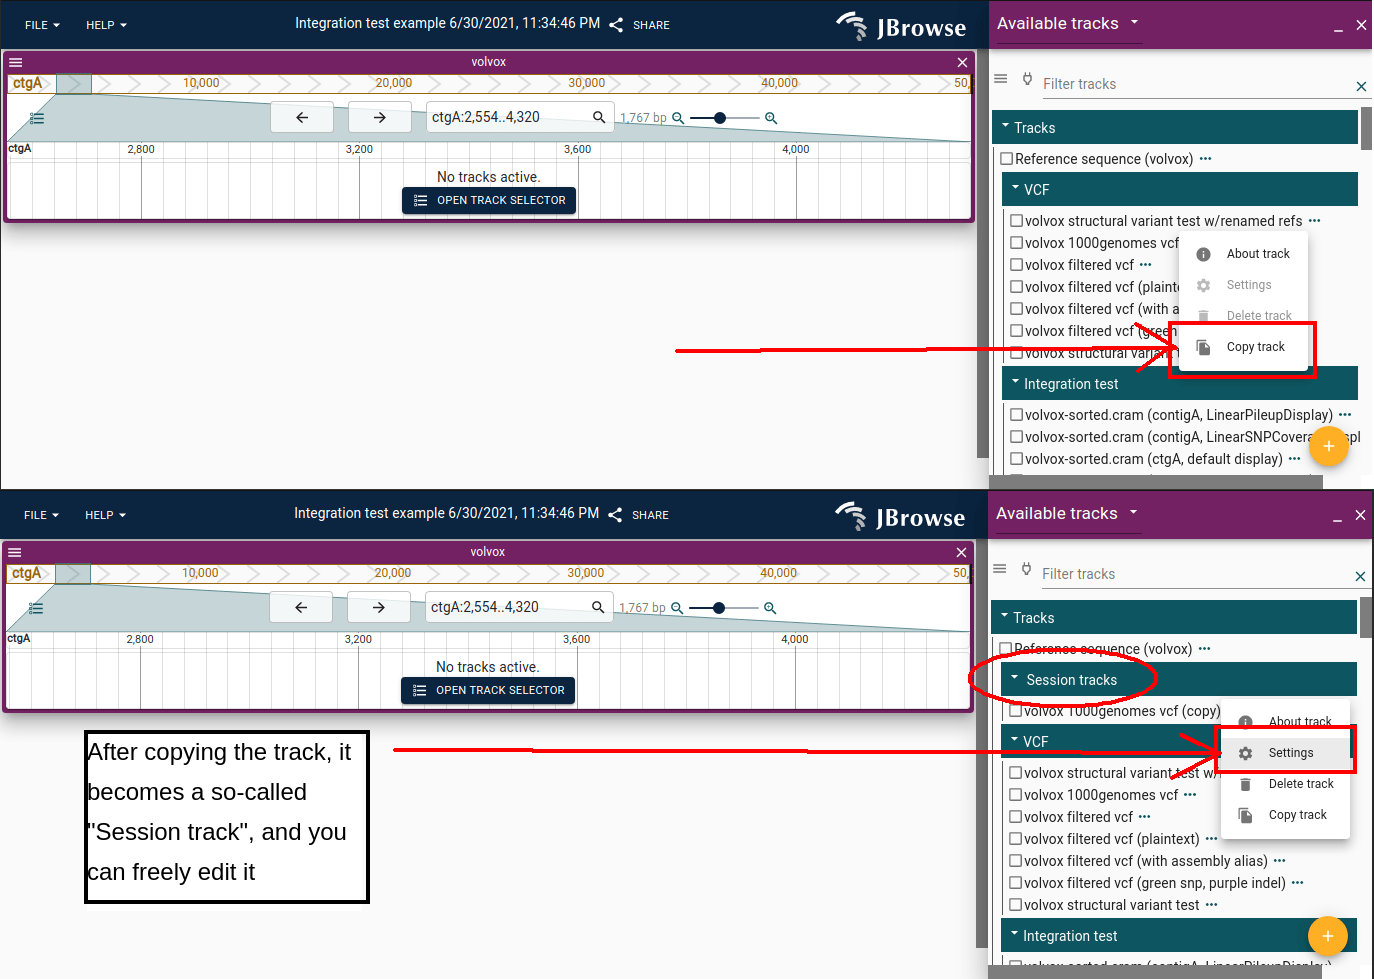
Editing track configs
Non-admin users must copy a track before editing it. The copy is saved to your "session tracks", which you can modify freely.
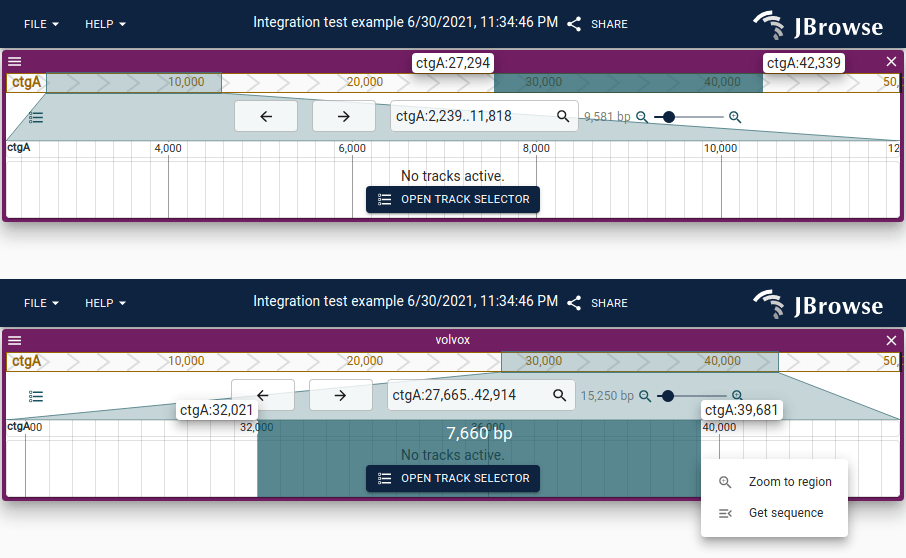
Rubberband selection
Click and drag on either the main (lower) or overview (upper) scale bar to rubberband-select a region.
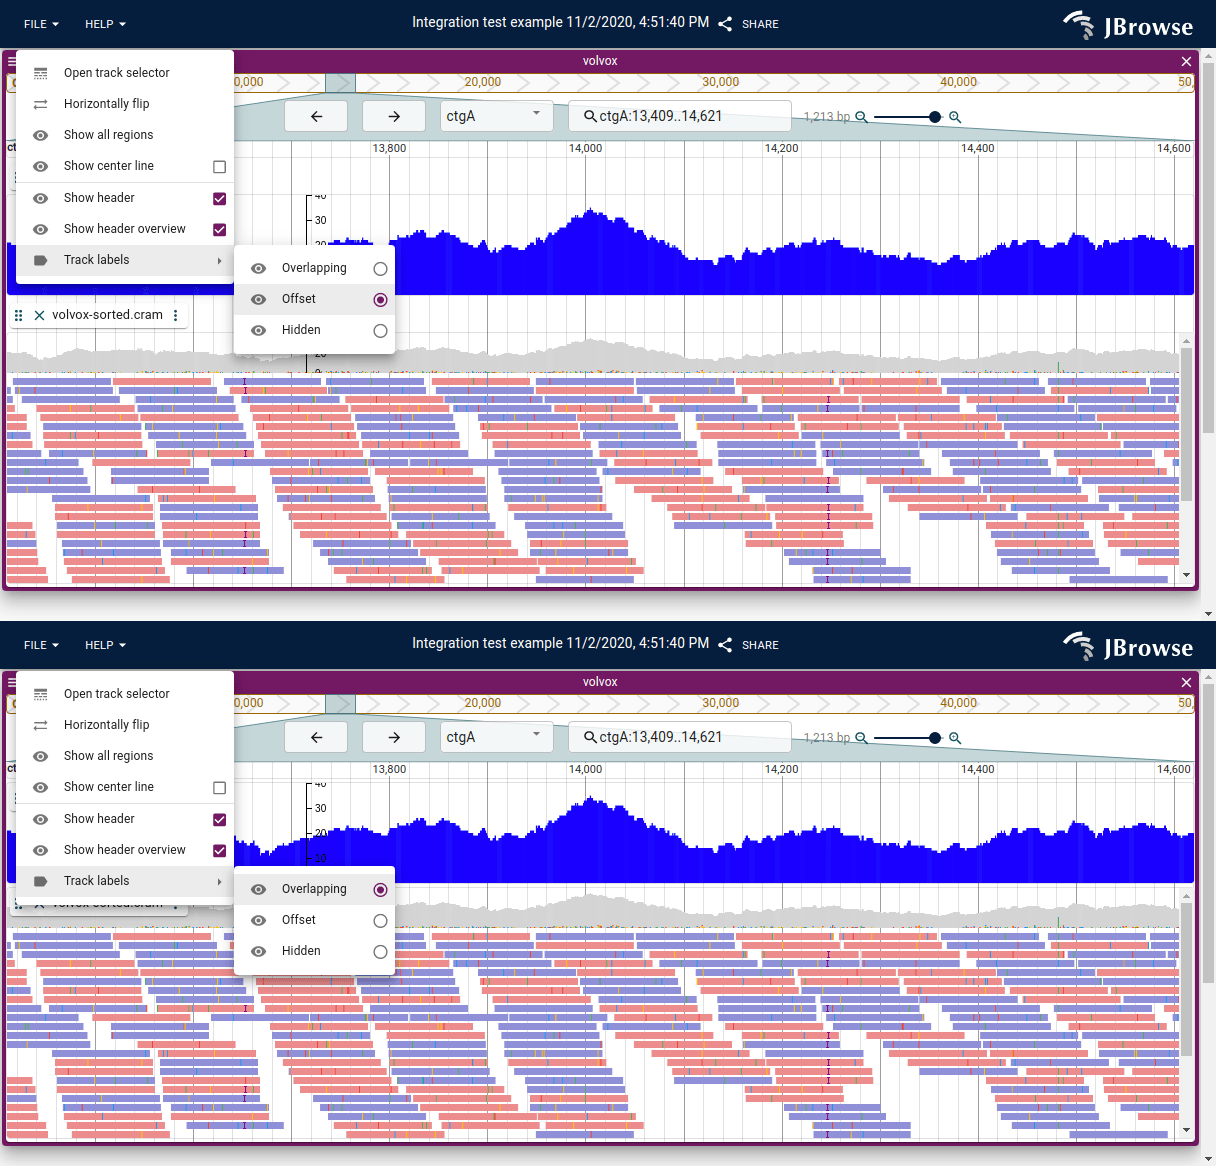
Track label positioning
Track labels can be positioned on their own row or overlapping the data to save vertical screen space. They can also be hidden. This is done by clicking on the hamburger menu for a specific view.
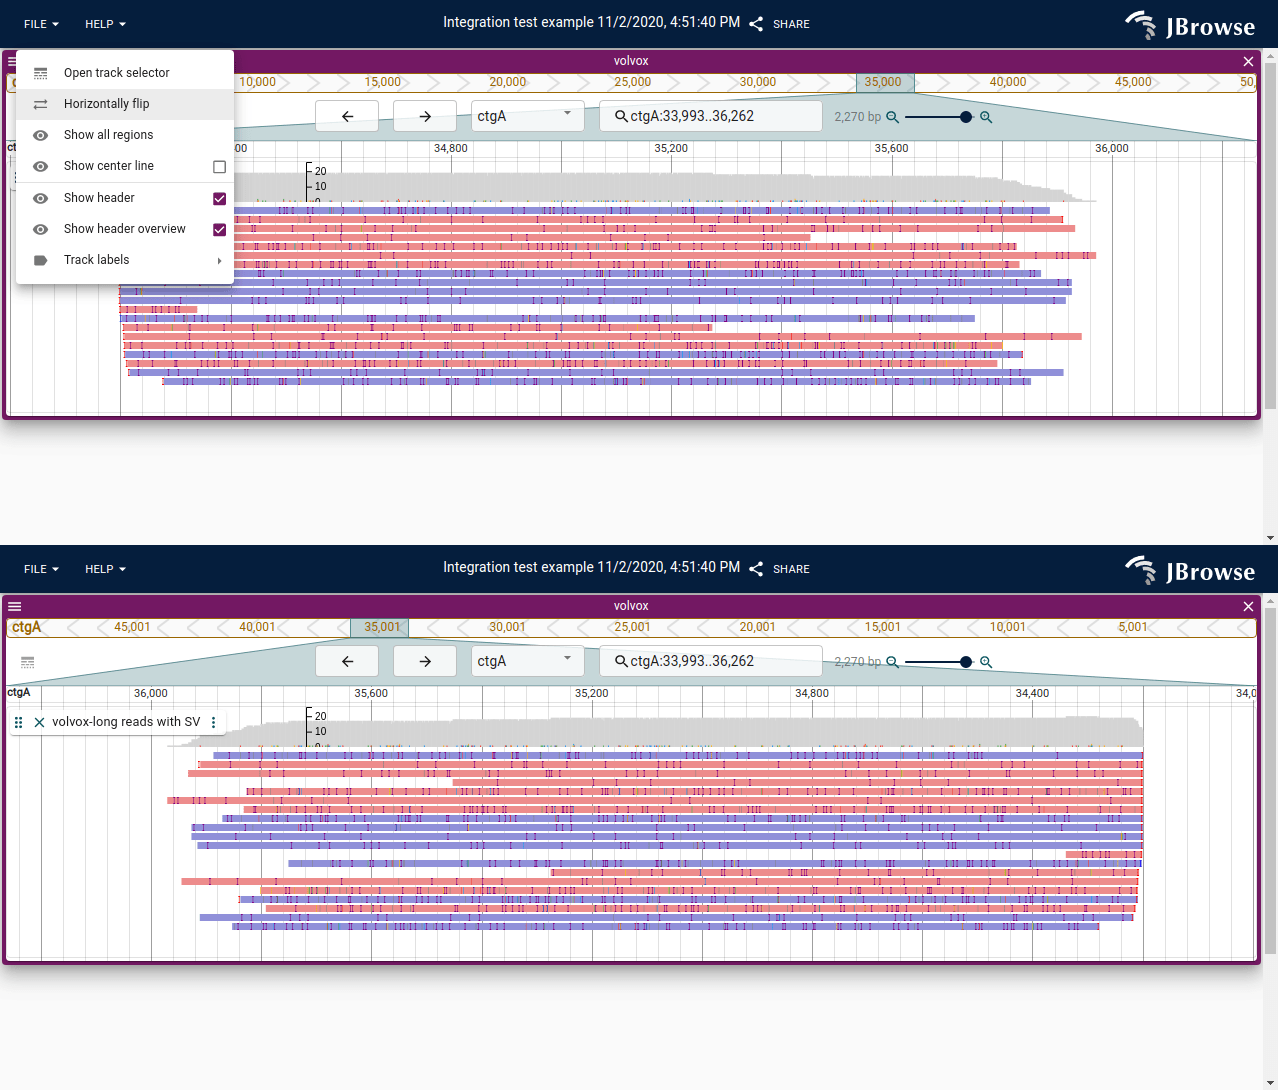
Horizontally flip
The view can be horizontally flipped (reverse complemented), reversing the coordinate direction. Triangles in the overview bar indicate the current orientation.
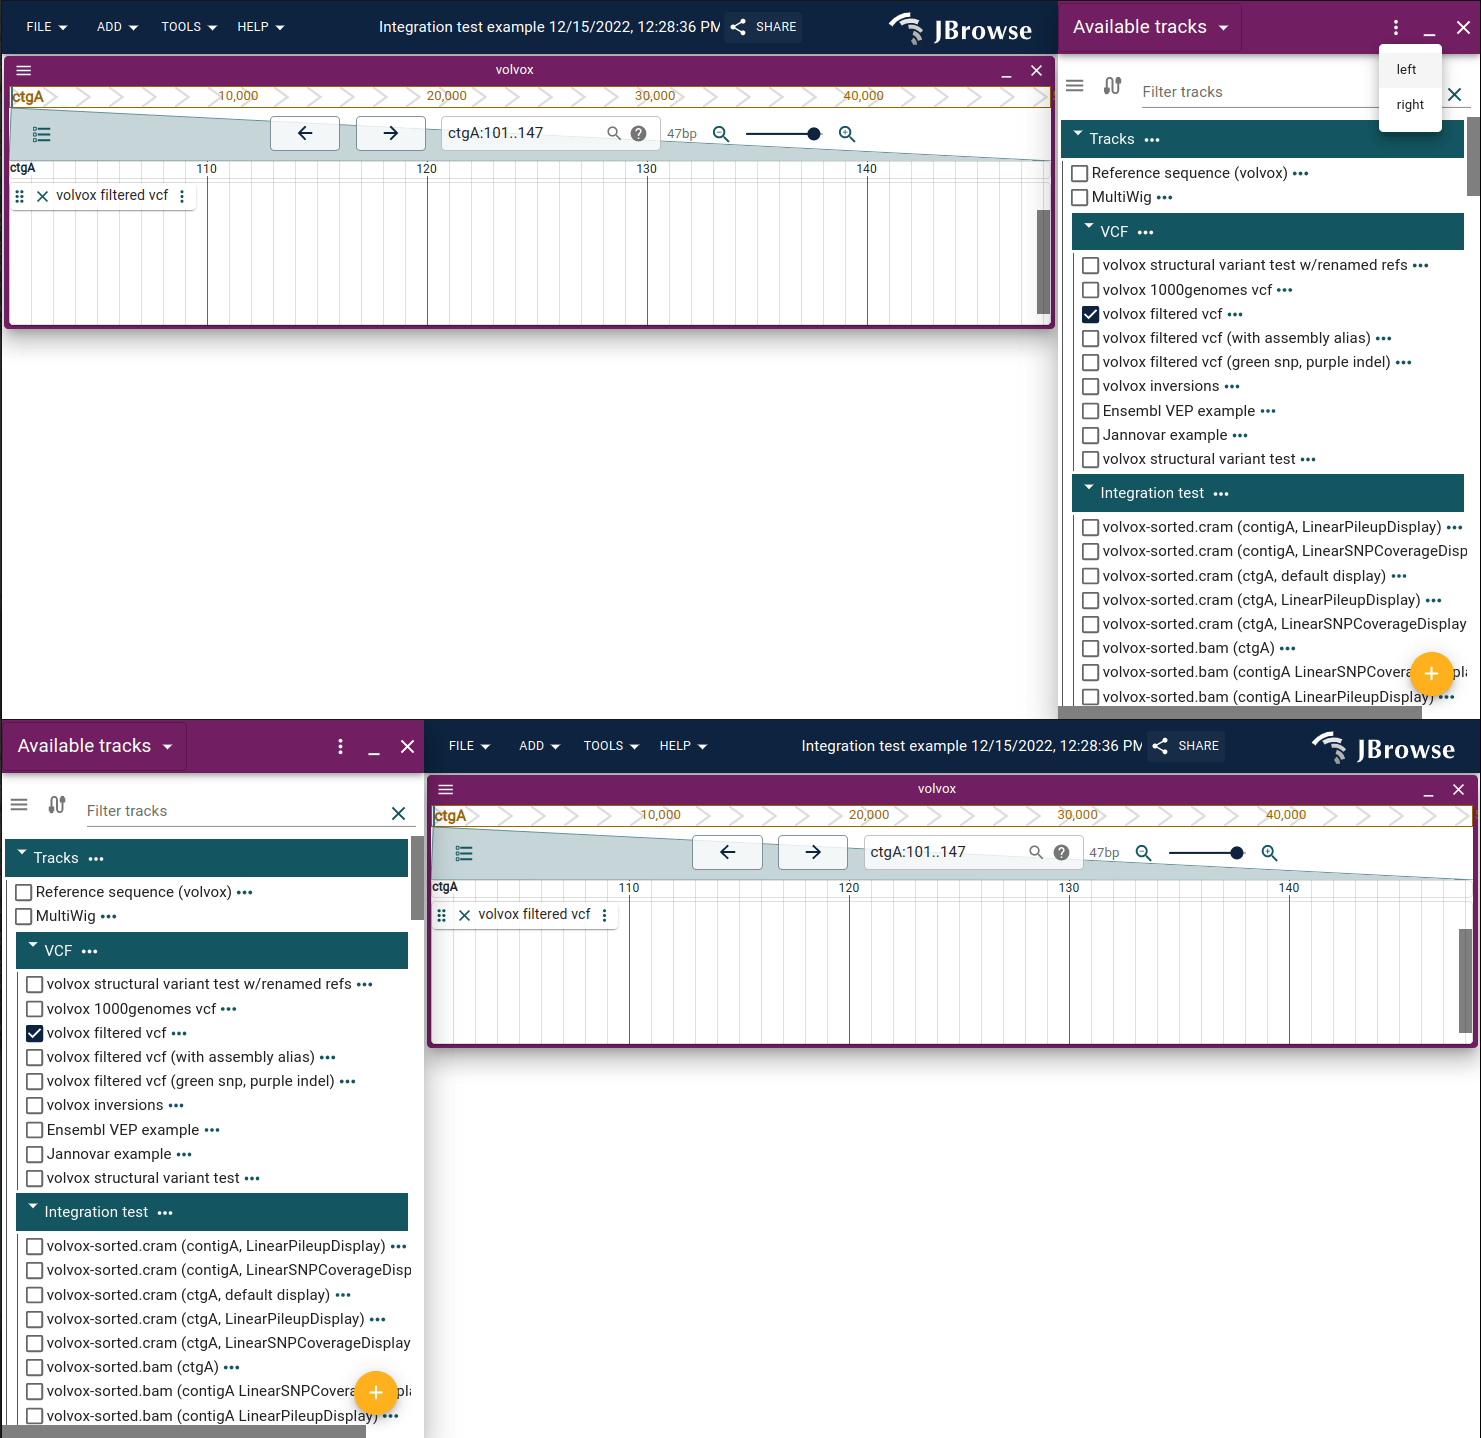
Toggle drawer widget on left or right side of screen
The drawer widget can be toggled to the left or right side of the screen using the header bar dropdown. It appears on the right by default.
Faceted track selector
The faceted track selector shows all tracks as a filterable table. Open it via the filter icon in the top right of the "Available tracks" widget.
Tracks with metadata fields in their config get extra filterable columns:
{
  "trackId": "my_track",
  "name": "My Track",
  "metadata": { "origin": "public", "date_added": "2024-02-20" }
}
See the configuration guide for more.